

I started making paneer at home more frequently when Mustafa Centre stopped stocking Amul paneer cubes intermittently. Although they were practically tasteless compared to homemade paneer, I always have a small bag in the freezer just in case the urgent need to make some paneer butter masala kicks in. When I make fresh paneer at home, I usually end up using it within the next day or two so the store-bought ones were good for storing away for a paneer emergency.
More amazing paneer recipes on Edible Garden:
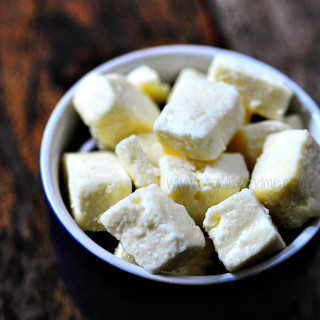
How to Make Paneer
Ingredients
- 1 litre full fat milk
- 1/2 cup curd or buttermilk or 1/3 cup lime or vinegar
Instructions
- Pour 1 litre full fat milk into a pan. It's very important that you use full fat milk for making paneer since we are basically going to extract the milk solids and fats from it and separate the whey
- In this pictorial I have used lemon juice but have found that curd or buttermilk is more predictable so if you are a beginner, use that
- Bring the milk to a rolling boil and add the curdling agent - curd, buttermilk, lemon juice OR vinegar - any one of your choice
- Simmer for another 4-5 mins or until the milk has completely curdled. Keep stirring gently while this happens
- Once the milk has curdled, turn the heat off and transfer to a double layered cheesecloth (or use an Indian cotton towel), that's placed over a colander which is in turn placed over a bowl large enough to collect all the whey
- Once the whey has drained off completely, wrap the ends of the cheesecloth over the paneer. At this stage, if I use lime or lemon juice, I run the paneer under some water to remove the sourness of lemon. This is optional
- You need to place some weights over this cheesecloth-paneer bundle to make a firm block of paneer. I placed a plate over it so that the block gets uniformly pressed down.
- Then I put my stone pestle and mortar over it and topped that up with my granite chapati rolling stone.
- Leave the weights on for about 2-3 hours and you should have a firm block of paneer
- Refrigerate for an hour or so so it's easier to cut into cubes and use immediately or store in the freezer for later use
 I used lemon to curdle the milk in this pictorial and you need about 1/3 to 1/2 cup of lemon juice. You can also use white vinegar instead of lemon. However, I have found the most consistency results when using buttermilk or curd so that’s the way to go, especially if you are new to making paneer at home.
Bring the milk to a rolling boil and add the lemon juice or vinegar. Simmer for another 2-3 mins until the milk has completely curdled. Keep stirring.
Remove from fire and transfer to a double layered cheesecloth (or use an Indian cotton towel – thorthu / thundu), that’s placed over a colander which is in turn placed over a bowl large enough to collect all the whey.

Once the whey has drained off completely..

Wrap the ends of the cheesecloth over the paneer (at this point, you can run this bundle under some running water to wash out any residual sourness from the lemon but this is optional)

You need to place some weights over this to make a firm block of paneer. I place a plate over it so that the block gets uniformly pressed down.

Then on goes my stone mortar..

.. topped off with my granite chapati stone. (You can use bags of beans, cookbooks, or anything that’s heavy and can be balanced over the pressed paneer)

Leave the weights on for about 2-3 hours and voila! You are left with fresh paneer!

Refrigerate for an hour before cutting into blocks.

What about the whey you ask? Well, you can use it to cook rice or any vegetables. Also add it to roti dough for super soft rotis. Another great way to use it up is to use it instead of lemon juice, vinegar, or buttermilk to curdle milk next time you make paneer. Store it in the fridge for up to a week.

The homemade paneer can be frozen for up to a month before use.
Check out how to make paneer in Tamil, Hindi, Telugu, Kannada, Marathi, Urdu etc by using the Google translate button in the sidebar.
Yes, full cream milk ensures more paneer goodness. YAY to making paneer at home!! 🙂
Hello Arnila, my guess is, you spread the milk mixture too thin when you strained it. Since we are only using one litre for this paneer recipe, you should make sure you are bring the cloth together after straining and keeping it a bit packed before pressing down with weights. Do try that next time.
i make paneer da way u told bt my paneer was very thin.not like ur paneer(in picture).y?
thk u….I resort to using Amul….mainly for storage reasons,too, as u mentioned :-D.
I was upset too when I realised I cudn't get it in Mustafa and one of the salepersons even told me they had stopped bringing it in… it has been a really long time since I made my own paneer. Making it myself wasn't as big a chore as I thought it would be :-D…the lemon juice didn't work for me though, had to use vinegar (but I think I shud have used more of the LJ to get the right result). Will try again with ur measurements. BTW, where do u buy cheesecloth in Singapore?
Hey SM, here are the answers 🙂
1. My cuz holds 200ml of liquid.
2. When you bring the milk to boil, first the edges start bubbling, then slowly the bubbling spreads across the surface of the liquid and after a short while (reduce heat at this point else it will bubble over), you will find that the milk comes to a rolling boil, meaning, it will boil in such a way that the surface looks like it is rolling (hard to explain, actually, but you will see this I promise!). Just keep boiling a bit longer once the milk has come to a boil initially.
3. I transfer it immediately. Make sure that the milk is completely curdled (white part separated from whey, u may need to add more lime juice if you feel its not complete yet) and then transfer immediately to the cheesecloth. You can use pretty much any kind of bowl for this, doesn't need to be steel or a bowl for this purpose. Use your rice cooker base, your pressure cooker base, anything 🙂
Hey Nags,
I am going to try making this, this weekend, and make the kadhai paneer recipe you posted with the home make paneer.
Few questions
1. What is the cup size you use, so i ensure I put the correct amount of lime juice.
2. What is rolling boil ?
3. Do you wait for the milk to cool down before you transfer to cheesecloth? since I do not have a huge bowl like you to drain out all the liquid 🙁
i know they are detailed, but i do not want to screw up 🙂
and thank you so much for this detailed recipe with pics. I love ur blog for exactly this reason, the pics make me feel like really trying ur recipes.
Keep blogging! you are really helping some of us newly married (trying to impress hubby) category ppl 😉
Oh, bless you! I've been dying to make my own paneer, and this step by step recipe is just what I needed!!!!
If you use the whey to cook dal, it turns out so sweet! I love making just plain yellow dal out of it
Making paneer at home is so convenient , isn't it..i make it at home as well..loved your step by step explanation.
first time here..you got a lovely space with awesome recipe collection..will b visiting often 🙂
Cheers
aipi
http://usmasala.blogspot.com/
Nothing can beat home made paneer. Didn't know about the smart dogs, probably because I don't have one. LOL