
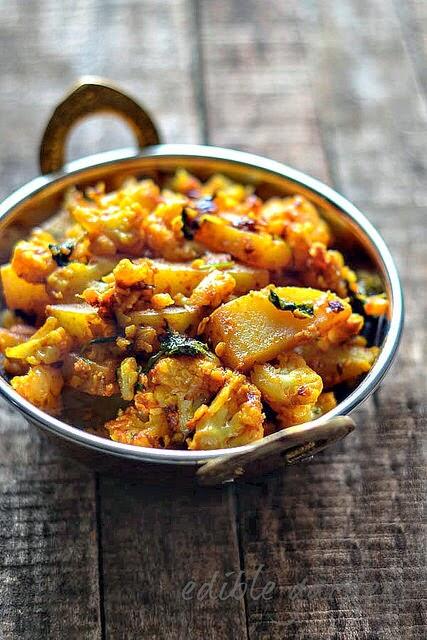
Gobi Ka Kheema Recipe

Ingredients:
(serves 4)
Cauliflower - 1 medium, cleaned and chopped fine
Bay leaves - 1-2
Cumin seeds - ½ tsp
Onions - 2 medium, chopped fine
Ginger garlic paste - 2 tsp
Tomatoes - 3 big, pureed
Peas - ¼ cup, boiled
Red chilli powder - 1 tsp
Garam masala - 2 tsp
Salt - to taste
Oil - 3 teaspoon + 2 tsp
Instructions:
1. Heat 3 teaspoon oil in a pan and fry the chopped cauliflower till its semi-fried and golden brown.
2. Simultaneously, boil the peas till its cooked. Keep both aside.
3. Heat the 2 teaspoon oil in a pan and fry the onions till golden brown. Add the red chilli powder and the garam masala and fry for a minute.
4. Now add the ginger garlic paste and fry for another 30 seconds.
5. Add the pureed tomatoes and the peas. Mix well.
6. Now add the fried cauliflower and mix again till the moisture from the tomatoes leaves the curry.
7. Add salt and remove from fire when the curry is thick enough and the ingredients have blended perfectly.
8. Garnish with freshly chopped cilantro.
We had it with rice but next time I intend to make it as a side to chappathis. It was really yummy!
Seena
I have the same comment of Sra's.. photo looks like a cookbook's cover! 🙂
Rosie
Nags one beautiful photo here it should be on a magazine 🙂
Rosie x
Pravs
I am all for the pic..very beautiful...like in a pro cookbook 🙂
Cynthia
I am really loving your pics, Nags. They look like stuff out of a magazine!
Kalai
Awesome, amazing pic, Nags!! So, now you're showing your kalai, too?! The dish sounds awesome! 🙂
Siri
I agree with DK. theres something thats doing its magic.. I already see that 'kalai' in u and ur pics..:D the pic looks amazing Nags and u are blogging even now???.. I mean u have just a few day s of 'freedom' girl!!.. :D... Hope u are having a blast with ur family back home!.
Siri
DK
I came here..did a double take..checked the link..checked to see if it was really you! Whoa girl...special something is doing its magic I guess...new look,new 'situation', new cookbook style photography ..hehe ( I dunno if u have seen this painter wala ad in Tamil..may be in all southi lang! anyways ). Your photography is awesome! I like everything I see 🙂 keep it up gal...
Passionate baker...& beyond
Now you're going to spread the word further by the beautiful pictures! Lovely picture & great recipe nags. Way to go!!
Suganya
Yay! You made it :). Nags, I love what I am seeing here. Way to go with the layout. Have a nice time with your family.
Sig
That does look like the cover of a cookbook!!! Great picture... 🙂