
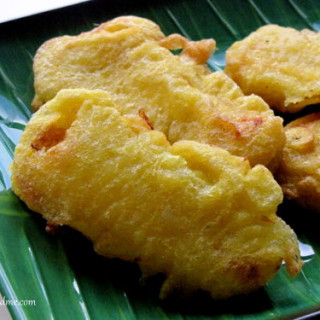
Pazham pori recipe: pazham pori or ethakka appam is a popular and beloved Kerala snack that consists of ripe bananas ( a particular variety called Nendran bananas) sliced lengthwise, dipped in a lightly sweetened batter made of all-purpose flour (maida), sugar, and a pinch of turmeric for colour, then deep-fried until golden brown. The result is a crispy, sweet, and slightly chewy treat that's perfect with a cup of tea.

More about Pazham Pori
Pazham pori, ethakka appam, banana fritters, whatever it is called, holds a special place in the cuisine of Kerala. It's a quintessential Malayali snack and you get to buy it in every restaurant, roadside snack cart, train, hostel canteen, college cafe, and is also made at home when guests appear and you are looking to serve something fresh and delicious. For making the perfect Pazham Pori, you need very ripe bananas (more on the Nendran banana used for pazham pori below) as this could really make or break the taste of your pazham pori.
Yes, it's deep fried, yes, it's coated in all purpose flour, but Pazham Pori is worth it and I want you to take my word on this.
What is Pazham Pori made of?

The bananas used for Ethakka Appam is Ethappazham or Nendran pazham, the raw version of which, Ethakka, is used to make the famous Kerala banana chips! Pazham pori won't taste the same or as good if you use any other kind of banana.
Nendran Pazham vs Plantain
For those wondering if nendran pazham and plantain are the same, yes they are essentially the same and the usage of it in Kerala is typically to cook them rather then eat them raw. This is due to the texture which is tough and also the high starch content. Cooking ripe plantain also makes it easier to digest and brings the sugars out, making it delicious in sweet preparations.
Oil used to make Pazham Pori
Traditionally, pazham pori is fried in coconut oil, which gives it an authentic Kerala-style flavour. If you prefer a more neutral taste or don't like the coconut oil flavour, you can use any oil with a high smoking point like vegetable oil or sunflower oil.
However, for the most authentic flavour, coconut oil is the way to go and what I use.

Related Snack Recipes
If you love easy snack recipes, then do check out ulli vada, parippu vada, and this ghee fried banana recipe that uses the same variety of nendran banana.
Pazham pori recipe
Ingredients
- 1 Ethapazham / Nenthram pazham / Ripe plaintain
- 1 cup all purpose flour maida
- 1 tbsp rice flour for extra crispiness, optional but recommended
- 1 teaspoon sugar
- ¼ teaspoon baking soda
- A pinch salt
- A pinch turmeric powder for colour
- ½ cup water more or less
- 3 cups Coconut oil for deep frying
Instructions
- Place the all purpose flour in a wide bowl.
- Add sugar, salt and baking soda. I use raw sugar which explains the colour.
- Add about ½ cup water and adjust as you go, to make a batter that's thick enough to easily coat the banana slices (more notes below)
- Add in a pinch of turmeric powder. This is only meant for colour and doesn't change the taste or flavour in any way.
- Cut the plaintain into half and then slice each half midway vertically. Further slice each of the quarters into 2-3 thin pieces. Dunk these into the batter.
- Heat the coconut oil until its nearly smoking
- When the oil is coat each banana slice in the batter on both sides and gently slide into the oil
- Fry until golden brown and drain on paper napkins
- Serve Pazham Pori hot with tea.
Notes
- Use ripe Nendran bananas for the best taste and texture. They should be yellow with a few black spots. Overripe bananas will turn mushy and if they are not ripe enough, they will hard when bitten into inside the pazham pori
- Add rice flour to the batter for extra crispiness. This also means more oil will be absorbed but it's worth it for the texture. When you add rice flour, the pazham pori is delicious when eaten hot.
- Upon cooling down, the fritters turn chewy which is still delicious. Refrigerating or reheating is not recommended so enjoy them hot or just store them in a container at room temperature to eat later.
- As with any deep fried snack, take care not to overcrowd the pan. Depending on the size of your pan, add only a few fritters at a time.
- Some people add a few cumin seeds or cardamom powder to the batter. I don't like either variation, preferring to keep the flavour primarily to that of the bananas
- Adding sugar to the batter is not only to give it some sweetness but to also add crispness. Don't omit that step!
Step by Step Images for Pazham Pori Recipe

Place the flour in a wide bowl.

Add sugar, salt and baking soda. I used raw sugar but white sugar works perfect too.

Add about ½ cup water and adjust as you go, to make a batter that's slightly more watery than dosa batter. It shouldn't be too thin, otherwise, the pazham pori will be too oily.

Add in a pinch of turmeric powder. This is only for colour and doesn't change the taste in any way.

Cut the plaintain into half and then slice each half midway vertically. Further slice each of the quarters into 2-3 thin pieces. Dunk these into the batter.

Heat the coconut oil until its all bubbly. You have to use coconut oil for the authentic taste. Anything else is a blasphemy so don't tell me if you used vegetable oil or *shudder* olive oil.
I used a super small kadai so that I need very little oil and that reduces wastage.

When the oil is just short of smoking hot, add in the banana pieces coated with the batter.

Fry until golden brown and drain on paper napkins. Serve hot Pazham Pori with tea.
Anonymous
Love this kerala banana snack and one of my favourites
Nags
thank you!
supriya premaraj
very good blog, thank you for sharing your recipes
Anonymous
This website makes it easy to make Keralean recipes. Thanks for not putting nos. and actually putting the precise measurements. It helps me to understand when it is precise measurements for someone who doesn't cook much.
Nags
Its so sweet of you to cook Kerala food for your husband and family, Amanda. Very glad my Kerala recipes help! Will try to post step by step pics as much as possible!