
As I type this, I can visualise those humid Kerala evenings when the house would fill with the aroma of coconut oil and the sizzle of the sakkirams will reach us kids where we are playing or whiling away time doing pretty much nothing useful.
Everything my grandmom used to do, especially cooking, was a labour of love. She never took shortcuts, never skimped on effort, was patient and painstakingly meticulous in everything she did (although patience was not a virtue of hers in general) and kai murukku / sakkiran was no exception.
Since we always made them in bulk, there would at least be 4 people involved in the preparation process, one person exclusively doing the deep frying - usually the maid. My mom, her elder sister, and their mother would sit on the kitchen floor, saris hoisted to a comfortable height, pallus tucked in and start on one batch of the murukku dough. Each of them gave a unique twist, quite literally, to the murukku and the kids would attempt to guess who made which ones once everything was fried.
Sometimes I try not to think that those summer days are long gone never to return. We are supposed to move ahead, after all.
More Diwali snacks from Edible Garden:
Thenkuzhal murukku
Tamil style mixture
Thattai
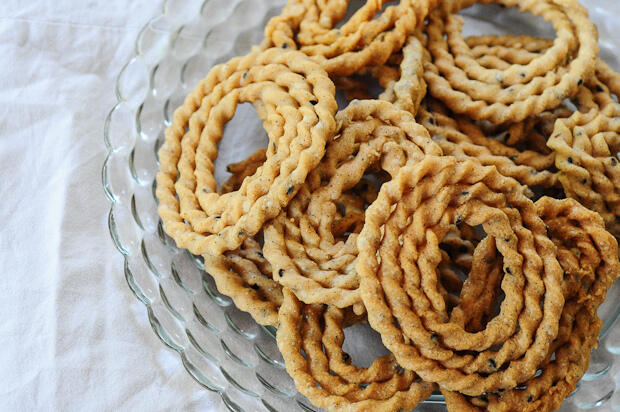
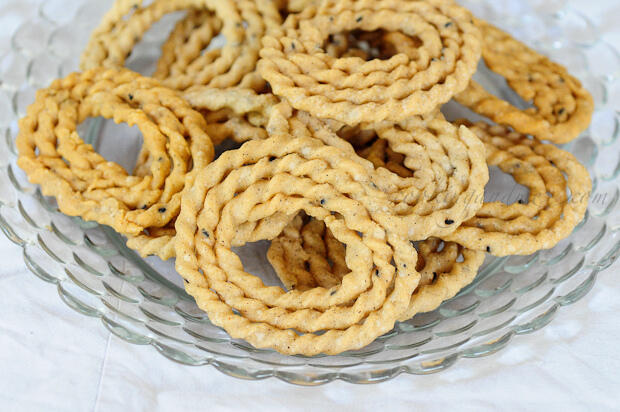
Kai Murukku | Raw Rice Murukku | Sakkiram Recipe
Preparation time: 1 hour
Cooking time: 45 minutes
Makes ~20 pieces
Recipe source: Amma and Aatha
Ingredients:
1 cup of raw rice, soaked in water for 1 hour
⅓ cup of split urad dal / ulutham paruppu
1 tablespoon of black sesame seeds
1 tablespoon of white sesame seeds (see notes)
1 teaspoon of crushed jeera / cumin seeds (optional)
2 teaspoon of softened butter
Salt of to taste
Oil of to deep fry (we use coconut oil)
How to Make Kai Murukku
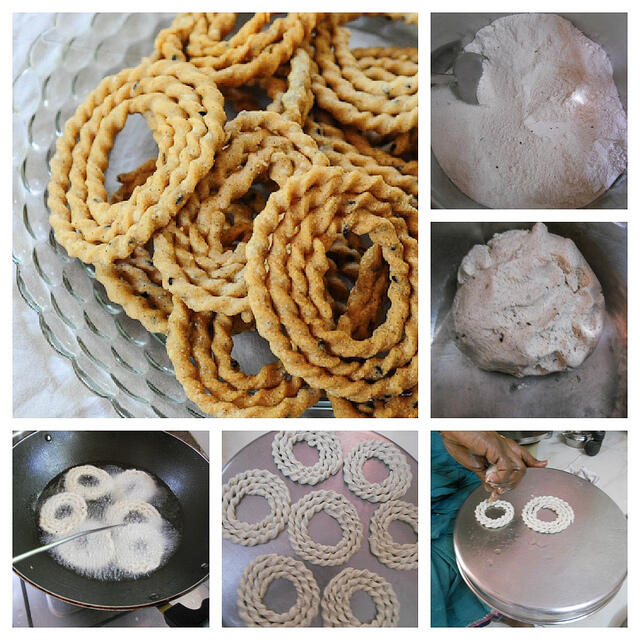
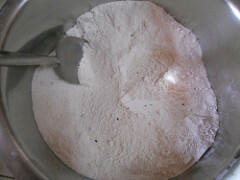
1. Lay the soaked raw rice on a white cheesecloth or muslin until the water has completely drained. You can also use a colander, just make sure to spread it in a thin layer so that maximum water can drain out. Powder this fine and set aside. If you feel it's moist after powdering, lay it on the cloth (or even a large plate) again so that it gets drier.
2. Dry roast the urad dal until it turns aromatic and a light golden brown. Powder this finely.
3. Sieve both the rice powder and the urad dal (separately) into a large bowl. The coarse rice bits that you get can be ground again and passed through the sieve to minimise wastage.
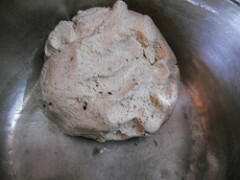
4. Mix both the powders with the sesame seeds, jeera (if using), butter and salt.
5. Once the ingredients are thoroughly combined, add water very little at a time and knead into a soft dough. The consistency is important and it only gets perfect with practise but there are some tips to make it work even if you are a novice (see notes).
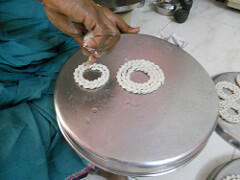
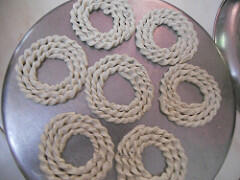
6. Here's the part that needs a bit of practise to get perfect. Take a lemon-sized dough in hand and gently pinch with three fingers into a long-ish shape. Twist gently and form a circular pattern of about 4-5 turns. This video, although in tamil, demos this process very well. My mom and her sister are experts and get the shape beautifully because they've been doing this for years so don't be put off if yours doesn't come out well the first time. Keep your fingers moist and lightly greased to make the process easier.
We use the greased, upturned steel plate for this. A plastic sheet works well too.
Repeat process until you have about 8-10 murukku ready to be fried..
7. Heat oil until almost-smoking point and slide a thin spatula under each murukku swiftly to transfer it to the spatula without losing its shape. Gently slide into the hot oil and fry until brown. It helps greatly if the spatula is lightly greased with oil too.The rule of thumb is, stop and drain the murukku when the oil no longer sizzles around it.
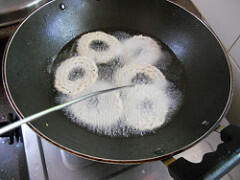
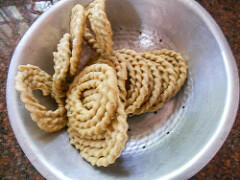
We prefer ours not too red but you can judge by the colour how much you want to fry. Store in an airtight container for up to 3 weeks. I keep it in the refrigerator for longer.
Notes:
- you can use just one kind of sesame seeds if you don't have both varieties. The black ones have a better flavour when fried so go for that if you only want to use one.
- butter makes the murukku softer but adding too much will make the dough too soft and the murukku will drink too much oil. Err on the lower side than adding a higher quantity of butter than needed
- if the dough is too wet and sticky, wrap in a clean kitchen towel/cheesecloth/muslin and let it sit for 10 mins. The cloth will absorb the extra moisture and you can proceed with the rest of the murukku recipe. If it's too dry, wet hands and pinch off a bit of dough to work with. Having a drier dough is a better problem to have because it's easier to fix
- using readymade raw rice powder won't work well for kai murukku because what we get to buy is roasted raw rice (done to improve shelf life) which would've lost much of its starchiness required to make kai murukku. If you can get your hands on unroasted raw rice powder somehow, then that's worth a shot.
- If you are working alone, it's better to knead a little dough at a time, otherwise it will start to ferment, turn sour, and make the murukku too red in colour when frying. It also compromises the taste
- you can use the same dough and make achu murukku - with the murukku press - which is much quicker and easier
- admittedly, I haven't tried making kai murukku myself. All pics are sent to me by amma and mama (her brother). If you have questions, leave it in the comments section and I will get back. Let's learn together 🙂
Chitra
Looks perfect. I too referred the same video & made for gokulashtami..Useful post 🙂
jeyashrisuresh
This kai murruku looks perfect and quite tempting too
Priya
Feel like munching some, am yet to try this kai murukku at home.
Farah Saleem azeez
oh wow! looks so perfect! might take years for me to perfect these! its an art! sigh!
Hope
Excellent post, Nags...kai murukku been my fav forever!
Veena Theagarajan
Nags, I tried couple of times and gave up.. Nice post... It brought me back to my childhood days where the process of making snack is very similar at my grandma house.. I love to have couple of murukku and tea for my snack time today
Great-secret-of-life.blogspot.com
Joyful
These snacks look like they take some serious preparation 🙂 No wonder you have such fond memories of your childhood. I think you should savour the memories and not feel guilty. Good memories sustain us.
StarzzSpace
I so use to love eating it while in bangalore and my telugu friend use to get from home 🙂
Nivedhanams Sowmya
have this on my list for long!!!! nice and helpful recipe.. thanks
Sowmya
Ongoing Event - Coconut
ramya anand
Iam plannin to try this for a long time...need to muster courage !