• Skip to primary navigation
  • Skip to main content
  • Skip to primary sidebar
Edible Garden
  • Popular Categories
    • Dal Recipes
    • Chicken Recipes
    • Egg Recipes
    • Indo-Chinese Recipes
    • Mushroom Recipes
  • Kerala Recipes
  • About
  • Privacy Policy
You are here: Home / Food Photography Tips / How to build a Light box for Food Photography

How to build a Light box for Food Photography

September 25, 2020 47 Comments

XFacebook1PinterestTelegramWhatsAppYummly
1
SHARE
After many months of thinking about it, I finally did it – A light box for food photography! It really is as easy as they say in many sites and blogs around but before you jump ahead, I would ask you to consider a few things, based on my experience.
– Do you really need one? Although a light box gives you the flexibility to click pictures of your food whenever you’d like, nothing can beat natural light when it comes to food photography. Let me repeat that – nothing. A lot of professional food photographers may go for fancy studio equipment but the beauty of food blogging from our homes and kitchens is, this is what we make for our family meals, we are sharing our recipes and what we cook on a day-to-day basis. I wouldn’t compare that to commercial food photography any day.
Another thing to consider is, do you usually plan before you cook for the blog or do you cook something and then decide you want to blog about it. If you find yourself doing more of the latter, then a light box may be a good idea because half the time I think that way, its night time on a week day when I am at work all day.
– Do you have the space for it? You can always dismantle your light box and set it up only when you need it but trust me, that won’t happen often. So you will end up building it but hardly ever using it if you don’t have a fixed spot for it in your house. We recently moved into a three bedroom apartment and I am using the third bedroom as my studio. The wardrobe is where I keep my photography accessories and the light box sits to one side of the room. I don’t intend to move it from there or dismantle it.
So here it is, my very own light box!

lightbox pic
Pin

I pretty much followed the instructions on RV’s site. The few differences I made are:
– I used a smaller box
– I used tracing paper instead of fabric to cover the slots through which light enters the box
– I used 18W daylight bulbs that give a 100W output
A few initial shots with varying light input – both Straight Out Of Camera (SOOC) and edited.

lightbox picPin

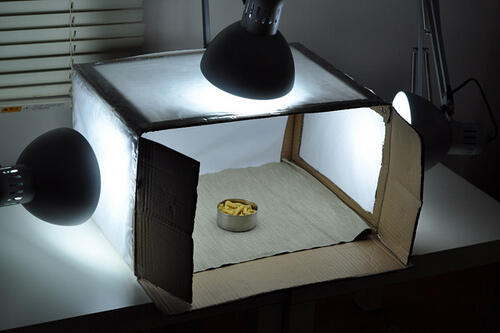
This is the first picture I took, without bothering with a background sweep or anything. I was super eager to see the results. Remember, this was taken in the night, at around 8:00pm. Taken with one light – SOOC.

lightbox picPin

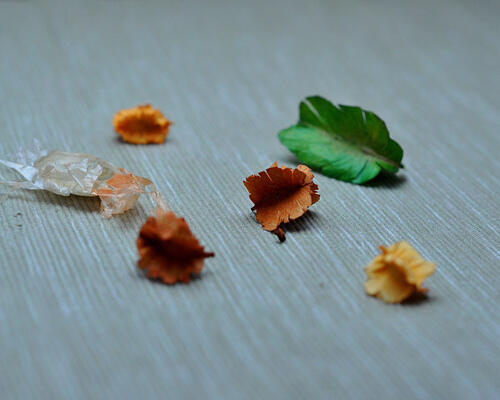
Another macro shot, taken with one light – SOOC.

green mor kozhambuPin

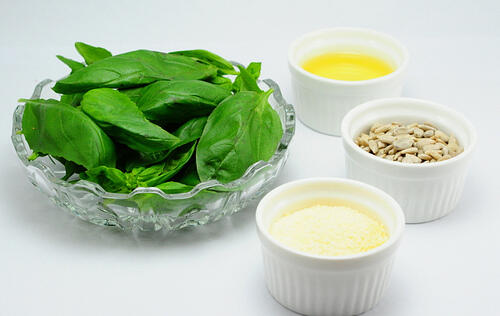
The first food shot, taken with one overhead lamp – SOOC except for watermark and straightening. I didn’t have the other two lights set up when I took this so I had to depend on editing to make it look better.

5310998967_dfae8bb4c5_zPin

Same picture, after editing.

lightbox picPin

Enter three lamps – first food picture with all three lamps as shown in the light box picture above. No editing done – SOOC.

DSC_0746-edPin

One of my favourite light box pictures to date (I haven’t taken that many yet, I always turn to natural light if I can help it). This is a very lightly edited picture taken in the light box, again, in the night.

I have taken a few more and recipes are coming up soon for this dishes. Going forward, I will clearly mark the picture setting when posting pictures because I expect a good mix of both kinds of pictures in future posts.

Other sites you can refer for building your own light box:
Digital Photography School
Jugalbandi

XFacebook1PinterestTelegramWhatsAppYummly
1
SHARE

By nags Filed Under: Food Photography Tips, Uncategorized

Previous Post: « Chilli Paneer Recipe, Dry Chilli Paneer Recipe
Next Post: Schezwan Vegetables Recipe – Indo Chinese Side Dish for Fried Rice »

Reader Interactions

Comments

  1. Paaka Shaale

    January 12, 2011 at 4:11 pm

    Lovely post nags!!! Thanks soooo much for sharing 🙂

    Reply
  2. ?

    January 12, 2011 at 3:12 pm

    Agree with you on the natural light. Almost all of my photos were taken in natural light; and yes, sometimes when you finally decide to blog about a dish, you find that the 'light' is gone! Have seen RV's post and your box looks compact and neat.

    Reply
  3. Miri

    January 12, 2011 at 2:56 pm

    I have often thought of how helpful this would be since a lot of my pics for recent posts have been spoilt by the fact that they were taken in yellow light in the evening – part laziness, but mostly because if I cook before we eat there is not time to set up white light etc etc. The light box would be great to have. Thanks for this demo and ideas 🙂

    Reply
  4. Radhika

    January 12, 2011 at 12:41 pm

    Nags, what a great job. The last click steals the show though.

    Reply
  5. Taste Junction

    January 12, 2011 at 11:25 am

    Wow..another addition to your wonderful knowledge sharing series on food photography for new bloggers like me. Congrats on your spacious new 3BHK…your camera is really lucky to have its own room!! Love the composite shot with 3 lamps..it looks almost like a daylight shot.
    Anamika

    Reply
  6. callezee

    January 12, 2011 at 11:24 am

    You revealed a Big Secret but this trick is really mind blowing

    Reply
  7. Indrani

    January 12, 2011 at 10:55 am

    Very useful+helpful post, nags..hope I'll get courage one day to try out making a lightbox, that day I'll use this post, bookmarking it

    Reply
  8. notyet100

    January 12, 2011 at 10:32 am

    thanks for this,..;-)

    Reply
  9. Kurinji

    January 12, 2011 at 9:53 am

    Very useful post n thanks for sharing…

    Kurinji kathambam

    Reply
  10. Priya

    January 12, 2011 at 9:51 am

    Thats a useful post for many of us, thanks Nags, gonna make soon a light box, since its getting too dark earlier here..

    Reply
« Older Comments
Newer Comments »

Leave a Reply Cancel reply

Your email address will not be published. Required fields are marked *

Recipe Rating


Primary Sidebar

Hello!

I am Nags, the face behind Edible Garden, a food and recipes website for the busy (and sometimes lazy!) cook since 2007. My recipes are meant to be quick yet healthy and delicious - Nothing fancy, nothing too difficult. Follow Me On Instagram for real-time food and life updates.

Trending Recipes

Kerala plum cake recipe
Butter-Chicken-Recipe-murgh makhani
paneer butter masala recipe restaurant style
Eggless No-Bake Mango Cheesecake Recipe Step by Step
Instant Oats Idli Recipe with Rava, Step by Step
1 min chocolate chip cookie in a cup
dosa recipe-how to make dosa
pressure cooker eggless sponge cake recipe (no oven cake)
vegetable pulao recipe
garlic pull-apart rolls recipe, eggless
bread paneer rolls recipe
easy pav bhaji recipe

Browse Older Recipes

Copyright © 2025