
As I promised in the last post of the Basics of Food Photography Series, I am going to share how I edit pictures after I upload them from the camera. This is the most basic of edits and just involves a few clicks on Picasa. It's quick, easy and totally lazy-friendly.
If you don't have Google Picasa, you can download it here. It's free and quite useful!
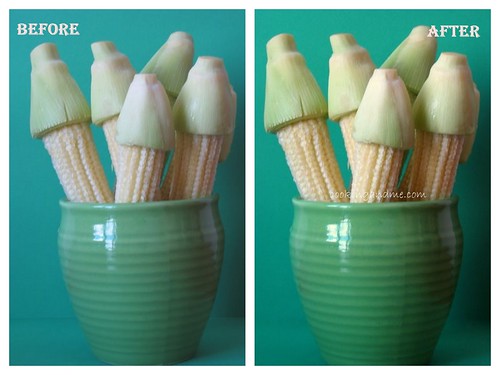
Okay, so here is the picture we are going to use and a side-by-side comparison in case you guys want to see what I am going to talk about for the rest of the post. It's the baby corn I bought to make baby corn masala.
Once you have Picasa running on your computer, it will automatically sync all your pictures into the program. To edit a picture, open it in Picasa.
Let's look at the editing process step-by-step now.
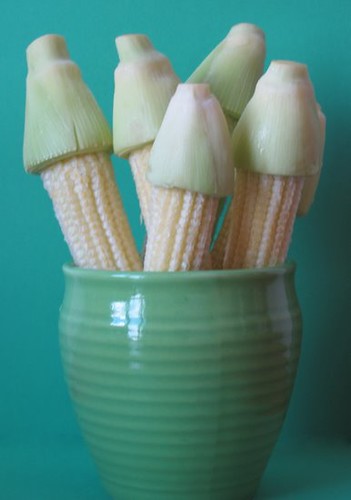
This is how my picture looked SOOC - Straight Out Of Camera.

The first thing I always check is whether my picture can use with a crop. I sometimes chop off considerable amount of the picture when I feel the main stuff is not getting its due attention.
In this case, I feel there is a bit more space on the left than the right so I am going to crop off a bit of the green space on the left.
In the menu to the left, under Basic Fixes, choose 'Crop'. Click and drag the mouse to choose the portion you want to retain in the picture. Hit 'apply'

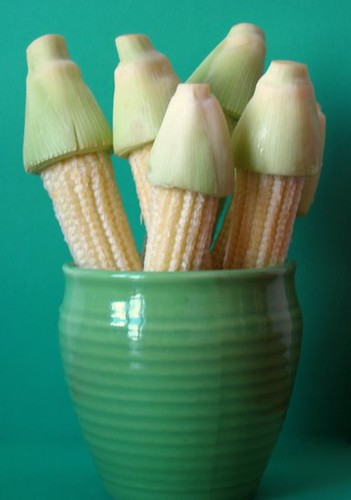
There you go, much better!
The next thing I want to fix is the faint line you see near the base of the bowl. I used to chart papers to form as the base and background of the picture and this is where they meet on the table. I want that line to be as invisible as possible.
To do this, choose 'Retouch' from the menu on the left. Use the box at the bottom right of the picture to navigate to the portion of the pic you want to retouch. Choose brush size from the left menu. Click on the area you want to retouch while holding the left mouse button down, then click on a space in the picture that's smooth.
In this case, I slightly increased the brush size from default, hold-clicked my cursor on one end of the line on the left. Then I clicked on a smooth portion of the green background so that the line gets blurred a bit.
After working the whole line to the left of the bowl, here is how the picture looked like.

Notice the difference on the left and right of the bowl? The line is blurred and blends better with the background. If I hadn't brought your notice to it, you wouldn't have noticed it in the picture 😉
Quick tip: The retouch tool is very useful to remove blotches of curry or small shreds of vegetables that appear on the side of your bowls in pictures. Just click on the blotch, and then click outside on a smooth part of the bowl to make it disappear! Same method to remove that unwanted pimple on your profile picture in Facebook 😉
Do the same retouching on the right of the bowl as well. Here is the final retouched picture.
Now its time to move to the second tab in the left side menu in Picasa - the 'Tuning' tab - my absolute favourite.
I use the 'fill light' option if the picture looks a bit too dark. Since this one is fine in the lighting department, let's jump to the 'highlights' slider. Play around with this option until you feel your picture looks better then before. We don't want the pic to be too bright. I moved the slider about ¼th of the way to the right to make it look like this.

See the difference? The greens are a bit brighter. Just a tad, that's all we need.
Next is the 'shadows' slider. Ooooh, I love this! It can give an instant boost to your pic. What this does is, it enhances the shadows in your picture. It brings out the colour beautifully in most cases so play around with this as well. Be careful not to be too enthusiastic because if used badly, this can make one portion of your pic really dark.
Like for my pic, the shadow is darker on the right hand side so if I go overboard with the 'shadows' slider, the right hand side will look too dark.
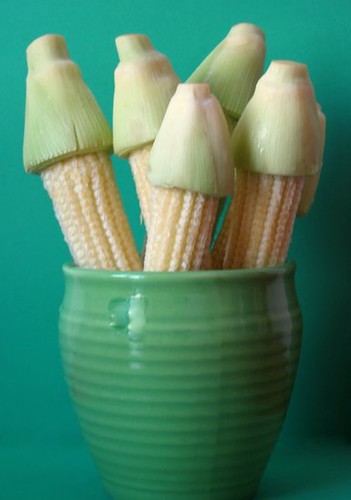
I brought the slider about ⅓rd of the way to the right.
Here's the result.

See how the colours are popping out? I always love the effect of 'shadows'. It works especially well if you have a black background and use a black bowl. Like in this picture.
Ok, now let's increase the colour temperature a bit. This is also to accentuate the colours in your pic a bit so increasing it a bit never does harm. I increased a bit on this pic and here's how it turned out.
You'll notice that the colours generally 'warmed' a bit, especially the yellows of the corn.
Time to click on the third tab, 'Effects', now.
This has a lot of options that you can experiment with but the one I use most is the first one, 'sharpen'. Now the tool comes with a slider so you can control the amount. I don't sharpen too much since it makes the pic look unnatural, but a little bit never hurts.
Here is the above picture, sharpened.

Ah, nice. Almost done!
Hmm.. I didn't notice that glaring patch of light on the bowl before. Do you see that? On the bowl, towards the rim on the left?
Let's try and see if we can use 'Retouch' under 'Basic Fixes' to remove that.
Ack!! Bad idea!! Good to demo that Picasa does come with limitations and you can't perform magic with it, just close to magic 😉
Thank God for the 'undo' function! Undo undo!!
Ah good. I think I am pretty happy with the pic now so all I need to do is add my watermark, the copyright info. Initially, I used to add it to one corner in the bottom of the pic but these days I add it to the center of the pic and make it blend as much as possible.
Use the 'text' tool under 'Basic Fixes' and play around with different fonts and text colours. My favourite is Bradley Hand that's subtle enough to put in the center of the pic.

There you go! Good to upload to flickr and type up a post.
I know this seems like a lot of steps but once you learn your way around Picasa you will realize how ridiculously easy it is.
Even with having to save the pics at the end of each step for this demo post, I still took under 20 minutes to do the whole thing.
Here's another look at what we just did.
Happy editing 🙂
Now I have a question for you all. I have three ideas for my next post in the series.
1. Blurring backgrounds using Photoshop
2. Plates and bowls, what works best and what I have
3. Shutter speed and ISO (if you choose this, I will have to teach myself what they mean, first :D)
Let me know what you would like to learn more about next.

Cher
Thank U once again. With recent advancements, do you think Picasa is still recommended software?
nags
Now I use Lightroom 🙂
gastronymous
Hi Nags, really enjoyed all the useful tips on the food photography. All I came here for was a simple chapati recipe! I've been trying my hand at bloggin recently on gastronymous.me and there's been a lot of learning along the way. Thanks for helping me speed up my blogducation 🙂
Shema George
Thanks for this informative article...I dont like the pics I take and wanted to read some article like these which dont use too much jargon's and techie words...love ur tutorial...thanks a lot..u r a gem!!!
Shema Life Scoops
hawaii real estate
this is one of the nice post i have searched
dinosaurs
a very good post by a great author only some people have the ability to write like this way