
Badusha recipe, a detailed recipe to make flaky and sweet badusha from scratch.

My athamma (of the Unniyappam recipe fame), is an expert at making Badusha. Her badusha is bite-sized, has just the right amount of sweetness, and has those lovely layers inside that all other badusha surely envy. For the longest time, I’d been meaning to get her to make these for me and take step by step pictures of how to make badusha and it never happened due to my sporadic and super short visits to her home.

However, I got to see the second half of her badusha preparation process during this Christmas holidays. My niece loves her badusha so she made a huge batch just for us and we arrived at her home just when she was making the small discs of badusha dough ready to fry.
While traditionally badusha recipe is made during Diwali, Athamma makes it year round whenever there are enough people around to eat it.
You may also like spicy diamond cuts, thenkuzhal, kalakand with ricotta cheese.
Badusha Recipe
Ingredients
- 4 cups 800 grams of all-purpose flour or maida
- 1 cup of melted ghee
- 1 tsp of baking soda or soda powder
- 2 tsp of curd plain yogurt
- 2 cups of sugar
- 3/4 cup of water (just enough to submerge sugar
- Oil of for deep frying
Instructions
- Mix the flour and soda in a bowl well until incorporated. Add the melted ghee and curd to this and knead until you get a smooth, stiff dough. You can add water by the teaspoon if you need more moisture but don't overdo it. Keep covered aside for 30 mins to maximum an hour.
- After the dough has sat for a while, knead again until smooth and soft. The more you knead the better the badhusha will be. Athamma kneads the dough for about 5-7 mins.
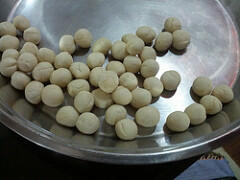
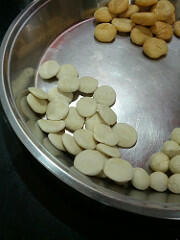
- Take 1/4th of the dough between your palms and roll into a long log. Pinch off small gooseberry-sized balls of the dough and make into smooth-ish balls. Once you have a small batch of these, flatten each between your palms with just one press. Set aside the badusha dough discs for frying.
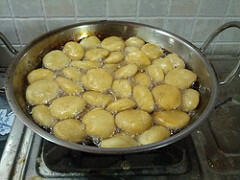
- Heat oil in a kadai until just smoking point. Drop in as much badushas as you can without overcrowding them. They should be able to float without overlapping. Once you have added the badusha, reduce the flame to low and fry until both sides turn golden brown. It's important to keep the flame at low otherwise the insides won't cook.
- Drain and set aside all the fried badusha and get ready to make the sugar syrup.
- In a WIDE pan (that can preferably hold all the badusha we have fried), heat sugar and water until it's all bubbly.
- Cook down the sugar syrup until it's thick and reaches the one-string consistency. Athamma doesn't check one-string consistency. She proceeds when the syrup is thick and coats the back of the spoon you are using to mix it. Reduce flame to low.
- Add the fried badusha to the sugar syrup and mix them well together. Do NOT stop mixing at this stage, you have to keep going until the sugar thickens and crystallizes and coats the badusha evenly. If you stop, then mixing will be super hard.
- When the sugar has fully coated the badusha, switch off flame and IMMEDIATELY transfer the hot badusha to another plate.
- Cool completely and transfer to air-tight containers. Consume the badhusha within 3 days.
Step by Step Badusha Recipe
1. Mix the flour and soda in a bowl well until incorporated. Add the melted ghee and curd to this and knead until you get a smooth, stiff dough. You can add water by the teaspoon if you need more moisture but don’t overdo it. Keep covered aside for 30 mins to maximum an hour.
2. After the dough has sat for a while, knead again until smooth and soft. The more you knead, the better the badusha will be. Athamma kneads the dough for about 5-7 mins.
3. Take 1/4th of the dough between your palms and roll into a long log. Pinch off small gooseberry-sized balls of the dough and make into smooth-ish balls. Once you have a small batch of these, flatten each between your palms with just one press. Set aside the badusha dough discs for frying.
4. Heat oil in a kadai until just smoking point. Drop in as much badusha as you can without overcrowding them. They should be able to float without overlapping. Once you have added the badusha, reduce the flame to low and fry until both sides turn golden brown. It’s important to keep the flame at low otherwise the insides won’t cook.
5. Drain and set aside all the fried badusha and get ready to make the sugar syrup.
6. In a WIDE pan (that can preferably hold all the badusha we have fried), heat sugar and water until it’s all bubbly.
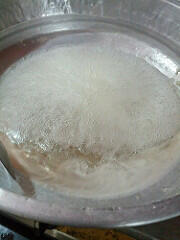
Cook down the sugar syrup until it’s thick and reaches the one-string consistency. Athamma doesn’t check one-string consistency. She proceeds when the syrup is thick and coats the back of the spoon you are using to mix it. Reduce flame to low.
7. Add the fried badusha to the sugar syrup and mix them well together. Do NOT stop mixing at this stage, you have to keep going until the sugar thickens and crystallizes and coats the badusha evenly. If you stop, then mixing will be super hard.
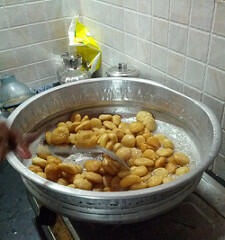
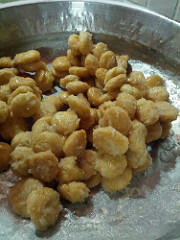
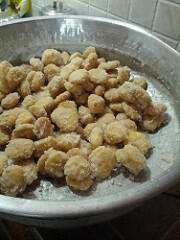
8. When the sugar has fully coated the badusha, switch off flame and IMMEDIATELY transfer the hot badusha to another plate.
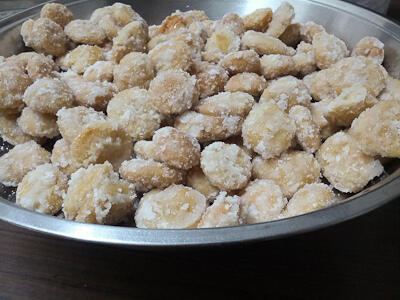
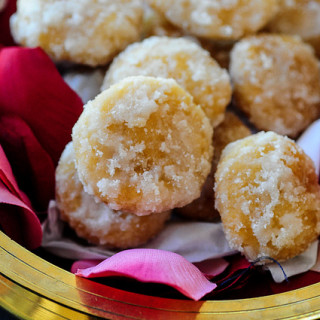
Cool completely and transfer to air-tight containers. Consume the badusha within 3 days. This badusha recipe makes a large batch as you can see, so adjust ingredients accordingly to get the right batch size of your choice.
Notes:
– You can replace ghee with vanaspati (dalda) for making badusha without compromising texture or taste. Whether we are compromising health is debatable though.
– You can add some powdered cardamom to the sugar syrup once it’s thick but we all prefer our badusha plain so Athamma doesn’t add cardamom or any other flavours to them.
– If you want to soak the badusha in sugar syrup in small batches, you can make the syrup and immediately add the fried discs to them in batches, soak for about 2 mins per batch, and scoop out to lay on a plate before proceeding with the next batch.
– Athamma makes mini-sized badusha that are just larger than a coin. This makes portion control and frying easy but if you want to make them larger, by all means go ahead.
– This recipe can be halved or quartered as you prefer. One thing to remember is that the flour : sugar ratio is 2 : 1.
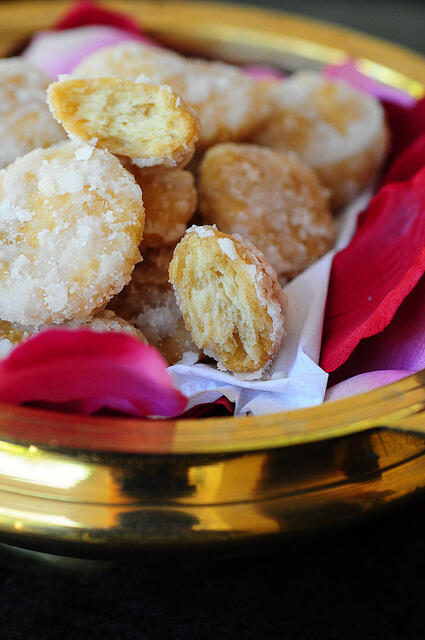
– The sign that you have got the badusha right is the layers of dough you can see when you bite into them. Athamma has years of practice so her badusha recipe is perfect as you can see below.
Two spoons of curd enough? I put one cup and it came out very nice
Hi Nags, I tried doing Badhusha for my Anniversary.I followed all your steps, but it dnt come well. When I started frying, the dough just splits into pieces. Can you tell me, what mistake I did..I tried 2 cups Maida with 1/4 cups ghee and 1/2 tsp soda.
you need to add the right amount of ingredients revathy. since you halved the flour, you should have halved the ghee too but looks like you quartered it.