• Skip to primary navigation
  • Skip to main content
  • Skip to primary sidebar

Edible Garden

  • Popular Categories
    • Dal Recipes
    • Chicken Recipes
    • Egg Recipes
    • Indo-Chinese Recipes
    • Mushroom Recipes
  • Kerala Recipes
  • Chocolate
  • About
  • Navigation Menu: Social Icons

    • Facebook
    • Instagram
    • Pinterest
    • Twitter
You are here: Home / Snacks and Appetisers / Garlic Pull-Apart Rolls Recipe, Eggless Garlic Rolls

Garlic Pull-Apart Rolls Recipe, Eggless Garlic Rolls

February 24, 2020 133 Comments

Jump to Recipe·Print Recipe

Garlic pull-apart rolls, the easiest bread rolls you can bake, especially if you are a beginner to baking bread at home.

I had been eyeing this recipe of Garlic Pull-Apart Rolls from Suhaina for a long time. When she brought these rolls warm from the oven for our Singapore food bloggers’ meet, I was totally sold. Finally managed to make them this weekend.

I would highly recommend this to all those who are dying to bake but fear the yeast monster. Trust me when I say these eggless garlic pull-apart rolls are really fool-proof and you can feel so proud of yourself when done!
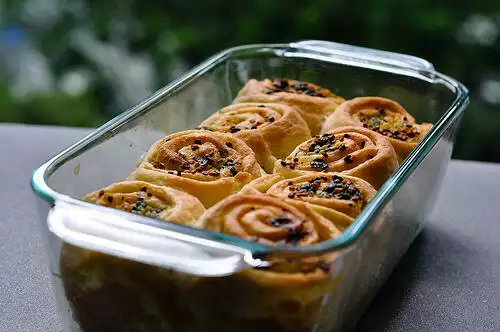
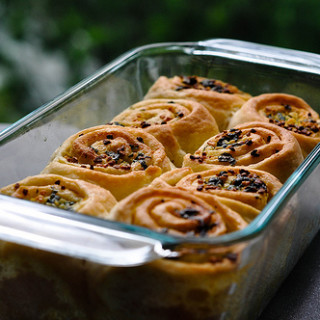
Garlic Pull-Apart Rolls Recipe, Eggless Garlic Rolls

I halved the original garlic rolls recipe and got 8 mini rolls, enough to serve 2 very generously. We had one here and one there, through the weekend.

If you want to try similarly easy bread and rolls, check out my:

pesto pull apart rolls (also eggless)
nan made on tawa,

apple cinnamon rolls

soft hokkaido bread recipe.

Print
clock clock iconcutlery cutlery iconflag flag iconfolder folder iconinstagram instagram iconpinterest pinterest iconfacebook facebook iconprint print iconsquares squares iconheart heart iconheart solid heart solid icon
garlic pull-apart rolls recipe, eggless

Garlic Pull-Apart Rolls Recipe

★★★★★ 5 from 1 reviews
  • Author: nags
  • Prep Time: 1 hour 30 mins
  • Cook Time: 30 mins
  • Total Time: 2 hours
  • Yield: 8 rolls
  • Category: Bread
  • Cuisine: International
Print Recipe
Pin Recipe

Description

Garlic pull-apart rolls, these eggless bread rolls are a fool-proof way to start your journey into bread baking and if you are already a baker, this is the recipe you want to whip up in a short time!


Ingredients

For the rolls

  • Plain Flour – 1.5 cups
  • Warm Water- 1/2 cup + 1 tbsp
  • Yeast – 1/2 tbsp (instant or active dry yeast)
  • Salt – 1 tsp
  • Sugar – 1 tbsp
  • Olive Oil – 1 tbsp + 1 tsp

For garlic spread

  • Salted butter, at room temperature – 6 tbsp
  • Minced garlic – 2 tbsp
  • Chopped coriander leaves (cilantro) – 2 tbsp

Instructions

  1. Mix 1.5 cups flour, 1/2 tbsp yeast, 1/2 cup + 1 tbsp (if needed) warm water, 1 tsp salt and 1 tbsp sugar together until you get a smooth, slightly sticky dough.
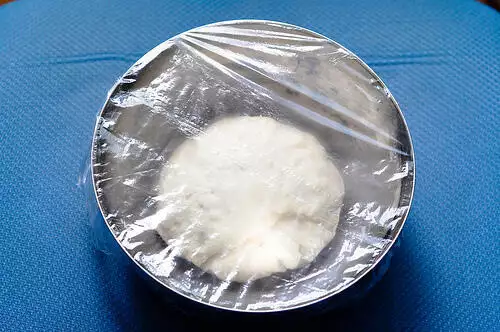
  2. Add some olive oil to your fingertips and palms and knead until the dough springs back when you press with your fingers – about 4-5 mins
  3. Wrap the dough in cling film and allow to double by keeping in a warm place for about 45 mins. You can also just cover the bowl with a damp clean kitchen towel.
  4. Meanwhile, make the garlic spread by simply mixing all the ingredients.
  5. Grease a baking pan or loaf tin with olive oil. I used my glass Pyrex loaf pan which was the 6. perfect size for 8 mini garlic rolls.
  6. Knock down the air in the dough and divide it into two equal portions.
  7. Transfer one portion of the dough to a floured surface and roll gently into a rough rectangle of about 1/2″ thickness. Apply more flour sparingly if sticky.
  8. Spread about 2 tbsp of garlic spread on one side.
  9. Roll from one end gently and as tight as you can.
  10. Cut into half and then each half again into two halves to get 4 equal portions.
  11. Now place the rolls with the cut side up in the greased pan leaving some room for rising while baking
  12. Repeat the same procedure with the remaining dough.
  13. Spread a little milk on top the rolls and add the remaining garlic spread on top. You can also add some sesame seeds or chia seeds on top to add some crunch.
  14. Allow to rise for another 20 minutes.
  15. In the mean time, preheat the oven to 180C / 375F.
  16. Bake the eggless pull-apart garlic rolls for about 30 mins or until the top is golden brown. My Pyrex glass pan usually takes longer to bake in, so mine took about 35 mins to bake just right. If the top seems to be burning or cooking faster, lightly cover with aluminium foil and continue baking
  17. These rolls are really soft and have an amazing flavour. Serve fresh and hot!

Did you make this recipe?

Tag @ediblegarden on Instagram and hashtag it #ediblegardenrecipes

Step by Step Eggless Garlic Pull-Apart Rolls Recipe:

Mix 1.5 cups flour, 1/2 tbsp yeast, 1/2 cup + 1 tbsp (if needed) warm water, 1 tsp salt and 1 tbsp sugar together until you get a smooth, slightly sticky dough.

Garlic Pull-Apart Rolls Recipe, Eggless Garlic Rolls

Add some olive oil to your fingertips and knead until the dough springs back when you press with your fingers – about 4-5 mins.
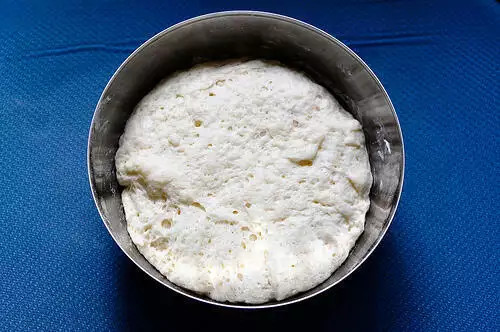
Garlic Pull-Apart Rolls Recipe, Eggless Garlic Rolls

Wrap in cling film and allow to double by keeping in a warm place for about 45 mins. You can also cover the bowl with a damp clean kitchen towel or even a plate.

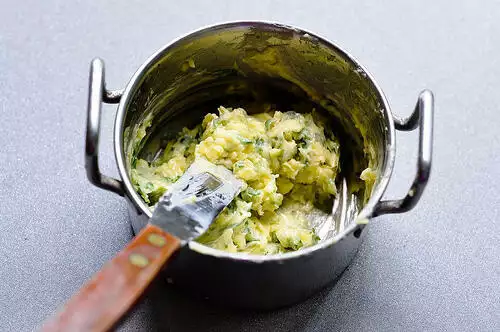
As the dough rises, make the garlic spread by simply mixing all the ingredients. Set aside until needed.

Eggless Garlic Rolls Recipe

Grease a baking pan or loaf tin with olive oil. I used my glass Pyrex loaf pan which was the perfect size for 8 mini garlic rolls.

Knock down the air in the dough once risen and divide it into two equal portions.
Garlic Pull-Apart Rolls Recipe, Eggless Garlic Rolls

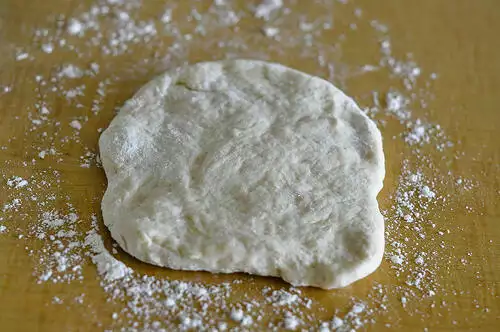
Transfer one portion of the dough to a floured surface and roll gently into a rectangle of  about 1/2″ thickness. Apply more flour sparingly if sticky.

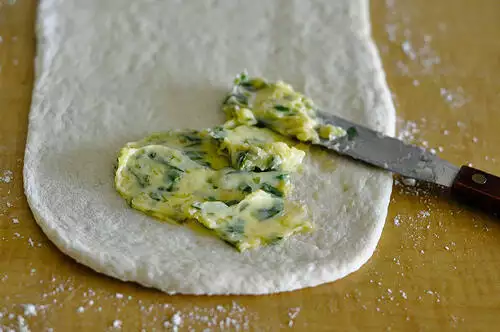
Spread about 2 tbsp of garlic spread on one side.
Garlic Pull-Apart Rolls Recipe, Eggless Garlic Rolls

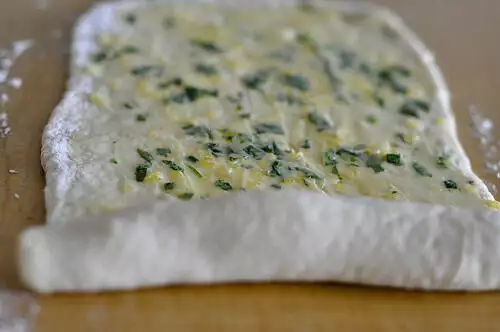
Roll from one end gently and as tightly as you can.
Garlic Pull-Apart Rolls Recipe, Eggless Garlic Rolls

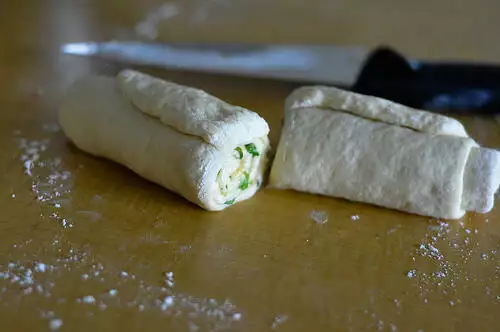
Cut into half and then each half again into two halves to get 4 equal portions.
Garlic Pull-Apart Rolls Recipe, Eggless Garlic Rolls

Now place the rolls with the cut side up in the greased pan.

Repeat the same procedure with remaining dough.

11. Spread a little milk on the rolls and add the remaining garlic spread on top. You can also add some sesame seeds or chia seeds on top to add some crunch.
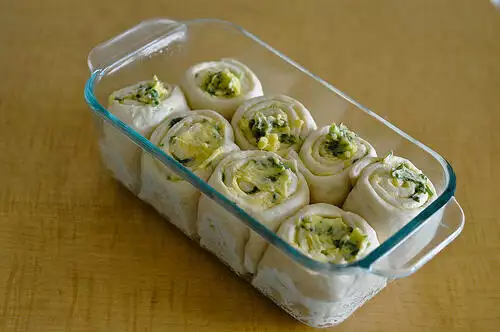
Garlic Pull-Apart Rolls Recipe, Eggless Garlic Rolls

12. Allow to rise for another 20 minutes, loosely covered with foil or a damp kitchen towel.

In the mean time, preheat the oven to 180C / 375F.

Bake the garlic pull-apart rolls for about 30 mins until the top is golden brown. My Pyrex glass pan usually takes longer to bake in, so mine took about 35 mins to bake just right.

Garlic Pull-Apart Rolls Recipe, Eggless Garlic Rolls

These rolls are really soft and have an amazing flavour. Serve fresh and hot!
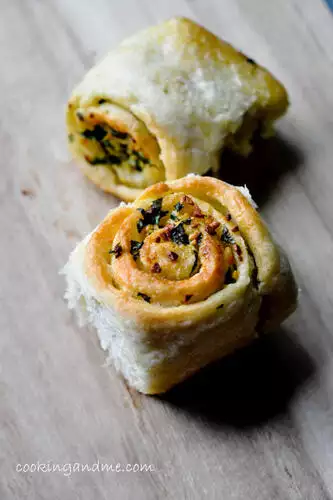
Garlic Pull-Apart Rolls Recipe, Eggless Garlic Rolls

Notes:

1. The amount of water depends on the type of flour you are using. Use your judgment to get a slightly sticky dough that behaves when you apply oil.

2. The amount of yeast can be reduced if you don’t like the flavour of yeast too much in your breads. You can add just 1 tsp and let it double over a couple of hours, slowly. Also, if you are using yeast available in India, you need to proof it. To proof yeast, add it to 1/4 cup warm water and set aside for 10 minutes until bubbly. Then use it in the recipe as directed. The quality of yeast will really make a difference to the softness of the bread rolls. Enjoy your garlic bread rolls!

For Garlic Pull-Apart Rolls recipe in Hindi, Tamil, Telugu, Kannada, Urdu, French, Spanish, Malay etc please use the Google translate button in the sidebar.

Share This Recipe
  • Facebook0
  • WhatsApp
  • Pinterest0
  • Twitter
  • Google+0
  • Email
  • Print
0

By nags Filed Under: Bread Recipes, Most Popular, Snacks and Appetisers

logo
Food Advertising by

Subscribe

for your weekly recipe fix.

Previous Post: « Dahi Ke Kabab Recipe | Quick and Easy Snack Recipes
Next Post: Basics of Baking, Baking Essentials for Beginner Bakers »

Reader Interactions

Comments

  1. Rhishikesh Gaikwad

    April 26, 2021 at 12:20 am

    Wow Superr!! looks absolutely amazing.. beautiful pictures too.. 🙂 thanks for sharing..

    ★★★★★

    Reply
  2. Jagruti

    September 14, 2020 at 10:26 pm

    I made these rolls yesterday and they turned out superb. This morning I microwaved for 20 seconds n they became unbelievably soft. Had some leftover dough which I put in fridge n today made pizza. Just tooooo good..crispy below n soft to bite. Thank u so much.

    Reply
    • nags

      September 16, 2020 at 6:26 am

      so glad you like them!

      Reply
  3. maria.K

    February 2, 2019 at 1:32 am

    hi,
    tried these rolls today-
    the taste-awesome
    texture-suberb
    eveybody loved it, was finished at one go!!
    thanku so much.
    I had one issue and thats – the brown top. Tried
    with milk today – no success!!
    Much as I try, the bakery brown colour is something
    i just cannot achieve. pl let me in on your secret.

    Btw,The recipe is a keeper.

    Reply
  4. Avantika

    February 23, 2018 at 9:18 pm

    Hi,

    Mine got burnt within 6 mins of baking 😭

    Reply
    • nags

      March 13, 2018 at 10:52 am

      seems like your oven has hot spots. you have to check that temperature is set correctly and use an oven thermometer if your oven knob is not reliable

      Reply
  5. neha

    April 3, 2013 at 10:40 pm

    I know am stupid. I should have searched it before but I used wheat flour instead of plain flour. I thought maida is called all purpose-flour. I dint know that it is also called as plain flour. I have just kneaded my dough and I don't know how they will turn out now. :(. I will update you once am done making these pull aparts with wheat flour.

    Reply
  6. neha

    April 3, 2013 at 10:39 pm

    I know am stupid. I should have searched it before but I used wheat flour instead of plain flour. I thought maida is called all purpose-flour. I dint know that it is also called as plain flour. I have just kneaded my dough and I don't know how they will turn out now. :(. I will update you once am done making these pull aparts with wheat flour.

    Reply
  7. Anonymous

    March 31, 2013 at 4:26 am

    Hi Anon here again I ended up just used dried mix herbs. OMG I made these this morning, absolutely delicious. I love this recipe it's so easy and the outcome was great.

    Thank you, will definetly be trying your other recipes!!

    Reply
  8. Anonymous

    March 29, 2013 at 5:25 am

    Hi just wondering I don't like coriander is it possible to replace it with another herb and what would be the best replacement?? Thanks!!

    Reply
    • Nagalakshmi V

      March 29, 2013 at 11:48 am

      sure, it's up to you. try mint or basil maybe?

      Reply
  9. Dhara

    March 27, 2013 at 5:09 am

    Hey Nags,

    I am trying to make this rolls, just a quick question, Can we use other oil instead of olive oil ?

    Thanks,

    Reply
    • Nagalakshmi V

      March 27, 2013 at 5:28 am

      I wouldn't recommend it. Please try to use olive oil for best results

      Reply
    • Dhara

      March 29, 2013 at 5:23 am

      Thanks Nags,

      I have tried this today and that came out AWESOME.. 🙂 Got appreciation from everyone who had it…

      I am following your blog everyday.. Your recipes are truly awesome and the images are too… 🙂

      Thank you so much for sharing them with us…

      Reply
  10. Anonymous

    February 26, 2013 at 2:13 pm

    Hello 🙂
    I'm a newbie to baking and this is the first time i'm experimenting with yeast! And sadly, the dough didn't rise even after an hour:( Is there another way to make it rise? Like by adding lil more yeast and flour to the kneaded dough?

    Thanks in advance,
    Abhi 🙂

    Reply
  11. Tina Dawson

    February 17, 2013 at 1:07 pm

    Amazing pictures and a tempting recipe. Thank you. I made these and they came out so well.
    Thanks again!

    Reply
  12. maspace

    February 13, 2013 at 4:28 am

    hello, I have been trying a lot of your recipes and this was one of them….everything was going on perfect until (ie the dough rose well and stuff) I baked them…they came out real hard!!!

    I am clueless as to why that happened..

    PS: I recently got married and moved to Indonesia (Medan), your blog has been like a savior (next to Mom!) – much appreciate the good work 🙂

    Best regards,

    Neha

    Reply
  13. Sucheta Judith

    January 5, 2013 at 11:29 am

    Hi Nags!! One of the best recipes i like trying over and over and OVER again. Its a fave of my dad's and thank you for sharing this here.

    I enjoy your other posts too.

    Cheers and have a lovely 2013.

    Judith V

    Reply
    • Nagalakshmi V

      January 5, 2013 at 11:37 am

      Thank you Judith. I am so glad you and your family enjoy the garlic pull apart rolls so much. Have a wonderful new year 🙂

      Reply
  14. swati

    December 11, 2012 at 9:38 am

    Hi Nags !! this blog of yours is slowly turning out to be one of my favorites. Today was the first time I actually used yeast to do anything and the rolls taste really nice. Even my lil boy is loving them as he is coming back for more again n again. I had previously tried ur mango cheese cake which was divine. and you also helped me make curd as i live in australia and never thought of boiling the milk before. thanks for inspiring me.

    Reply
    • Nagalakshmi V

      December 11, 2012 at 9:41 am

      hello swati, very sweet of you to leave a note

      Reply
  15. Farah Saleem azeez

    December 11, 2012 at 7:14 am

    im sorry. this is the link.
    http://amumsjournal.blogspot.com/2012/12/soft-garlic-rolls.html

    Reply
  16. Farah Saleem azeez

    December 11, 2012 at 4:44 am

    hi nags! just tried out this recipe…….super soft n YUM! thanks! pls visit my blog n check out this recipe………http://amumsjournal.blogspot.com/2012/12/garlic-pull-apart-rolls_10.html

    Reply
  17. Arti Bareja

    December 2, 2012 at 3:35 pm

    Hi Nags….I want to make this and your paneer roll recipe for a party lof 30 people. I am making lots more and want to avoid the last minute baking and standing in the kitchen. Can I pre make both these and stick into the over 5 minutes before serving just to re-heat? Or are these to be made absolutely fresh?

    Reply
    • Nagalakshmi V

      December 3, 2012 at 2:00 am

      You can totally make it in advance and re-heat it. the only thing i'd be careful with is, the top of the rolls could get hard or dry. so when you take them out after baking, brush with some milk and do the same after-re-heating too. and of course, they are not going to taste the same as when they are fresh, but this works too. i'd not recommend making them more than 12 hours ahead though.

      OR, here's another idea. make the dough, let it rise once, punch down and make the rolls. keep in the baking tray and refrigerate immediately. let it rise in the fridge slowly until you need to bake them. baking time is barely anything so you can make them fresh. yep, i'd recommend this option for sure.

      Reply
    • Nagalakshmi V

      December 10, 2012 at 1:55 am

      Hey Vids, self-raising flour doesn't substitute for yeast in bread. Even if you use that flour, you have to use yeast as well otherwise the bread won't come out soft. Hope you try again 🙂

      Reply
    • Vids

      December 9, 2012 at 11:46 pm

      Nags,

      I am a great fan of your blog like many others. You are an inspiration for me. I had no yeast and hence bought self rising flour (Great Value from Walmart) and exactly followed your recipe. I assumed that SRF will need no yeast. I let the dough sit for 90 minutes. Also i did not apply milk on top before baking. The end result came out too moderate. I mean, the base of the rolls became very hard and somewhere it was all wrong. The rolls were dry and lacked something more. Any thoughts ?

      Thanks
      V

      Reply
  18. Anonymous

    November 23, 2012 at 9:02 pm

    Hey…It looks wonderful…nothing like freshly baked bread..sadly I am in a very small town currently and not very sure if I can get yeast here..I often go through recipes and make mental notes of variations I would like..I came across this recipe of yours and thought a thin layer of spicy boiled potatoes in the roll could also taste divine…wish I could try it someday soon 🙂 Sonal.

    Reply
  19. Teena Manish Agarwal

    November 21, 2012 at 4:24 am

    Hi Nags,

    I am actually laughing my lungs out right now, for having made a fool of myself with this fool-proof recipe. What was I thinking, just a few days into baking, & here I thought of experimenting!!!

    The last time I baked these rolls, the dough was a bit thicker and didn't spread much and easily, however, the taste was just near perfect!. So I thought of trying again, to better it this time.

    Dunno what got into me, and I said to myself, let's make this a healthier version, using the atta (whole wheat flour!!). Only thing good was the dough spread easily, that's it. Rest all has been a DISASTER!! The rolls are in the oven since morning (it's afternoon here now!).

    Seems like somethings are better eaten sinfully. Sharing my disaster experience so that the health-conscious ones & the moms out their don't try this so called healthier version. Better stick to the plain flour!!

    God bless you! 🙂

    Reply
    • Nagalakshmi V

      November 21, 2012 at 6:21 am

      oh no! although you made it sound hilarious it happened, i am sorry it did. hope you try again with regular flour and make up for it 🙂 thanks for sharing your experience teena

      Reply
  20. Anonymous

    November 9, 2012 at 1:20 pm

    This is just one of the many recipes from your blog I have tried. Like the others, loved it!

    Never thought I'd be using ingredients such as yeast and gelatin (for the mango cheesecake). They intimidated me.

    Thank you very much. I hope your ability to scout easy, fool-proof recipes and your talent at presenting them so clearly (with good photographs) continues to help several others. Good luck.

    Reply
  21. rosie thomas

    November 1, 2012 at 4:44 pm

    tried this recipe (with a lot of trepidation..!) but it came out awesome… so easy too..and yummm!! thank you for sharing especially the pics and clear directions.

    Reply
  22. Anonymous

    October 28, 2012 at 8:37 pm

    Hi. Quick question. I have strong bread flour in the cupboard, can I use this? Or does it have to be plain/all purpose flour? Please help. I want to make these rolls for a lunch with friends on Tuesday. Thanks 🙂

    Reply
  23. kalpana

    September 15, 2012 at 10:15 am

    very interesting recipe !! i am trying it right now and keeping fingers crossed !! thank you nags 🙂

    Reply
  24. Anonymous

    September 14, 2012 at 2:55 pm

    Hi,

    This will be my first attempt baking with yeast and would like to try this recipe. My doubt is what if i knead the dough in the afternoon and use by late evening can i leave the dough outside for so long or should i refrigerate it. please guide me Thanks Anu .

    Reply
    • Nagalakshmi V

      September 14, 2012 at 8:37 pm

      for the amount of yeast mentioned here, you don't need to leave it aside for too long. if you want to leave it longer, reduce the amount of yeast a bit or leave it in the refrigerator and take it out an hour before you plan to bake.

      Reply
  25. Maya Mathew

    August 12, 2012 at 3:01 pm

    Made it twice already in a weeks time and is a big hit at my home.. Very soft rolls with a nice flavour

    Reply
  26. Anonymous

    August 4, 2012 at 7:03 pm

    Excellent rolls! We used parsley instead and they still turned out great!

    Reply
  27. SohNi

    July 25, 2012 at 5:30 am

    Hi Nags,

    I am new commer to your blog…and I tried my hands at garlic rolls as i love garlic bread..

    But my rolls were not as fluffy as shown in pictures… any tips 🙂

    Also, baking in pyrex glassware2 convection mode for 30 min was taking too long… and no signs of browning on top of the roll 🙁

    pls pls.. how to fix this …

    Reply
    • Nagalakshmi V

      July 25, 2012 at 7:47 am

      looks like you need to increase heat in your oven. can't think of any other reasons and it's always hard to tell..

      Reply
  28. techie2mom

    July 7, 2012 at 5:41 pm

    Hi, tried using whole wheat flour also, they too came out ok. Though not as tasty as the ones with Maida but tasty enough 🙂

    Reply
    • Nagalakshmi V

      July 8, 2012 at 2:17 am

      thank you so much for leaving a note! it's quite a coincidence because i made these yesterday and was wondering today how it would turn out if i substituted half the maida (plain flour) with atta

      Reply
  29. techie2mom

    July 7, 2012 at 12:53 pm

    i tried to comment but looks like it got lost, Wanted to thank you it turned out really tasty. Wanted to know if we can use whole wheat flour in the place of maida.

    Reply
  30. techie2mom

    July 7, 2012 at 9:10 am

    Hey, i was searching for recipe of Pav and found your page. And when i saw these rolls, i had to make them 🙂
    And they turned out really tasty!!! Thanks a ton 🙂
    I also made pav using the same dough, they too turned out really soft and tasty 🙂
    i was thinking of using whole wheat flour in place of Maida for this recipe. Will it work?

    Reply
  31. Anonymous

    June 29, 2012 at 9:49 am

    Hi Nags, thanks for the lovely recipe. Tried this yesterday and it came out really well… added little chopped green chillies with the garlic to make it a little spicy and it tasted really yum.

    Reply
  32. tania thms

    June 18, 2012 at 11:01 am

    Nags ,tried this the other night for dinner, all loved it. Looked and tasted yum.

    Tania

    Reply
  33. Swapna

    June 17, 2012 at 12:53 pm

    Hi Nags, Thankyou so much for the recipe. I have posted my version of it on my blog. 🙂 Keep them coming .. thanks….

    Reply
  34. renu's foodigest

    June 10, 2012 at 11:07 am

    Nags … I tried out the garlic rolls and it came out well.. here they are
    http://www.blogger.com/blogger.g?blogID=7960524861169829818#editor/target=post;postID=5634747390755751032

    Thank u nags!!:)

    Reply
  35. renu's foodigest

    June 9, 2012 at 8:34 am

    Hi nags.. i tried these an dthey came out well…. will send u pics soon…
    just wanted to give u a sunshine award … you may collect it from my blog..You may already be having many awards .. but this is just to show you that i looovvveee your blog!!!

    Reply
  36. renu

    May 29, 2012 at 2:22 pm

    this is something on my " to try list" i have it bookmarked!!! will definitely back link u and also give u my fb…

    Reply
  37. Alina

    May 25, 2012 at 4:44 pm

    Hi there! Like I promised, after the gobi manchurian, I had to try some more stuff from you! So I came across this recipe. Oh boy was this a hit! I am accustomed of baking with yeast, so I had no second thoughts. Oh wow really! I even made sausage rolls, I replaced garlic with cheese, I tried all sorts of fillings and I must tell you all came amazing. The flufft beautiful bread that coats all these fillings came always amazing. Thanks for this one! I'll surely be trying many others 😀

    Reply
  38. Saras

    May 16, 2012 at 11:20 am

    Hi Nags, I have been a regular reader of your blog. I tried the garlic rolls, not once, but twice !! Must say came out really soft & really yummy. Was loved by all & vanished in minutes. Thanks !!

    Reply
  39. Anshu

    February 28, 2012 at 10:05 pm

    Nags,

    I finally tried this out the past weekend. OH.MY.GOD.!

    It was so good. I did not have time to click pics cause they disappeared fast..rainy weekend + 2 hungry souls…you do the math,

    Anyways, making this again during Spring Break and will blog about it + send you pics 🙂

    —
    Anusha

    Reply
  40. ms. self destruct

    February 23, 2012 at 8:46 pm

    Hey, I have a question, although the post is quite old I still hope you answer me 🙂 you say you use instant yeast, but how much yeast I should add if I'm using the regular, fresh kind? You know, like this: http://en.wikipedia.org/wiki/File:Compressed_fresh_yeast_-_1.jpg

    Thanks 🙂

    Reply
    • Nagalakshmi V

      February 26, 2012 at 2:03 am

      I am not sure because I haven't used fresh yeast myself. Maybe you can do a Google search to see if anyone else has tried substituting fresh yeast for dry yeast?

      Reply
  41. Anonymous

    February 9, 2012 at 10:14 am

    i get only dry active yeast, how much of that should i use?

    Reply
    • Nagalakshmi V

      February 10, 2012 at 1:16 am

      i am not sure, haven't tried with it. maybe half or 3/4 of the amount mentioned here?

      Reply
    • Eat & Burpp

      October 11, 2012 at 6:51 am

      I was redirected to this recipe while going thru your recent post & found it fab & worth a try!!

      However I have the same prb- what I get is active dry yeast. The granules are not fine enough. So what do I do to test if it proofs well rather than end up wasting all the ingredients?

      I am really dying to make this over the weekend. So please suggest!

      Reply
  42. Anonymous

    February 5, 2012 at 6:07 pm

    hello…
    do we have to knead the dough for 5 to 10 mins until it is more elastic or just mixing all the dough ingredients and making into smooth dough is enough?

    Reply
    • Nagalakshmi V

      February 6, 2012 at 2:50 am

      Mix well and knead for about 5 mins. No need to exert too much energy 🙂

      Reply
  43. Anonymous

    February 4, 2012 at 7:26 pm

    hello…
    do we have to knead the dough for 5 to 10 mins untill it is more elastic?or just mixing all the dough ingredients is enough to make just a smooth dough.
    thanks,
    Neha.

    Reply
  44. Anindita

    December 12, 2011 at 4:41 am

    Hi, I tried this twice yesterday, and it came out really well. The first time, the dough didnt rize as much, but it still came out ok. The second time,i perfected it. Both batches were finished off in minutes. This is a great recipe, and I am really proud of myself for baking bread for the first time. Thanks for this. Small note: I used half the qty of butter you mentioned and it still came out well. 🙂

    Reply
  45. Nags

    October 25, 2011 at 5:39 am

    hey there, if the yeast doesn't dissolve you need to stop right there before proceeding and fix it 🙂 buy a different brand, heat the water a bit more, whatever it takes.

    Reply
  46. dillu

    October 21, 2011 at 3:48 pm

    hi…am very new to baking! also very scared of those involving yeast! but since this looked very easy, i went ahead and tried! it turned out to be a tragedy of errors!
    there were lots of difficulties i faced:
    1.the yeast did not dissolve in the dough..as it looked stony in the dough…
    2.even though i kept for 2 hrs there was no proving..as in it did not double..
    3.the butter came to bottom…
    4.the top was very crispy
    5.the inner part of the roll was not like bun/bread-like!
    hope u will help me findin my mistake!
    btw i love your site!! good job!

    Reply
  47. Anonymous

    September 12, 2011 at 12:12 pm

    In your recipe you used Plain flour. Is that the flour normally used for making cakes ( i dont mean self raising flour)

    Reply
  48. Nags

    September 12, 2011 at 2:55 pm

    yes i used regular flour for these rolls

    Reply
  49. Priya

    August 29, 2011 at 7:58 am

    Hi Nags,

    I wanted to let you know that I tried the rolls again this weekend with lesser amount of butter and they turned out perfect! No butter bubbling at the bottom. So, Yay to u and ur advice! 🙂

    -Priya

    Reply
  50. Nags

    August 29, 2011 at 3:34 pm

    awesome! 🙂

    Reply
  51. Nags

    August 23, 2011 at 2:25 am

    i have heard this feedback from others too, that the butter pools at the bottom. i didn't have that problem so not sure what's causing it. maybe you are adding too much butter?

    Reply
  52. Priya

    August 22, 2011 at 11:41 am

    Hi Nags,
    I tried this recipe this weekend. I had all the ingredients required… including "dying to bake but fear the yeast monster".

    The rolls turned out very well.

    The only thing that probably went wrong was that I didnt roll the dough firmly I guess. The butter from the stuffing was seen bubbling when the rolls were baking. Not sure if I didnt roll firmly enough or the dough was soft. But I did notice that in the end the butter got soaked up in the bread. Is that how it is supposed to be?
    Sorry for the long comment. Please feel free not to publish, but please do reply to my query.

    -Priya

    Reply
  53. jollyvindaloo

    March 29, 2011 at 3:28 pm

    Looks so Tempting !!!

    Reply
  54. Indu

    March 27, 2011 at 5:33 pm

    ya i did added at the right time. i don no wat went wrong. thanks for replying nags.

    Reply
  55. Nags

    March 27, 2011 at 12:16 am

    The oil should be coated with the dough once you knead it up. Not sure how it pooled at the bottom. Did you mix it in at the right time?

    Reply
  56. Indu

    March 26, 2011 at 2:42 pm

    Hi i tried ur garlic rolls today and it was mouth watering and superb. i really wanted to take a snap of it and send u but all the rolls got vanished in a fraction of second. every one loved it. every one appreciated me, but all the credits goes only to you . thanks a lot for posting such a delicious one. one thing that annoyed was the oil accumulation at the base the rolls and made it too oily. what mistake would i have made? at wat stage of the dough should i add oil?

    ADIOS
    ROLLS ROCKS!!!1

    Reply
  57. Anonymous

    March 8, 2011 at 9:42 pm

    GREAT!!! AWESOME!!!

    Reply
  58. Shoba Shrinivasan

    March 1, 2011 at 6:49 am

    Wow nags,

    You are really tempting me to make this one over the weekend..I saw the little balti with all the niceness n it and I was totally sold!

    Shobha

    Reply
  59. Nags

    March 1, 2011 at 6:51 am

    Hope you try the recipe Shobha. IT comes out really nice 🙂

    Reply
  60. Nags

    February 28, 2011 at 1:07 am

    Thank you so much for trying the garlic rolls Prathap. Super glad you liked the recipe 🙂

    Reply
  61. distanthorizon

    February 27, 2011 at 3:19 pm

    This recipe turned out to be awesome.. Did a slight modification, added chilli flakes.. as always, you rock 🙂 – Prathap

    Reply
  62. Nags

    January 7, 2011 at 1:38 am

    so glad the garlic rolls recipe worked for you 🙂

    Reply
  63. bake-a-holic

    January 6, 2011 at 3:43 pm

    Awesomee!!! thnx alot for da recipe nd pics…

    Tried thm today n came out perfect. Was verry happy…

    Reply
  64. alex

    December 31, 2010 at 3:15 am

    I just made these tonight! They were fabulous and it was the perfect amount for one meal (4 people). Thank you so much for posting!

    Also if anyone is having issues getting their dough to rise, try adding the yeast to the warm water and stirring it gently. Let it sit for a minute then add it to the dry ingredients.

    Reply
  65. Nags

    December 31, 2010 at 3:16 am

    Thanks for leaving the tip Alex! So glad the garlic pull apart rolls recipe worked for you 🙂

    Reply
  66. suma

    December 23, 2010 at 8:35 am

    Oh yumm!! Love garlic and butter in bread, freshly baked, these will be heaven!

    Reply
  67. Deeba PAB

    December 23, 2010 at 2:54 am

    Just what I've been looking for LONG! Bookmarked to make asap! happy Holidays Nags!

    Reply
  68. Kamagra

    December 20, 2010 at 6:50 am

    I am trying to follow a healthy diet and I was wondering how to go ahead with it and what should I eat. But thanks to your article, now I know which kind of diet is most effective and efficient for me and for my husband.

    Reply
  69. Mriganayani

    December 2, 2010 at 9:35 am

    Have you heard about pulling someones heart apart in all directions after dusting it with flour and baking it in an oven?

    Well, you just did.

    My heart is fragile now.

    Reply
  70. The Scatterbrain

    December 2, 2010 at 5:10 am

    I made them…. woo hoo!! I made them last night!! I had my best friend and her baby over, and she babysat while I mixed the dough, trying hard not to drool right into it. I made really tiny rolls and baked it all together in my biggest cake pan and it came out WONDERFUL!!! The entire batch got over in one shot! Even the babies loved it!

    Now i have something to carry for my Principal's potluck and something to impress guests with!

    Thank you nags, you deserve a huuuuge hug!

    Reply
  71. Nags

    December 2, 2010 at 10:03 am

    hahaha 😀 sending some garlic rolls with love spread in between for just you!

    Reply
  72. Nags

    December 2, 2010 at 5:27 am

    yayyy!! i am so glad 😀

    Reply
  73. Bharathi

    December 1, 2010 at 3:23 pm

    I made these rolls yesterday to go along with tomato soup…yummy!!!

    Reply
  74. Michaela

    December 1, 2010 at 1:56 am

    Yum! Two of my family's favorite things: garlic and cilantro! These look just like savory cinnamon rolls.

    Reply
  75. Priya (Yallapantula) Mitharwal

    November 30, 2010 at 6:17 pm

    Mind-blowing dear, I am drooling all over here. As you made it using a source and posted on tuesday, please feel free to link it to Aipi and mine "Bookmarked Recipe – Every Tuesday" event 🙂

    Reply
  76. Nags

    December 1, 2010 at 2:05 am

    I used instant yeast for the garlic rolls recipe. it was a new pack so very fresh 🙂

    Scatterbrain, you never fail to crack me up! Good luck and let me know how they turned out!

    Reply
  77. myspicykitchen

    November 30, 2010 at 5:00 pm

    Rolls look awesome… Would grab one from ur blog, if I could

    Reply
  78. Rupa

    November 30, 2010 at 3:53 pm

    Lovely looking rolls 🙂 ….Please could you tell me if it was Instant or Active dry yeast that you used?

    Reply
  79. The Scatterbrain

    November 30, 2010 at 3:53 pm

    Gosh Nags!! I've come back at least 3 times just to look at the pictures ! I've copied the recipe into my recipe diary and I've bought 3 diff brands of yeast available in the shops so that when i do get down to baking, i won't have the same problem as last time. And Ive signed myself up to bring garlic rolls for a potluck this weekend!!

    you really have me hooked with this one!

    Now… the big task is finding some time after my lil one goes to bed to begin baking!

    Reply
  80. shaliniv

    November 30, 2010 at 2:04 pm

    hiii

    these look sooooo amazing… any idea if we can make them in microwave??

    help pls…

    shalini

    Reply
  81. Gayu

    November 30, 2010 at 9:24 am

    Such a wonderful Garlic Rolls recipe..Looks delicious..

    Gayu
    http://ensamayalarangam.blogspot.com

    Reply
  82. Nags

    November 30, 2010 at 2:08 pm

    yes sure. bake it in convection mode and adjust baking time accordingly. just watch out and take out when the garlic rolls become nicely browned on top.

    Reply
  83. Torviewtoronto

    November 29, 2010 at 7:29 pm

    delicious bread looks fabulous

    Reply
  84. Ananda Rajashekar

    November 29, 2010 at 7:14 pm

    looks fabulous …want one of those 🙂

    Reply
  85. Ramya Kiran

    November 29, 2010 at 6:17 pm

    looks amazing..
    Bookmarked!

    Reply
  86. di

    November 29, 2010 at 5:05 pm

    lovely snaps, n thank your once again for sharing another simply yet gorgeous recipie. i m a regular at ur blog now, n i have tried n commented on quiet a few. i tried this one today, and they turned out really soft and yummm. the only problem i had was that my 6tbsps of butter seemed quiet a lot. since i doubted it, i pulled out the bun tray midway and found a lot of melted butter floating around, tilted it and drained it off using a kitchen towel. but otherwise it turned out great and it was lovely, i'm surely going to make it again but with a lot less butter. did u have such a prob? — di

    Reply
  87. Anjali

    November 29, 2010 at 5:04 pm

    I haven't baked bread for a while now. Can't wait to try these, bookmarked. Thanks Nags and Suhaina!

    Reply
  88. Miri

    November 29, 2010 at 4:16 pm

    looks great!! the golden colour makes it look like they are fried rolls!

    Reply
  89. Aladdin's Cave keepster

    November 29, 2010 at 3:29 pm

    Will defenately have a go with these little babies!!!!

    Reply
  90. Manasi

    November 29, 2010 at 3:14 pm

    I have, very recently, overcome my phobia of yeast and hv successfully been making bread at home. Will try these too!

    Reply
  91. Happy Cook

    November 29, 2010 at 2:44 pm

    Looks so so DELICIOUS. And that filling, i can imagine the aroma when you baked these. Super yumm.

    Reply
  92. jeyashrisuresh

    November 29, 2010 at 2:08 pm

    that turned out very perfect nags,Beautiful clicks

    Reply
  93. naama peled

    November 29, 2010 at 9:14 pm

    Looks fantastic!

    Reply
  94. Anonymous

    November 29, 2010 at 11:55 am

    lovely! Looks like I have another item to bake and try other than cakes in my convection MW oven! Btw, I also noticed that pyrex glass needs more baking time (in my convection MW) for cakes. I guess I can generalize it now that for baking in glassware, it takes longer than metalware? Would love to substitute with wheat..Shreya

    Reply
  95. Medifast Coupons

    November 29, 2010 at 7:10 pm

    I can see these garlic pull-apart rolls becoming a fast family favorite.

    Reply
  96. Akila

    November 29, 2010 at 10:12 am

    so lovely garlic rolls, and love the presentation….

    Reply
  97. The Scatterbrain

    November 29, 2010 at 9:57 am

    Hi! This looks like an easy enough recipe to try. I tried baking some piroshky the other day. I had to make 3 batches of yeast to get one that worked!

    Are you telling me this recipe doesn't call for diluting yeast in lukewarm sugar water?

    Reply
  98. Priya

    November 29, 2010 at 8:11 am

    Wat a tempting, flavourful and yummy garlic rolls..

    Reply
  99. Anukampa

    November 29, 2010 at 8:04 am

    wow..rolls look so soft and yummy,great explanation. Appreciate your efforts in explaining this to fine details. Great clicks.

    Reply
  100. Vandana Rajesh

    November 29, 2010 at 7:56 am

    yummy rolls…this looks so good…bookmarked!!

    Reply
  101. Sanjeeta kk

    November 29, 2010 at 7:12 am

    Love the garlicky flavor in this wonderful rolls. Would surely try it out this week end. Lovely clicks.(I think the 4th word in the starting sentence is eying or eyeing, can edit and remove this line from the comment:)
    Take care.

    Reply
  102. Bharathy

    November 29, 2010 at 6:29 am

    Nice recipe!..I tried it yesterday but dint get them good! 🙁 may becose of the quality of the yeast..should try again.
    came in running here to see the pics.
    Nice macro clicks!:)

    Reply
  103. sangeeta

    November 29, 2010 at 5:19 am

    I love these rolls n make them with whole wheat . Love using pesto and beetroot stuffings too for these . I call them happy rolls.
    your pics are great as always…

    Reply
  104. Prathibha

    November 29, 2010 at 4:45 am

    I have also posted them recently..ha ha..they look yummm..

    Reply
  105. indianspicemagic

    November 29, 2010 at 4:41 am

    Wow. Lovely pictures and tempting rolls.

    Reply
  106. Divya Kudua

    November 29, 2010 at 4:31 am

    I saw your message on facebook and immediately hopped over to Suhaina's blog and made them soon after.I usually am apprehensive when it comes to baking with yeast,but the recipe was so simple that I had to give it a try.The aroma coming out of the oven was so good and we almost burned our tongues trying to eat the hot rolls.Perfect,that's what this is.

    The pics are too good Nags,makes the recipe even more tempting!!

    Reply
  107. Sowmya

    November 29, 2010 at 4:16 am

    A great appetizer that will be an instant party hit!

    Reply
  108. Arch

    November 29, 2010 at 3:42 am

    Super looking rolls…been meaning to try Purple foodie's pesto rolls, but only gotten as far as drooling over them every time I visit her blog…these look lovely…

    Reply
  109. Mahimaa's kitchen

    November 29, 2010 at 2:10 am

    looks yummy and soft. feel like having some.

    Reply
  110. Radhika @foodfor7stages

    November 29, 2010 at 2:04 am

    Love to see the Nikon working.. Alluring pics and so is the rolls.

    Reply
  111. Nags

    November 29, 2010 at 10:03 am

    yes i am telling you exactly that! mix, proof, bake and go nuts 😀

    Reply
  112. Suhaina

    November 29, 2010 at 1:56 am

    wow…they sure look very tempting and they have come out so perfect..wonderful clicks too..

    Reply
  113. Nags

    November 29, 2010 at 7:21 am

    Edited! Thanks Sanjeeta 🙂

    Reply
  114. RAKS KITCHEN

    November 29, 2010 at 2:32 am

    Wonderfully done and clicked! Yummy and flavorful…

    Reply
  115. Sharmilee! :)

    November 29, 2010 at 1:38 am

    I was so tempted to try this out after seeing in Prathys space and now urs tempt me somuch…sure gona try it weekend

    Reply

Leave a Reply Cancel reply

Your email address will not be published. Required fields are marked *

Recipe rating ★☆ ★☆ ★☆ ★☆ ★☆

This site uses Akismet to reduce spam. Learn how your comment data is processed.

Primary Sidebar

Hello!

I am Nags, the face behind Edible Garden, a food and recipes website for the busy (and sometimes lazy!) cook since 2007. My recipes are meant to be quick yet healthy and delicious - Nothing fancy, nothing too difficult. Follow Me On Instagram for real-time food and life updates.

ADS

logo
Food Advertising by

Popular Recipes

Instant Oats Idli Recipe with Rava, Step by Step
Kerala plum cake recipe
Butter Chicken Recipe, Indian Butter Chicken Masala Recipe
dosa recipe-how to make dosa
pressure cooker eggless sponge cake recipe (no oven cake)
vegetable pulao recipe
Eggless No-Bake Mango Cheesecake Recipe Step by Step
garlic pull-apart rolls recipe, eggless
paneer butter masala recipe restaurant style

Browse Older Recipes

Translate

Copyright © 2022