
Then I actually tasted a macaron. That cost me 2.5 SGD a piece. And I said to myself, ok this is a challenge I need to take up. It can't be that hard, right? The idea went round and round in my mind for many months and finally, when I couldn't even grant myself the no-Kitchenaid excuse, I caved in and bought some almond meal. Before I knew it, egg whites were aging in the fridge and I was getting emotional support from some awesome people all over Facebook. There was no turning back.
There are tons of resources online for making macarons. Like experts would tell you, its not only about the recipe (although that definitely matters too), its more about the technique and the science behind it. My notes below combine the wisdom of all the sites and videos I referred. Hopefully you find it useful.
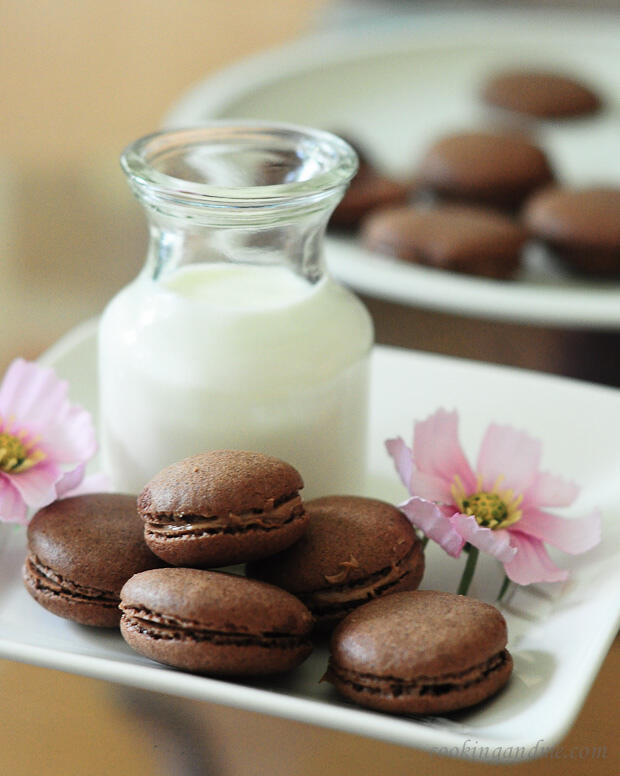
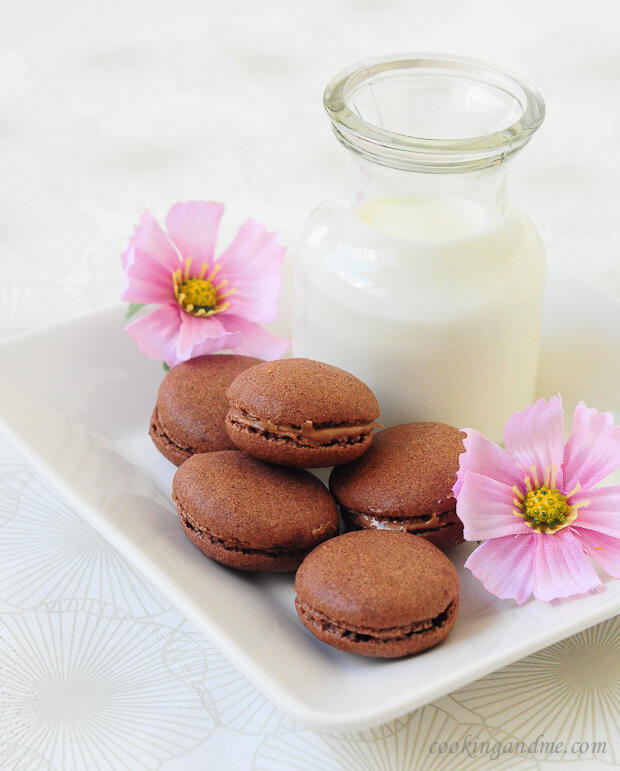
Chocolate Macarons Recipe
Adapted from David Lebovitz
Makes about 15-18 filled macarons
For Macaron Batter
1 cup (100 gm) powdered sugar
½ cup powdered almonds (about 2 ounces, 50gm)
3 tablespoons (25 gm) unsweetened cocoa powder
2 large egg whites, at room temperature
5 tablespoons (65 gm) granulated sugar
½ teaspoon vanilla essence
For Filling:
I used store-bought hazelnut spread to fill my chocolate macarons because I didn't want to stress over making the filling too, but go ahead and Google up some macaron filling recipes, I am sure there are tons out there, some interesting flavour combinations too.
Tools and Equipment:
- Piping bag with ½" or 2cm plain tip (I used a large ziplock bag and cut out a small corner). I was a piping virgin and this was my first attempt at it, although I must say that I have done a lot of henna designing and fabric painting back in the day.
- Egg separator (slightly optional, read notes below)
- Electric beater
- Silicon or wooden spatula
- Large, dry steel mixing bowl
- Baking sheet/parchment paper
A few notes on the ingredients:
- almost all websites I saw recommend aging the egg whites. If you live in a cold place, leave it out on your kitchen counter for a day or two. If you live in a warm place, let them age in the refrigerator, just remember to take them out and bring them to room temperature before proceeding. Some sites said microwaving the egg whites for 20 seconds in medium-high will do the trick but that idea freaked me out so I took the safe way out and aged them the old-fashioned way.
- use an egg separator to separate the yolks and whites. I know some people are experts at using their fingertips to do a juggling act with the egg to remove the whites from yolks, but this will add moisture to the egg whites and we don't want that. Make sure that all equipment you use is completely dry and this includes the egg separator, the bowl you are transferring the whites to, and even your hands.
- although many seem to prefer blanching their almonds and powdering it to make their own almond meal, I would highly recommend beginners to buy almond meal. Buy the finest you can find or atleast slivers if you can't find ground ones. That makes the process much easier and less prone to failure.
- although coloured macarons are definitely more fun, there are recommendations around what sort of food colour you should buy (powdered or gel colours vs oil-based or water-based ones, etc). I found the entire decision on what colour and what type too stressful so I took the easy way out and made chocolate macarons. I would recommend this highly for beginners.
Method:
1. Preheat oven to 300º F (150º C). This was the optimum temperature for my oven but I suspect the actuals were much higher. Don't take it up beyond 180 C though.
2. Line a baking sheets with parchment paper or Silpat and have a pastry bag with a plain tip about ½-inch, 2 cm ready. (Or take the ziplock route I took)
3. Grind together the powdered sugar with the almond powder and cocoa so there are no lumps. You can use your blender, food processor or mixie, just make sure that you don't grind the almonds to a pulp. Its important that you process these three together and not just the almonds.
4. In the bowl of an electric mixer, beat the egg whites until they begin to foam. At this stage, add the granulated sugar and continue beating until very stiff and firm. When you invert the bowl, the egg whites to stay put. That's how you know when to stop. It took me about 2-3 mins to get there.
5. Carefully fold the dry ingredients, in 5 batches, into the beaten egg whites with a flexible rubber spatula (ideally). Also add the vanilla essence at this stage. When the mixture is just smooth and there are no streaks of egg white, stop folding (it helps to set a limit, like no more than 50 strokes to incorporate the dry mixture into the egg whites) and scrape the batter into the pastry bag (standing the bag in a tall glass helps if you’re alone).
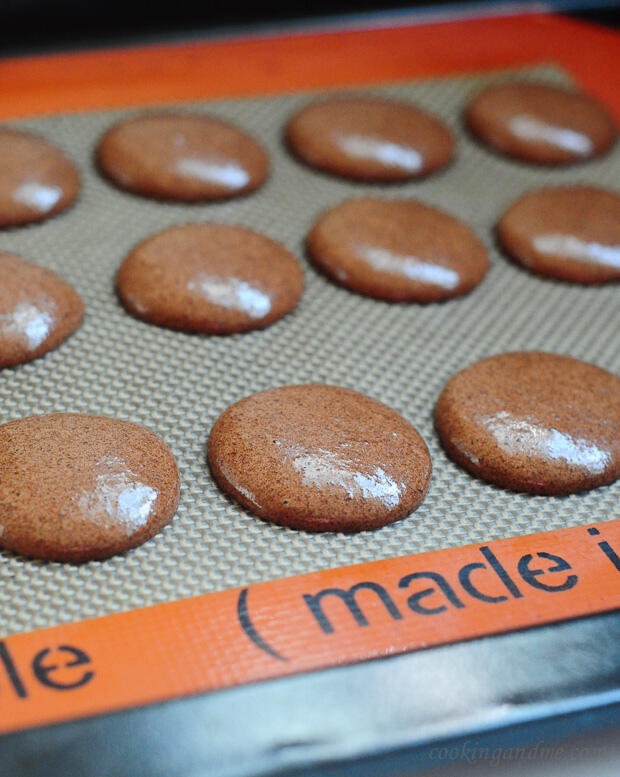
6. Pipe the batter on the parchment-lined baking sheets in 1-inch (3 cm) circles (about 1 tablespoon each of batter), evenly spaced one-inch (3 cm) apart.
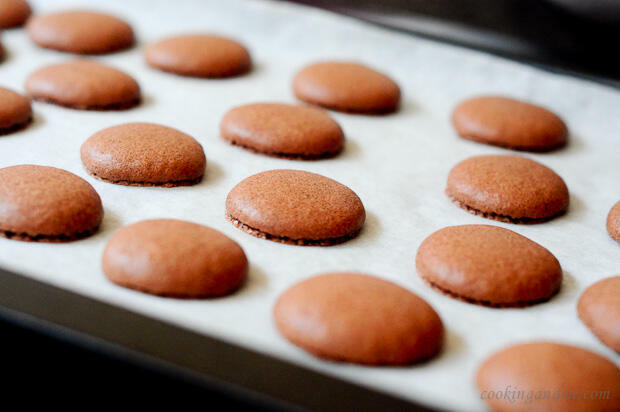
7. Rap the baking sheet a few times firmly on the counter top to flatten the macarons, then leave them alone for atleast an hour and up to a maximum of 3 hours. This is so that the top dries up and you get a smooth surface for the macarons but leaving them out too much will give you crunchy macarons and you don't want that. This step is important and if you skip it, you get non-macarons like in the picture below. Bake for 15-18 mins and let cool completely before removing from baking sheet.
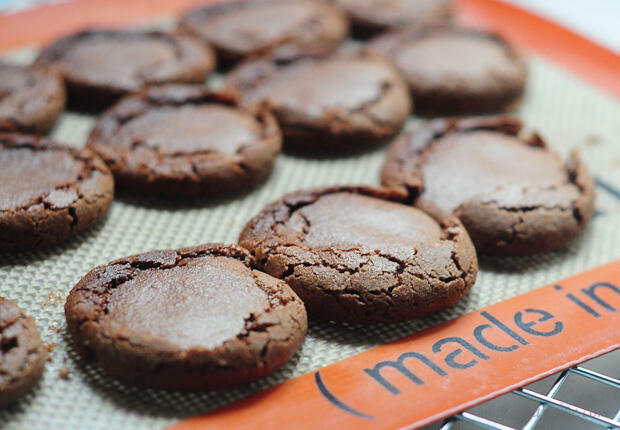
Above: I didn't let the piped macarons rest before baking.
Below: I let them rest for an hour and they turned out perfect.
Important Note:
If your macarons crack on top, there are two possible reasons for this - first, the batter is too runny in which case one can do nothing except start again. Second, the tops are not dried out enough. I crossed my fingers and let the macarons sit out before baking and that did the trick.
Confession: I had never piped anything before I baked these macarons. Actually, my very first attempt can be seen on these cupcakes and it looked so dreadful that I stopped after one cupcake
Go ahead, take the plunge. It will be worth it 🙂

Prolaap
uuuffff!!!! Am salivating! macaroonssssss!!!! making them at home??? the thought in itself is so scary...:(
Poornima Porchelvan
Very professional and perfectly made macroons.
Anonymous
Ive never made macarons before but I want to try. Yours look great! I was reading through the recipe.. you have vanilla essence in the ingredients list but where does it come in to the method...?
Nagalakshmi V
Sorry about that! I've updated the post.
Rashida Shaikh
They look so good and I always get fascinated to see them. Your article is so helpful and I'm so glad and thankful to you…
Anonymous
Think I should have read this before making my macarons. Mine have just come out cracked, quite hollow and what is inside is very wet and sticky. So looks like I didn't leave them for long enough before baking them and prob didn't bake them for long enough. Oh well, better next time (fingers crossed) 🙂
Mittu
Nags! These look absolutely perfect. Are you sure its your first attempt 😉 ? I've heard all kinds of horror stories abt first macarons! Well These look so perfect I am going to make them very soon.