
Aloo paratha recipe: A flat, filled Indian bread or paratha that is served for breakfast or as a street food in India during all times of the day. Over many years of trying to make aloo paratha at home, I’d like to believe that I have perfected my technique to dish out a very decent aloo paratha recipe, especially for a South Indian!

Potatoes have the property to inherently make aloo parathas soft so that makes our job that much easier. Although I struggled to make the perfect aloo parathas when I started cooking, I realised with practise it’s really a piece of cake paratha!
For more paratha recipes, check out gobi paratha, tawa nan, paneer paratha, and methi thepla recipe.
Aloo Paratha Recipe
Ingredients
For the Dough
- 2 cups atta / whole wheat flour
- Just over 1/2 cup water
- 1 tsp salt or to taste
- A few drops of oil
For Potato Filling
- 2 medium sized potatoes
- 1 tsp red chilli powder
- 1/2 tsp jeera / cumin powder
- 1/4 tsp ajwain / omam / carom seeds
- 1/2 tsp chaat masala or garam masala
- 1/2 tsp salt
- A handful of coriander leaves chopped fine
Instructions
To prepare paratha dough:
- Mix the atta and salt well together. Add a few drops of oil and mix with fingertips.
- Add water little at a time and keep kneading into a soft dough.
- Knead for 3-4 mins and coat with some more oil (don't overdo the oil bit, very few drops will do). Set aside while making the filling.
- To prepare aloo paratha filling:
- Boil and grate the potatoes. I used to mash them but that leaves small lumps here and there making it harder to roll out the aloo parathas smoothly. Grating is a better method to ensure a smooth filling.
- Mix all ingredients for the filling together, making sure they are well incorporated.
- The spices you add to the filling also make a large difference to the taste of your aloo parathas. There are tons of different versions here.
- Divide the dough into 8 equal parts and roll into smooth balls. Do the same with the filling. I like to make the size of the filling slightly smaller than the dough balls but you can make them into equal sizes if you wish.
- Flour the surface you are going to use to roll the parathas.
- Take one dough ball, place it on the floured surface and flatten with fingertips into a small round. I find that doing this with my fingertips makes it easier to get the surface equally thick than rolling with a rolling pin.
- Place a ball of potato filling in the centre of the flattened dough ball.
- Gather the dough ball around the filling, sealing it gently on top.
- Make it into a momo-like ball, making sure that the dough covers the filling ball completely.
- You can pinch off the extra bit of dough on top. I sometimes just flatten it against the top and continue.
- Again, using your fingertips, gently press the filled dough ball into a small circle, making sure the thickness is equal on all sides.
- Then use your rolling pin to flatten it out to as thick or thin as you want. I keep it slightly thicker than chapatis.
- Transfer rolled paratha to a hot griddle. Make sure you tap out the excess flour used in rolling.
- Cook until both sides are golden brown.
- When done, brush with some ghee / butter or oil and transfer to a plate.
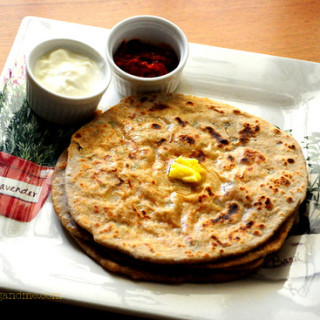
- Serve aloo paratha hot with a pat of butter on top, some curd and pickles.
Step by Step Aloo Paratha Recipe:
1. Make the dough first. (I use my Kitchenaid now for making chapati dough and its a breeze, will share details in a later post). Mix the atta and salt well together. Add a few drops of oil and mix with fingertips. Add water little at a time and keep kneading into a soft dough. Knead for 3-4 mins and coat with some more oil (don’t overdo the oil bit, very few drops will do). Set aside while making the filling.


3. Mix all ingredients for the filling together, making sure they are well incorporated.
The spices you add to the filling also make a large difference to the taste of your aloo parathas. There are tons of different versions here. Since I visited TH’s aunt in Mumbai and watched her Marathi maid make aloo parathas (in awe, I must add!), I use her recipe for the aloo filling.

4. Divide the dough into 8 equal parts and roll into smooth balls. Do the same with the filling. I like to make the size of the filling slightly smaller than the dough balls but you can make them into equal sizes if you wish.

5. Flour the surface you are going to use to roll the parathas. Take one dough ball, place it on the floured surface and flatten with fingertips into a small round. I find that doing this with my fingertips makes it easier to get the surface equally thick than rolling with a rolling pin.

6. Place a filling ball in the centre of the flattened dough ball.

7. Gather the dough ball around the filling, sealing it gently on top.

8. Make it into a momo-like ball, making sure that the dough covers the filling ball completely.

9. You can pinch off the extra bit of dough on top. I sometimes just flatten it against the top and continue.

10. Again, using your fingertips, gently press the filled dough ball into a small circle, making sure the thickness is equal on all sides.
In case you are wondering, there was no tripod used in any of the pics. I clicked with my left hand. The things food blogging teaches you – mind-boggling!

11. Then use your rolling pin to flatten it out to as thick or thin as you want. I keep it slightly thicker than chapatis. And before you ask, I still can’t make a perfectly round chapati / paratha, so help me God. Oh, you weren’t going to ask..
Ok moving on.

12. Transfer rolled paratha to a hot griddle. Make sure you tap out the excess flour used in rolling. I didn’t take enough for this paratha so ignore the excessive white patches.

13. Cook until both sides are golden brown. When done, brush with some ghee / butter or oil and transfer to a plate. I use my olive oil spray while making chapatis / parathas. You can spray on the oil at the end and it creates zero mess. Of course if you want to use ghee, then the mess doesn’t matter, only the flavour does!

That’s it! Serve aloo paratha hot with a pat of butter on top, some curd and pickles.
For aloo paratha recipe in Hindi, Tamil, Telugu, Kannada, Urdu etc please use the Google translate button in the sidebar.
Excellent way you described everything. It really helped me to make my own. What is a Punjabi aloo paratha and what else I need to make it? Looking forward for more recipes.
Hi. I have a query. My stuffing has become bit thin instead of being thick like that of batata wada types. While rolling the stuffing comes out. Can you tell how do I correct the stuffing so that it does not get waste.
you need to make sure your potato is not very moist. that’s key to getting a good filling
Another hit recipe, Nags ! The husband who thinks is an authority on Alu Parathas gave it a 5/5. Even with using Whole Foods unbleached organic flour, the parathas came out soft and fluffy !
Thank you Nags for the lovely pictures and the detailed step-wise recipe. Your parathas and the pictures are so perfect! I am always scared to try this because it oozes out while rolling and gets sticky 🙁 such a deterrent. But I am going to try this very soon. I love all your posts. I like your style of writing and your pictures. Keep up the great work Nags.
Don't worry about that 🙂 when you are just learning how to make aloo paratha, it tends to get a bit messy around the edges and oozes out. once you have learnt how to make the perfect and easy aloo paratha, it will look super professional, i promise. just needs some practise.
Tried them, kinda ma first attempt at cooking and it oozed out 🙁 Great recipe and great pics tho 😉