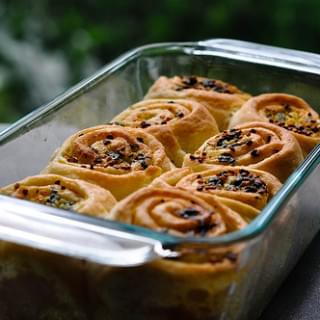
Garlic Pull-Apart Rolls Recipe - Step by Step
I had been eyeing this recipe of Suhaina's for a long time. When she brought them for our Singapore food bloggers' meet, I was totally sold. Finally managed to make them this weekend. I would highly recommend this to all those who are dying to bake but fear the yeast monster. Trust me when I say this is really fool-proof and you can feel so proud of yourself when done!
I halved the recipe and got 8 mini rolls, enough to serve 2 very generously. We had one here and one there, through the weekend.
Garlic Pull-Apart Rolls
Recipe source: Suhaina
Makes 8 mini rolls
Ingredients:
Plain Flour - 1.5 cups
Warm Water- 1/2 cup + 1 tbsp
Yeast - 1/2 tbsp
Salt - 1tsp
Sugar - 1 tbsp
Olive Oil - 1 tbsp + 1 tsp
For Garlic Spread:
Salted butter, at room temperature - 6 tbsp
Minced garlic - 2 tbsp
Chopped coriander leaves - 2 tbsp
How I Made It:
1. Mix flour, yeast, warm water, salt and sugar together until you get a smooth, slightly stick dough.

2. Add oil to your fingertips and knead until the dough springs back when you press with your fingers - about 4-5 mins.

3. Wrap in cling film and allow to double by keeping in a warm place for about 45 mins. 
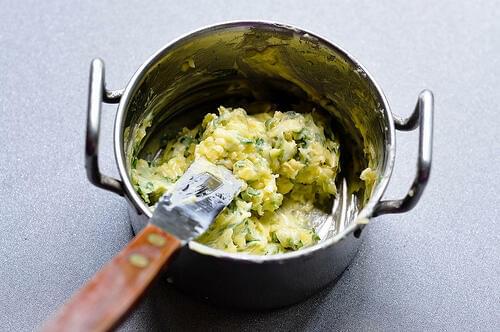
Meanwhile, make the garlic spread by simpy mixing all the ingredients.

4. Grease a baking pan or loaf tin with olive oil. I used my Pyrex loaf pan which was the perfect size for 8 mini garlic rolls.
5. Knock down the air in the dough and divide the dough into two equal portions.

6. Transfer one portion of the dough to a floured surface and roll gently into a rough rectangle of 1/2" thickness. Apply more flour sparingly if sticky.
7. Spread about 2 tbsp of garlic spread on one side.

8. Roll from one end gently and firmly.

9. Cut into half and then each half again into two halves to get 4 equal portions.

10. Now place the rolls with the cut side up in the greased pan.
Repeat the same procedure for the remaining dough.
11. Spread a little milk on the rolls and add the remaining garlic spread on top. I am sure sesame seeds as Suhaina has added will make the flavour even better but I didn't have any.

12. Allow to rise for another 20 minutes. In the mean time preheat the oven to 180C / 375F.
13. Bake for about 30 mins until the top is golden brown. My Pyrex glass pan usually takes longer to bake in, so mine took about 35 mins to bake just right.

These are really really soft and have an amazing flavour. Serve fresh and hot!

Suhaina's Notes:
1. The amount of water depends on the type of flour you are using. Use your judgment to get a slightly sticky dough that behaves when you apply oil.
2. The amount of yeast can be reduced if you don't like the flavour of yeast too much in your breads. You can add just 1 tsp and let it double over a couple of hours, slowly.


I was so tempted to try this out after seeing in Prathys space and now urs tempt me somuch...sure gona try it weekend
ReplyDeletewow...they sure look very tempting and they have come out so perfect..wonderful clicks too..
ReplyDeleteLove to see the Nikon working.. Alluring pics and so is the rolls.
ReplyDeletelooks yummy and soft. feel like having some.
ReplyDeleteWonderfully done and clicked! Yummy and flavorful...
ReplyDeleteSuper looking rolls...been meaning to try Purple foodie's pesto rolls, but only gotten as far as drooling over them every time I visit her blog...these look lovely...
ReplyDeleteA great appetizer that will be an instant party hit!
ReplyDeleteI saw your message on facebook and immediately hopped over to Suhaina's blog and made them soon after.I usually am apprehensive when it comes to baking with yeast,but the recipe was so simple that I had to give it a try.The aroma coming out of the oven was so good and we almost burned our tongues trying to eat the hot rolls.Perfect,that's what this is.
ReplyDeleteThe pics are too good Nags,makes the recipe even more tempting!!
Wow. Lovely pictures and tempting rolls.
ReplyDeleteI have also posted them recently..ha ha..they look yummm..
ReplyDeleteI love these rolls n make them with whole wheat . Love using pesto and beetroot stuffings too for these . I call them happy rolls.
ReplyDeleteyour pics are great as always...
Nice recipe!..I tried it yesterday but dint get them good! :( may becose of the quality of the yeast..should try again.
ReplyDeletecame in running here to see the pics.
Nice macro clicks!:)
Love the garlicky flavor in this wonderful rolls. Would surely try it out this week end. Lovely clicks.(I think the 4th word in the starting sentence is eying or eyeing, can edit and remove this line from the comment:)
ReplyDeleteTake care.
Edited! Thanks Sanjeeta :)
ReplyDeleteyummy rolls...this looks so good...bookmarked!!
ReplyDeletewow..rolls look so soft and yummy,great explanation. Appreciate your efforts in explaining this to fine details. Great clicks.
ReplyDeleteWat a tempting, flavourful and yummy garlic rolls..
ReplyDeleteHi! This looks like an easy enough recipe to try. I tried baking some piroshky the other day. I had to make 3 batches of yeast to get one that worked!
ReplyDeleteAre you telling me this recipe doesn't call for diluting yeast in lukewarm sugar water?
yes i am telling you exactly that! mix, proof, bake and go nuts :D
ReplyDeleteso lovely garlic rolls, and love the presentation....
ReplyDeletelovely! Looks like I have another item to bake and try other than cakes in my convection MW oven! Btw, I also noticed that pyrex glass needs more baking time (in my convection MW) for cakes. I guess I can generalize it now that for baking in glassware, it takes longer than metalware? Would love to substitute with wheat..Shreya
ReplyDeletethat turned out very perfect nags,Beautiful clicks
ReplyDeleteLooks so so DELICIOUS. And that filling, i can imagine the aroma when you baked these. Super yumm.
ReplyDeleteI have, very recently, overcome my phobia of yeast and hv successfully been making bread at home. Will try these too!
ReplyDeleteWill defenately have a go with these little babies!!!!
ReplyDeletelooks great!! the golden colour makes it look like they are fried rolls!
ReplyDeleteI haven't baked bread for a while now. Can't wait to try these, bookmarked. Thanks Nags and Suhaina!
ReplyDeletelovely snaps, n thank your once again for sharing another simply yet gorgeous recipie. i m a regular at ur blog now, n i have tried n commented on quiet a few. i tried this one today, and they turned out really soft and yummm. the only problem i had was that my 6tbsps of butter seemed quiet a lot. since i doubted it, i pulled out the bun tray midway and found a lot of melted butter floating around, tilted it and drained it off using a kitchen towel. but otherwise it turned out great and it was lovely, i'm surely going to make it again but with a lot less butter. did u have such a prob? -- di
ReplyDeletelooks amazing..
ReplyDeleteBookmarked!
I can see these garlic pull-apart rolls becoming a fast family favorite.
ReplyDeletelooks fabulous ...want one of those :)
ReplyDeletedelicious bread looks fabulous
ReplyDeleteLooks fantastic!
ReplyDeleteSuch a wonderful Garlic Rolls recipe..Looks delicious..
ReplyDeleteGayu
http://ensamayalarangam.blogspot.com
hiii
ReplyDeletethese look sooooo amazing... any idea if we can make them in microwave??
help pls...
shalini
yes sure. bake it in convection mode and adjust baking time accordingly. just watch out and take out when the garlic rolls become nicely browned on top.
ReplyDeleteGosh Nags!! I've come back at least 3 times just to look at the pictures ! I've copied the recipe into my recipe diary and I've bought 3 diff brands of yeast available in the shops so that when i do get down to baking, i won't have the same problem as last time. And Ive signed myself up to bring garlic rolls for a potluck this weekend!!
ReplyDeleteyou really have me hooked with this one!
Now... the big task is finding some time after my lil one goes to bed to begin baking!
Lovely looking rolls :) ....Please could you tell me if it was Instant or Active dry yeast that you used?
ReplyDeleteRolls look awesome... Would grab one from ur blog, if I could
ReplyDeleteMind-blowing dear, I am drooling all over here. As you made it using a source and posted on tuesday, please feel free to link it to Aipi and mine "Bookmarked Recipe - Every Tuesday" event :)
ReplyDeleteYum! Two of my family's favorite things: garlic and cilantro! These look just like savory cinnamon rolls.
ReplyDeleteI used instant yeast for the garlic rolls recipe. it was a new pack so very fresh :)
ReplyDeleteScatterbrain, you never fail to crack me up! Good luck and let me know how they turned out!
I made these rolls yesterday to go along with tomato soup...yummy!!!
ReplyDeleteI made them.... woo hoo!! I made them last night!! I had my best friend and her baby over, and she babysat while I mixed the dough, trying hard not to drool right into it. I made really tiny rolls and baked it all together in my biggest cake pan and it came out WONDERFUL!!! The entire batch got over in one shot! Even the babies loved it!
ReplyDeleteNow i have something to carry for my Principal's potluck and something to impress guests with!
Thank you nags, you deserve a huuuuge hug!
yayyy!! i am so glad :D
ReplyDeleteHave you heard about pulling someones heart apart in all directions after dusting it with flour and baking it in an oven?
ReplyDeleteWell, you just did.
My heart is fragile now.
hahaha :D sending some garlic rolls with love spread in between for just you!
ReplyDeleteI am trying to follow a healthy diet and I was wondering how to go ahead with it and what should I eat. But thanks to your article, now I know which kind of diet is most effective and efficient for me and for my husband.
ReplyDeleteJust what I've been looking for LONG! Bookmarked to make asap! happy Holidays Nags!
ReplyDeleteOh yumm!! Love garlic and butter in bread, freshly baked, these will be heaven!
ReplyDeleteI just made these tonight! They were fabulous and it was the perfect amount for one meal (4 people). Thank you so much for posting!
ReplyDeleteAlso if anyone is having issues getting their dough to rise, try adding the yeast to the warm water and stirring it gently. Let it sit for a minute then add it to the dry ingredients.
Thanks for leaving the tip Alex! So glad the garlic pull apart rolls recipe worked for you :)
ReplyDeleteAwesomee!!! thnx alot for da recipe nd pics...
ReplyDeleteTried thm today n came out perfect. Was verry happy...
so glad the garlic rolls recipe worked for you :)
ReplyDeleteThis recipe turned out to be awesome.. Did a slight modification, added chilli flakes.. as always, you rock :) - Prathap
ReplyDeleteThank you so much for trying the garlic rolls Prathap. Super glad you liked the recipe :)
ReplyDeleteWow nags,
ReplyDeleteYou are really tempting me to make this one over the weekend..I saw the little balti with all the niceness n it and I was totally sold!
Shobha
Hope you try the recipe Shobha. IT comes out really nice :)
ReplyDeleteGREAT!!! AWESOME!!!
ReplyDeleteHi i tried ur garlic rolls today and it was mouth watering and superb. i really wanted to take a snap of it and send u but all the rolls got vanished in a fraction of second. every one loved it. every one appreciated me, but all the credits goes only to you . thanks a lot for posting such a delicious one. one thing that annoyed was the oil accumulation at the base the rolls and made it too oily. what mistake would i have made? at wat stage of the dough should i add oil?
ReplyDeleteADIOS
ROLLS ROCKS!!!1
The oil should be coated with the dough once you knead it up. Not sure how it pooled at the bottom. Did you mix it in at the right time?
ReplyDeleteya i did added at the right time. i don no wat went wrong. thanks for replying nags.
ReplyDeleteLooks so Tempting !!!
ReplyDeleteHi Nags,
ReplyDeleteI tried this recipe this weekend. I had all the ingredients required... including "dying to bake but fear the yeast monster".
The rolls turned out very well.
The only thing that probably went wrong was that I didnt roll the dough firmly I guess. The butter from the stuffing was seen bubbling when the rolls were baking. Not sure if I didnt roll firmly enough or the dough was soft. But I did notice that in the end the butter got soaked up in the bread. Is that how it is supposed to be?
Sorry for the long comment. Please feel free not to publish, but please do reply to my query.
-Priya
i have heard this feedback from others too, that the butter pools at the bottom. i didn't have that problem so not sure what's causing it. maybe you are adding too much butter?
ReplyDeleteHi Nags,
ReplyDeleteI wanted to let you know that I tried the rolls again this weekend with lesser amount of butter and they turned out perfect! No butter bubbling at the bottom. So, Yay to u and ur advice! :)
-Priya
awesome! :)
ReplyDeleteIn your recipe you used Plain flour. Is that the flour normally used for making cakes ( i dont mean self raising flour)
ReplyDeleteyes i used regular flour for these rolls
ReplyDeletehi...am very new to baking! also very scared of those involving yeast! but since this looked very easy, i went ahead and tried! it turned out to be a tragedy of errors!
ReplyDeletethere were lots of difficulties i faced:
1.the yeast did not dissolve in the dough..as it looked stony in the dough...
2.even though i kept for 2 hrs there was no proving..as in it did not double..
3.the butter came to bottom...
4.the top was very crispy
5.the inner part of the roll was not like bun/bread-like!
hope u will help me findin my mistake!
btw i love your site!! good job!
hey there, if the yeast doesn't dissolve you need to stop right there before proceeding and fix it :) buy a different brand, heat the water a bit more, whatever it takes.
ReplyDeleteHi, I tried this twice yesterday, and it came out really well. The first time, the dough didnt rize as much, but it still came out ok. The second time,i perfected it. Both batches were finished off in minutes. This is a great recipe, and I am really proud of myself for baking bread for the first time. Thanks for this. Small note: I used half the qty of butter you mentioned and it still came out well. :-)
ReplyDeletehello...
ReplyDeletedo we have to knead the dough for 5 to 10 mins untill it is more elastic?or just mixing all the dough ingredients is enough to make just a smooth dough.
thanks,
Neha.
hello...
ReplyDeletedo we have to knead the dough for 5 to 10 mins until it is more elastic or just mixing all the dough ingredients and making into smooth dough is enough?
Mix well and knead for about 5 mins. No need to exert too much energy :)
Deletei get only dry active yeast, how much of that should i use?
ReplyDeletei am not sure, haven't tried with it. maybe half or 3/4 of the amount mentioned here?
Delete