
 Spiral cookies or pinwheel cookies – I have been eyeing this recipe for spiral cookies for a while now. They are so pretty and look so homely and nice right? That’s what actually got me started on this quite messy yet great decision to try them myself.
Disclaimer: I am not very artistic. I believe artistic people can make food look nicer and this is especially true for desserts and some bakes.
That really didn’t discourage me though. I have step-by-step pictures and although my cookies didn’t turn out as smooth and spirally as SJ’s, they still wow-ed a lot of a people and tasted great.
Other cookie recipes you may like – chocolate melting moments, microwave chocolate chip cookie, banana oatmeal cookies.
We need to prepare 2 batches of dough and since each require 1/2 an egg yolk, let’s get that out of the way.
Step by step pictures:
 Lightly beat an egg yolk and set aside. We will later halve this.
 Melt (or bring to room temperature) 1/2 cup unsalted butter and add 1/2 cup sugar to that. Beat until well combined.

Add 4 drops of vanilla essence to this along with a pinch of salt. Mix well. Now add half the beaten egg yolk and 1.5 cups of all-purpose flour.
 Mix well to form a soft dough like so. Don’t knead, just incorporate with fingers and bring together.
 For the chocolate dough, do the same with the butter and sugar, but omit the vanilla and add 1/4 cup unsweetened cocoa powder. Mix well.
 To this, add 1 and 1/4 cups all-purpose flour. If you find the dough too soft, you can add a couple of spoons of flour. I didn’t have to add extra though.
 Again, combine well with fingers to form a soft dough. No need to knead. Heh.
Now, refrigerate both doughs for 30 mins. Take out your book and read while you wait. If you are impatient like me, go take a nap and you won’t feel the time pass.

After 30 mins, take out the chilled dough, transfer to a floured surface and roll out as above. This is not going to be the easiest thing to do. I later heard that if you do the rolling between plastic sheets or butter paper, it makes things very easy. Do try that because in this method, there were a lot of broken pieces that I had to patch in later.
 Gently transfer the chocolate layer and place it over the vanilla layer. I used a spatula – say hi to my fave steel spatula.
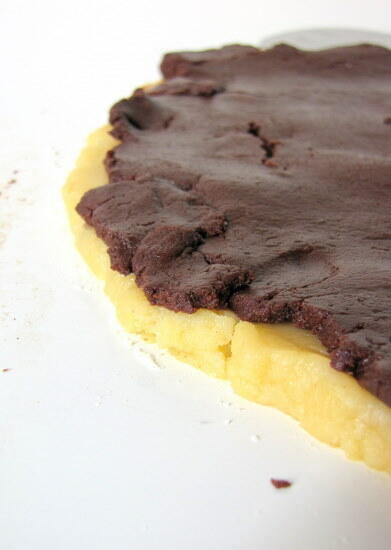 I know this doesn’t look perfect. That’s ok. Trust me on this and let’s carry on.
 Now, roll the flour from the short end, gently, covering up as many split areas as you can. Its ok even if the layers are not ultra-smooth and imperfect. Like I said, wait for the end-result and you’ll see.
SJ mentions refrigerating at this point but I was super-charged after my nap so I ignored that.
 Cut gently into 1/2″ discs. Look at that!
 Are they pretty or what?! I didn’t use a sharp enough knife which is why the biscuit sides are not as smooth as I’d have liked them to be. Anyway, lesson learned.
 Here’s another look. I couldn’t get over how pretty they looked. It was almost like when I saw the Taj Mahal for the first time. Almost.
Note the huge hole on the top of my dough log? It doesn’t matter if you get a similar one. Keep cutting and ignore that. Everything will turn out fine.
 Bake in a pre-heated oven at 350F/180C for 15 mins until the white part of the cookies turn a light golden brown.
Now that you ask, I have no clue how’d I find out if this cookie is done if it were all chocolate. I guess I’d go by the smell and time on original recipe as I did for my chocolate melting moments.
Here’s the recipe again, all in one place.
Recipe for Spiral CookiesMakes: 28 cookies (approx.)
Ingredients:
For the Vanilla Dough:
1/2 cup unsalted butter (at room temperature)
1/2 cup sugar
1/2 egg yolk, beaten
4 drops of vanilla essence
A pinch of salt
For the Chocolate Dough:
1 1/4 cups all purpose flour
1/2 cup unsalted butter (at room temperature)
1/2 cup sugar
1/2 egg yolk, beaten
1/4 cup unsweetened cocoa powder
Instructions:<
1. Start with the vanilla dough. Beat the until and sugar until well incorporated. Add the egg yolk, salt and vanilla essence to this. Mix again.
2. Add the flour next and mix well to form a soft dough.
3. For the chocolate dough, beat butter and sugar, add the cocoa powder and mix well without any lumps. Then add the egg yolk and mix well. Finally, add the flour and mix well to form a soft dough.
4. Refrigerate both doughs for 30 mins.
5. After 30 mins, roll out gently into flat squares (as square as you can make it). Place the chocolate layer over the vanilla layer. Roll out from the short end gently.
6. Cut into discs of 1/2″ thickness and bake and transfer to a greased or lined cookie sheet.
7. Bake in a pre-heated oven at 350F/180C for 15 mins until the vanilla part turns a light golden brown. Keep an eye on the cookies starting from 10 mins, just to be on the safer side.
These spiral cookies, my friends, will wow your friends. Guaranteed!
i made dessert this way but never tried cookies. such a good addition.
Can i make it without using eggs?
Tried this recipe..
needed an extra 2 eggs for the vanilla dough & an extra 1 egg for the chocolate dough. also a heaping tablespoon of butter for each to get the dough to work.
other htan that, turned out yum. Was like sugar-shortbread cookies.
yay!! so glad the easy spiral cookies turned out well for you. eager to see the pics, do share the link 🙂