
Before you run away after reading the title, repeat with me - "aperture is my friend". If you haven't met yet, then now is the best time!
So, meet your best friend when it comes to food photography - aperture!
Before we go on to learn more about aperture, let's quickly recap what I shared in the introduction post.
- Light is the most important component in any kind of photography.
- If you determine where to place your food and how much light there should be, you are that much closer to clicking great pictures.
- Click lots of pictures in different angles and even in different light situations (near window, facing window, on kitchen counter, even under a table lamp) to find out which one works best for you and your camera and even your dish.
Ok, now its time to meet aperture.
Your lens camera is like your own eyes. Of course, with technology and digital cameras, the clarity and range is superior to human eyes but the basic concept of how they work is the same.
To understand this further, and yes I did this, hold your thumb about 15cm from your eyes and focus on it. You will notice that the thumb is clear whereas the background is blurred.
Now, try holding your thumb in the same position and look at an object in the background without having to move your head. You will notice that your thumb is blurred. Right?
This is the exact concept behind using aperture settings for your food photography. The idea is to focus on one object or one part of the object and the background will appear blurred. Now, the amount of blur or clarity of focus depends on your camera and how much of it you can manually set.
With my old basic Nikon L10, there were hardly any settings I could control. So all I used to do was turn on the macro setting and shoot away. This is where lighting becomes even more important. The more basic the camera, the more preparation you will need to do with respect to lighting, angle of shot and editing afterwards. In the next post, I will share one quick trick in photoshop that will help you blur the background 'cuz our friend, aperture, is waiting to meet you.
So, more about aperture now.
Aperture is what controls the entry of light into your camera lens, like the pupils in our eyes. The larger the aperture setting, the more light you are allowing into your camera lens, and vice versa.
A confusing bit here, and this took me about 8 months (ok, 2 years) to digest, is that the larger the aperture setting number (called F-Stops) in your camera, the smaller the opening that lets light in, and vice versa (let me know when this expression starts getting annoying!)
Once more - the larger the F-Stops, the lesser the amount of light entering your camera lens. The setting is denoted by an 'f' in most cameras.
The range for my camera is from f2.8 to f8. So -
f 2.8 means a bigger opening and more light can enter the lens.
f 8 is the smallest opening and less light can enter the lens.
This brings us to the next character that we need to meet, Depth-of-Field (DOF). No no, I am not going to kill you now with information overload. I just want you to know what DOF means as well, since F-Stops and DOF are very closely connected.
Ready?
Ok.
Depth of Field means how much of the photo is in focus and how much is blurry. If you can choose these settings in your camera, then you are already well on your way to taking much better looking pictures.
So a shallow depth of field means the subject will be in focus, the background will be blurred and you will need to choose a large aperture, which would be a small number, like f 2.8.
This technique is very useful for food photography and for taking portraits.
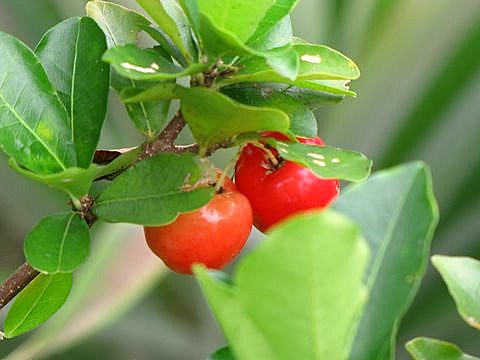 This pic was taken with f3.2. I wanted to focus on
 the branch that had the fruits (acerolas) and blur the rest.

A large depth of field means you want pretty much the entire picture in focus and so need a small aperture which would be a large number, like f 8.
For SLR cameras, the F-Stop ranges may be around f1.4 to f22 which explains some wonderfully background-blurred pictures in some food blogs that you have admired.
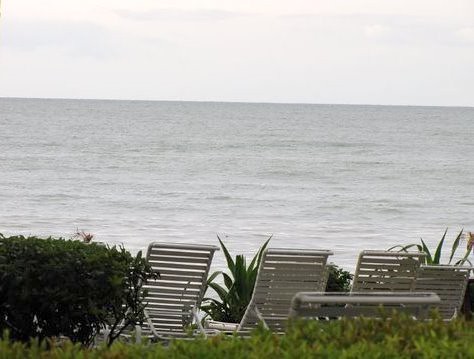 This pic was taken with f8. You will see that I wasn't trying to focus on
any one thing (no hot guys on the beach that day), just the landscape.
Do I hear people saying they would rather learn algebra than try to remember all this? Trust me, it gets easier with time. And always remember one thing - if Nags can do it, anyone can 🙂
If you are wondering why I started off all simple and then went technical on you, fret not! Next week, I will share some editing options for basic point and shoot cameras. No jargons, I promise!
If you liked this post and would like to show me some love for the 8 hours I spent on writing it, please stumble the post by clicking the button below.

aromaticencounters
Nags, plz ignore my poor knowledge (or a no knowledge!!) bt what is macro setting??
-Rashmi
Nagalakshmi V
it's a setting on your camera rashmi. just read your camera manual to learn more
Shruthi
Wonderful Post Nags...Simply loved it specially how you explained about F-stops & DOP...For Starters like me it is really easy to follow. Thanks again for sharing your experience.
Yummilicious
Hey Nags,
Very very informative... learning a lot from your blogs...about food as well as food photography. Thanks a lot!!!
Nagalakshmi V
very glad you found the food photography basics and tips useful 🙂
Anonymous
Great job! Thanks for taking the time to break this down for first timers.
Shobana
hi,
very very beautifully explained for strugglers like me.. great job.. truly..
Shabs..
Hi nags....I have almost given up trying to understand aperture, god....It just goes over ma head....Ater reading your post, aperture has been registered somehomw....hope i dint lose it as i leave....But will be coming here again....That was a fantastic post dearie...I love the way u expalined by giving the example of looking at the thumb and the object in front. Never in ma life looked in that prospective..loved it.Thank u dear...