• Skip to primary navigation
  • Skip to main content
  • Skip to primary sidebar

Edible Garden

  • Popular Categories
    • Dal Recipes
    • Chicken Recipes
    • Egg Recipes
    • Indo-Chinese Recipes
    • Mushroom Recipes
  • Kerala Recipes
  • Chocolate
  • About
  • Navigation Menu: Social Icons

    • Facebook
    • Instagram
    • Pinterest
    • Twitter
You are here: Home / Bread Recipes / Simple White Bread | Basic White Bread | Step By Step Recipe

Simple White Bread | Basic White Bread | Step By Step Recipe

November 23, 2015 105 Comments

I first made bread when I was in Hyderabad. I’d tried no-knead bread and I used my OTG to bake it in. I didn’t have a proper bread tray or any idea whatsoever what on earth I was doing! Yet, it came out fine and most importantly, edible.

Baking bread can be a bit daunting, especially for beginners. But something remarkable about it is the use of minimum ingredients, ones that are available all around the world! The technique and other stuff can be perfected in time but the idea is to take the first step.

Everyone loved my Butterscotch Blondies Step by Step Recipe and gave good feedback saying since it was step by step, it made it look less daunting. A lot of people tried it even though butterscotch chips was not easily available where they live. Many of you wrote to me with creative substitutes you used and some even sent me pictures. That was probably one of the most encouraging set of comments I have ever received.

Anyway, after my first attempt at bread, I tried again about a month ago, but this time I decided to go for the normal bread, the one where you need to knead it. The good part is, the ingredients are very very simple and easy to get everywhere.

I hope the step by step recipe makes it less scary for people to take the first step 🙂 If you need to skip the pictures, please scroll to the end of the post for the complete recipe, in one place.

Simple White Bread – Step By Step Recipe

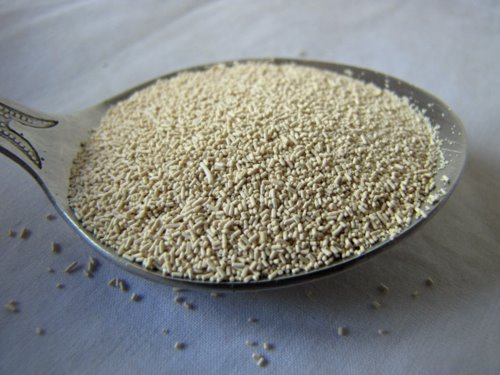
Make sure that you get some good quality active dry yeast.

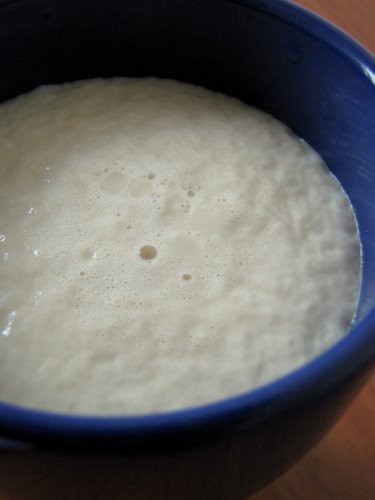
1. Mix together 1/2 tbsp active dry yeast (1.5 tsp), 1 tbsp sugar and 1/2 cup warm water. Let it stand for 10 – 12 mins until the mixture starts to froth, like so.

If your yeast is not good enough or is nearing its expiry date, it won’t froth much so that should be a good indicator.

Also, this mixture doesn’t smell so good so if your husband or anyone else at home comes around saying “what the heck is that smell? what on earth are you making?”, don’t let that deter you. We can get back at them with the heavenly smell of baking bread very soon.


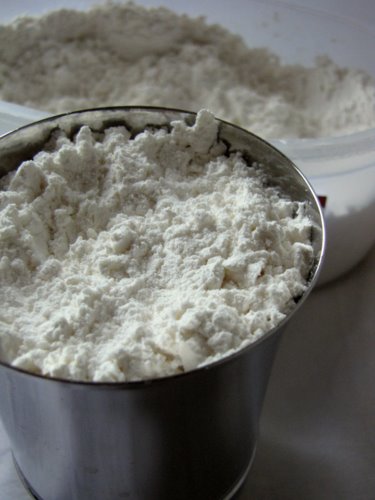
2. Measure out your flour next. You will need 2 cups of maida or all – purpose flour.

You can substitute half of this with atta or whole wheat flour if you want. Since atta is coarser than whole wheat flour, run it through your mixer once before using it.

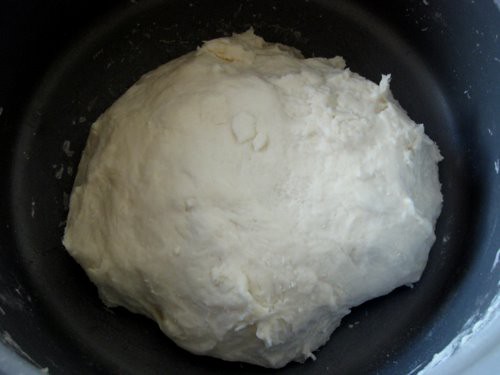
3. Mix the flour gently into the yeast mixture with about 1/2 tsp salt, and knead until it all comes together. This dough will feel unbelievably silky. Sprinkle some flour while kneading it gets too sticky.

Ok, it may not look so silky or even smooth because I suck at shaping it out nicely and making it look pretty. But this is good enough, you will see. Make sure you rub in some olive oil (or butter) on the sides of the bowl to prevent the dough from sticking on too much.

Let this sit for an hour. You can cover it with some cling wrap. I didn’t have any, so I cut up a thin plastic bag and used that instead.

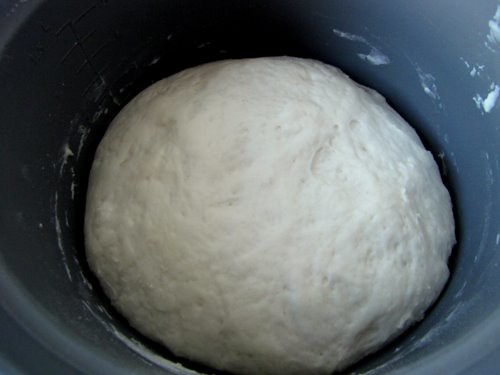
5. After an hour, you will see that the dough has risen to almost double its size and that it looks quite uniform and pretty, unlike the previous picture. Always let nature (or yeast, in this case) do its own thing.

Note: its still not going to smell so good but like I said, ignore and keep going.

6. The next step is to knead down the dough a bit, on a floured surface.

If you are anything like me, you will be a bit tired by now, with all the measuring and the waiting and the photography. So call in your husband, or anyone else you can boss into helping you knead. You don’t need to knead your palms off, just be slow and firm.

Make sure you interfere them while kneading and ask them to pose for a few pics. Its all in the game of bread-making.

PS: If you have a bread-making machine, then you fall into the category of people who I am jealous of, so don’t rub it in by commenting and gloating about it, please.

7. After about 10 minutes of kneading, transfer the dough to a loaf tray that’s dabbed with olive oil or butter on all sides. Don’t go overboard with the dabbing though.

I used a pyrex glass loaf tray, and I blame it for this ugly picture. Cover this again with cling wrap / cut up plastic bag and let it sit for another hour.

8. It will rise again to almost double its size, like so.

If you touch the top of the dough, it will be s-o-f-t. Resist temptation to punch it down and play with it. Its time to bake your bread!

9. Pre-heat oven to 200 C / 390 F and bake for about 20 mins. The crust will turn a lovely golden brown.

This, my friends, will be the best smelling thing you have ever made! Trust me!

My crust got a little dry, but you can dab some butter or milk when it just comes out of the oven and you should be just fine. I didn’t do this because I was too busy taking pictures!


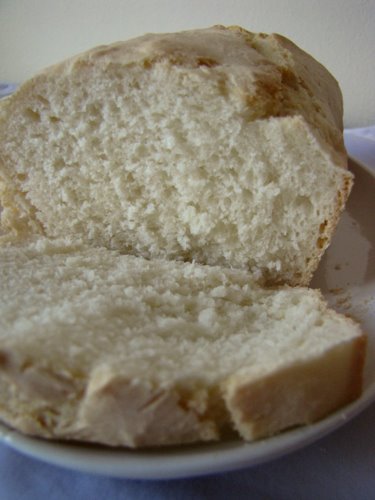
10. Cut it into slices and store in an air-tight container for upto 3 days. I got about 9 slices so it didn’t last that long.

Here is the recipe again, all in one place.

Simple White Bread Recipe
Makes one 8″ loaf


Ingredients:
2 cups all-purpose flour / maida
1/2 tbsp (1.5 tsp) yeast
1 tbsp sugar
1/2 cup warm water
1/2 tsp Salt
Olive oil or butter to grease

How to make Basic White Bread

1. Mix sugar, warm water and yeast together and leave aside for 10-12 mins until the mixture froths.

2. Mix in the flour and salt and knead gently. Place in a greased bowl covered with cling wrap for an hour, until the dough doubles in size.

3. Knead on a floured surface for 10 mins and transfer to a greased loaf tin. Cover with cling wrap and let it rise for another 1 hour. It will again double in size.

4. Bake in a pre-heated oven at 200 C / 390 F for about 20 mins until the crust turns golden brown.

5. Slice and enjoy!

We had this with some home made hummus when it was still warm, and let me tell you, the feeling that I created all this, was awesome!

Freshly baked white bread with hummus

Try it and drop a comment below, won’t you?

Share This Recipe
  • Facebook0
  • WhatsApp
  • Pinterest2
  • Twitter
  • Google+0
  • Email
  • Print
2

By nags Filed Under: Bread Recipes, Uncategorized

logo
Food Advertising by

Subscribe

for your weekly recipe fix.

Previous Post: « POTATO SAGU RECIPE | ALOO SAAGU RECIPE
Next Post: Yellow Dal / Dal Tadka Recipe / Dal Fry Recipe / How to Make Dal »

Reader Interactions

Comments

  1. Vandana

    September 10, 2016 at 5:38 pm

    Hey. Did you make this bread in the round oven. I have a similar one and am not sure what all barware material could be used in that. As I understand you have used the pyrex glass loaf tray. Can I use the same

    Reply
    • nags

      September 15, 2016 at 1:25 pm

      yes i baked this in the round oven and yes you can use bake-safe glassware in it

      Reply
  2. anvi

    April 7, 2013 at 5:14 pm

    Hi nags..been following your blog lately for its clear step by step instructions n really informative pics..great job!!! i would like to know if i can bake the bread in a convection oven as i do not have an OTG yet?

    Reply
    • Nagalakshmi V

      April 8, 2013 at 2:30 am

      yeah sure!

      Reply
  3. Roshni

    March 22, 2013 at 3:46 am

    Thanks for the post. Its a simple recipe. Tried it yesterday. The bread was very dense. How do I make it more fluffy? Also the bread tasted sweet. Can I reduce the amount of sugar? Will it interfere with the rising of the dough?

    Reply
    • Nagalakshmi V

      March 22, 2013 at 4:59 am

      this came out very fluffy for me so it's hard to tell what went wrong for you. yes you can reduce the amount of sugar. generally the sugar is for activating and feeding the yeast and shouldn't make the bread very sweet.

      Reply
  4. Anonymous

    February 14, 2013 at 4:57 pm

    Your recipe sounds doable and I enjoyed your chatty instructions .The comments from other people who have tried it are encouraging so will definitely try it out in a day or two .Thanks from a terrified first timer 🙂

    Reply
  5. @Passionateaboutfood

    January 4, 2013 at 6:00 am

    Ya i have a 2 litre bread dish which i really want to use for this recipe. Can you please tell me the adjustments i need to make to the recipe?

    Reply
    • Nagalakshmi V

      January 4, 2013 at 6:04 am

      i used a one litre dish so maybe you can double this basic bread recipe?

      Reply
  6. Janice Willis

    October 7, 2012 at 7:08 am

    making this recipe right now! i'll let you know how it turns out!

    Reply
  7. Janice Willis

    October 7, 2012 at 7:08 am

    trying this bread right now. i'll post when i'm done. got yeast and sugar and warm water sitting right now!! so excited to see the results!!

    Reply
  8. marissa deacon

    September 27, 2012 at 9:34 pm

    Delicious bread however i found it didnt rise much the second time maybe over kneaded maybe not enough not sure trying again now and will report back

    Reply
  9. Anonymous

    September 4, 2012 at 5:07 pm

    i tried this recipe. tasted good but failed to rise. what did i do wrong? the yeast is not old.

    Reply
    • Nagalakshmi V

      September 7, 2012 at 2:23 am

      that's hard to tell unless i am there with you physically watching everything you did… sorry!

      Reply
    • marissa deacon

      September 27, 2012 at 9:50 pm

      Could be any number of things really could have been the temperature of your kitchen…

      Reply
  10. ritsababy

    April 28, 2012 at 5:36 am

    love this bread……..i have been trying to make one for over years now and finally i cd make it…………its perfect !!!

    Reply
  11. Anonymous

    April 13, 2012 at 5:30 pm

    Thank you for recipe – it will be useful for me to bake such bread with indian flour. We use to eat this type of bread in Russia but flour little bit different and i'm not so experienced to manage with this difference.

    Btw you can have it as bread instead of chapatti, you can use it to make breakfast sandwiches and small lake kanape , you can fry these slices and then add beaten eggs (type of omelett). I also like sweet sandwich: you take simple white bread and cover with thin layer of unsalted butter and then put the jam (better made of sour berries like cranberry) – yummy with coffee or tea!

    To bake it you can simply make round form (like big bun) – my grandmother used to bake like this. Btw, it can be made withut yeast also and with different flour types.

    Good luck!

    Reply
    • Nagalakshmi V

      April 16, 2012 at 5:24 am

      thanks for that 🙂

      Reply
  12. Anonymous

    March 31, 2012 at 2:43 am

    I had no luck with this bread at all!! Only got half way through and it is a big mess! I usually have no trouble with making bread but this recipe didn't work for me!

    Reply
    • Nagalakshmi V

      April 2, 2012 at 5:44 am

      sorry to hear that. what do you mean by "it is a big mess" though. what exactly seems to be the issue?

      Reply
  13. Simmy

    February 3, 2012 at 6:57 am

    I love you!!! Just baked my bread..and yess….it tastes just as heavenly as you said. 🙂

    Reply
    • Nagalakshmi V

      February 4, 2012 at 1:55 am

      I am SO GLAD 😀 A basic white bread recipe is often the only thing you need!

      Reply
  14. Simmy

    February 3, 2012 at 6:56 am

    How I love You!!!!

    Reply
  15. Anonymous

    February 1, 2012 at 7:28 am

    Wow…!!!its looks really awful actually me n my husband tried recently a week ago to bake bread for the the first time, I think i added little bit much water, so the upper crust is very hard but the taste is good, and your step by step process really really helpful and good will try one more time….thnks Nags

    Reply
  16. Anonymous

    December 3, 2011 at 3:15 pm

    thanks a lot….
    you literally saved my life…..!!

    Reply
  17. Nags

    August 31, 2011 at 2:59 am

    i have posted a no-knead bread recipe here: https://www.cookingandme.com/2007/10/i-baked-bread.html

    Reply
  18. Anonymous

    August 30, 2011 at 10:03 am

    Hello maam,
    I have been looking EVERY WHERE for a simple bread recipe and voila, here it is, thanks.
    Also, wanted to know whether you have tried the folding technique and the no-knead ones as well?
    Thanks,
    Anju from ulhasnagar

    Reply
  19. Nags

    July 25, 2011 at 3:12 am

    its been ages since i baked simple white bread. and this recipe is so easy too! please drop in a note if you try this with wheat flour 🙂

    Reply
  20. Raji

    July 24, 2011 at 7:54 am

    Followed your recipe and got it perfect 🙂 My hubby loved it so much. It was actually so good the next day. Have to try it with wheat flour next time. Many thanks to the recipe.

    Reply
  21. Anonymous

    May 19, 2011 at 12:35 am

    I'm trying this, but my dough wont rise, the yeast mixture in the begining had a nice froth and I mixed the flour mixture into it and covered it with a plastic bag, instead of cling because the bowl was to big… Am I doing something wrong?

    Reply
  22. Nags

    May 19, 2011 at 12:48 am

    If dough won't rise, it has to be quality of yeast. Maybe it froths in water but doesn't act on the flour. Try buying yeast fresh before you make it again, maybe?

    Reply
  23. sums

    April 27, 2011 at 2:33 pm

    thanks will try that next time!

    Reply
  24. sums

    April 25, 2011 at 7:37 pm

    I tried baking wheat bread yest (replacing the ap flour with wheat flour) nd it came out pretty good..except that the inside of the bread was a bit moist.What could be the reason for that? pls advice.
    thnx! 🙂

    Reply
  25. Nags

    April 26, 2011 at 12:55 am

    Try increasing the baking time!

    Reply
  26. Anonymous

    March 13, 2011 at 4:55 pm

    This was really fun to make, I've just popped it into the oven. Everything looks fine so far. Very easy to follow the recipe and it's nice to see some personality instead of a boring old recipe page. Keep it up! 🙂

    Reply
  27. Anonymous

    January 4, 2011 at 6:05 pm

    I have a bread machine, and I usually let that do all of the work for kneading bread. It's working on this recipe now. It does a very good job with baking the bread, but I prefer baking it in the oven.
    I'll let you know how it turns out.

    Reply
  28. Anonymous

    September 19, 2010 at 9:30 pm

    Hi there, this is the 3rd time I try making bread and your recipe WORKS! Thank you!!! I love your pic's and sense of humor!!! Regards, a wannabe bread baker in Tel Aviv 🙂

    Reply
  29. Nags

    September 20, 2010 at 1:08 am

    Thank you so much wannabe baker in TA 🙂 You made my Monday morning!!

    Reply
  30. Nags

    July 5, 2010 at 5:15 am

    That won't work in this recipe. However, there are soda bread recipes available on many sites 🙂

    Reply
  31. manjesh

    July 4, 2010 at 3:05 pm

    can i use baking soda in place of yeast

    Reply
  32. manjesh

    July 4, 2010 at 3:04 pm

    can i use baking soda in place of yeast

    Reply
  33. manjesh

    July 4, 2010 at 3:02 pm

    can i use baking soda in place of yeast

    Reply
  34. surajana

    May 28, 2010 at 12:16 pm

    hai 4 the very first time iam into baking and i wondered seeing ur tutorial. step by step instruction with photographs was very easy to understand and simple and i tried it immediately and got a good result and my husband too appreciated me for that. thank a lot and do post nice recipes. hi i used little butter for kneading and my crust was also good.

    Reply
  35. Nags

    May 28, 2010 at 1:50 pm

    Thanks a lot Surajana. If you can take pics of the bread and email me, that would be great. You can find my email address in the "about" link on top of this blog.

    Reply
  36. Nags

    May 27, 2010 at 1:44 am

    Hey Anon. Do double check if you added enough amount of water. Another reason could be the quality of yeast. Make sure you use the freshest yeast possible and that you let it froth in warm water for enough time.

    Kneading is also important. Make sure that you knead the dough well for 8-10 mins. Use some muscles to get that done! 🙂

    My crust was a big dry too so I would ask you to dab some butter on as soon as it comes out of the oven. Alternately, you can give the top of the bread an egg wash before baking (beat an egg lightly in a bowl and brush some on the top of the dough before baking).

    These are the reasons you could have gone wrong, do try again and let me know!

    Reply
  37. Anonymous

    May 26, 2010 at 10:44 am

    hello i had a little problem…the dough turned out to be very dry and hard….can u help wid this???y does the dough become so hard and wat i can do to make it softer….

    Reply
  38. Shreya

    April 1, 2010 at 1:28 pm

    hi Naga, this is such a treat! I remember my mother made white bread at home when I was younger and we all loved it..especially with home made butter:-) The smell is divine..pls pls post how to make brown bread/wheat bread too…

    Reply
  39. renuka

    April 1, 2010 at 1:28 pm

    Will post it soon,had tried few months back the aroma was just great but was a flop.Best to try with small quantity as yours.Thanks for sharing

    Reply
  40. sra

    April 1, 2010 at 1:28 pm

    Nags, the first and second photos are simply beautiful.

    Reply
  41. Sheetal

    April 1, 2010 at 1:28 pm

    Your blogs makes a very interesting read. I must add though that the first bread you baked looked awesome than this one.

    Reply
  42. Susan/Wild Yeast

    April 1, 2010 at 1:28 pm

    Great step-by-step tutorial. Thanks for sending this to YeastSpotting!

    Reply
  43. Mahimaa's kitchen

    April 1, 2010 at 1:28 pm

    i had posted bread-besan toast earlier… this one is bread-rava toast 🙂

    Reply
  44. Crafty Shines

    April 1, 2010 at 1:28 pm

    GIMME UR ADDRESS NAGS! i gotta raid! i'll do all the kneading, clicking n posing as long as i get to eat what u make 😀 needless to say, i eat husband's share too coz he is gonna be free of all this labour! 😉

    Reply
  45. Anonymous

    January 22, 2010 at 9:26 pm

    This recipe only made 6 rolls for me… is it possible that more yeast is needed?

    Reply
  46. Nags

    January 23, 2010 at 1:17 am

    6 rolls sound about right for this amount of ingredients.

    Reply
  47. Time Warper

    October 5, 2009 at 12:16 pm

    Simply fabulous. I never thought bread making was so easy. You made it so simple. The first one I made got gobbled up in 10 mins. To make a smooth crust without it drying and cracking you can smear the surface of the dough with some milk with a brush or spoon just before keeping it in the oven. Thanks a lot.

    Sunil

    Reply
  48. farida

    April 11, 2009 at 4:59 am

    This is a great tutorial! I love baking breads of all kinds. This is a great recipe – easy to follow.

    Reply
  49. Kiran

    April 5, 2009 at 4:27 am

    Thank you Nags! you are the best! no really, I mean it 🙂

    Reply
  50. Mary

    April 3, 2009 at 3:27 pm

    Simply delicious. Thanks for the step by step instructions.

    Reply
  51. Sharmila

    April 3, 2009 at 11:38 am

    Thank you so much for this less scary version of simple bread. I’ve been evrywhere .. but almost always found some complicated stuff .. including keeping the dough overnight etc.
    I am trying this for sure … no I did not jump to the recipe … those pics are a great help. 🙂

    Reply
  52. Mahimaa's kitchen

    April 3, 2009 at 6:46 am

    i had posted bread-besan toast earlier… this one is bread-rava toast 🙂

    Reply
  53. Nags

    April 3, 2009 at 6:47 am

    Mahimaa – ah yes 🙂 I knew I can’t have been totally wrong! 😀

    Reply
  54. Srivalli

    April 2, 2009 at 5:19 pm

    Thats so lovely nags!..very neat

    Reply
  55. Aparna

    April 2, 2009 at 5:11 pm

    The texture of your bread looks quite good, Nags. I like your step-by-step posts.
    And I have a shortcut now. I use my food processor to do most of the kneading for a lot of my breads! Easy on my wrists and I don’t “knead” to sweat it out.:)

    Reply
  56. Rachel

    April 2, 2009 at 2:46 pm

    A very very useful pictorial…

    Reply
  57. Susan/Wild Yeast

    April 2, 2009 at 2:16 pm

    Great step-by-step tutorial. Thanks for sending this to YeastSpotting!

    Reply
  58. FoodyGuru (Srimathi)

    April 2, 2009 at 10:04 pm

    Hey Nags, I was just looking at all bread making recipes this morning and was very sure I wanted to bake one this weekend and I login to see you posting a bread recipe. Nice… The bread looks very good.

    Reply
  59. Vandana Rajesh

    April 2, 2009 at 2:02 pm

    The bread looks good. Have to try some bread making and ur step by step presentation makes it look like a doable recipe.

    Reply
  60. delhibelle

    April 2, 2009 at 10:57 am

    OMG..you baked such a lovely looking bread. Wish we were neighbours so I could have smelled and sampled:)

    Reply
  61. Dibs

    April 2, 2009 at 6:11 am

    That’s a really a humerous post! Good idea to boss somebody to knead the dough!!!

    Reply
  62. Cham

    April 2, 2009 at 2:19 am

    U made only one loaf, I love baking bread, I will try probably soon this recipe! The slice is gorgeous!

    Reply
  63. Madhumathi

    April 2, 2009 at 10:06 am

    Oh yeah got it..Thanks 🙂

    Reply
  64. Rajitha

    April 2, 2009 at 12:23 am

    good girl :)..love the bread and the bossing part 😉

    Reply
  65. Mahimaa's kitchen

    April 1, 2009 at 10:39 pm

    bread looks yum.. soft on the inside and crip crust. i will have this with butter 🙂

    Reply
  66. Manasi

    April 1, 2009 at 8:16 pm

    Pat urself on the back for such a a lovely loaf! I tried once, but the end result was heartbreak 🙁
    The crust looked gr8, golden brown and all, which became hard later and the inner texture was all porous but very chewy.. wonder what went wrong…

    Reply
  67. Aparna V

    April 2, 2009 at 1:07 am

    Lovely pics ! Nice step by step instructions…absolutely idiot proof…hehehe. My hubby is the bread maker in the family and he experiments with all sorts of bread types, but he’s never made a simple white bread loaf. Will pass this on to him, so that I can enjoy eating it :))

    Reply
  68. Nags

    April 2, 2009 at 12:53 am

    Oh and an OTG is an Oven Toaster Grill 🙂 It looks like a smaller version of a Microwave and is supposedly good for baking. I had a small simple version and it made my cakes extremely dry and not that great. Maybe a higher end OTG would be a better bet. I never tried grilling in it but that could come out well.

    Reply
  69. Nags

    April 2, 2009 at 12:52 am

    Sorry for the messup in the amount of flour in the complete recipe at the bottom – the right measurement is 2 cups. I used about 1/2 cup water but the measurement may change according to the texture of your flour and humidity and all the rest of it. So please use your own discretion.

    Asha – thanks for the honest feedback. Its true, the crust was dry but it didn’t make it hard to chew or anything. The sliced bread hardly showed that flaw but next time I will make small indents on the crust like you said 🙂

    Madhumathi – Substituting choc chips is the only thing I can think of but that will change the flavour considerably.

    Reply
  70. Divya Vikram

    April 2, 2009 at 12:28 am

    I agree with u how wonderful a feeling you have when you bake your own bread! It gets addictive!! Looks airy n moist!

    Reply
  71. The Koshy Mostafas

    April 1, 2009 at 3:16 pm

    Oooh bread!!!
    I love me my carbs 🙂 It’s funny because my next post was going to be strawberry jam 🙂
    ps: what’s an OTG?

    Reply
  72. Soma

    April 1, 2009 at 3:09 pm

    Wonderful Picture of the Dry yeast!

    I have always been using whole wheat to bake, but yours look so pristine white, I want to make this with flour exclusively:-) That’s how i eat my bread- hummus or any other chutney or spread:-)

    Reply
  73. Sheetal

    April 1, 2009 at 2:58 pm

    Your blogs makes a very interesting read. I must add though that the first bread you baked looked awesome than this one.

    Reply
  74. Rohini

    April 1, 2009 at 2:08 pm

    it definitely looks yummy.. will try it for sure and will let u know!

    Reply
  75. Pavani

    April 1, 2009 at 2:00 pm

    Smell of bread baking is on top my favorite food smell list. Pictorial looks lovely as usual. Thanks for taking time.

    Reply
  76. Laavanya

    April 1, 2009 at 1:34 pm

    The bread looks so fluffy inside & soft.
    Not to be picky but just something I noticed.. initially in the step by step, you say 2 cups of flour but in the final ingredient list (below) you say 1 cup of flour… may want to check & update.
    I've been meaning to try the no knead bread for ages.

    Reply
  77. Asha

    April 1, 2009 at 12:15 pm

    I HAVE BREAD MACHINE AND I LOVE IT BUT DON’T USE IT OFTEN!!!;D

    I will be honest, texture inside is good but top is dry as you said. I think you used too much Yeast for 1 cup flour!
    You must also score/cut the bread dough on top to release air/steam so it doesn’t split on it’s own randomly.
    Either way, great to eat homemade bread in the morning. I almost never buy White bread, but bake sometimes with plain flour.
    Good one Nagu! 🙂

    Reply
  78. Ann

    April 1, 2009 at 7:26 pm

    That was a nice read with great effort Nags..That type of yeast i never got in life i think..makes great result !!

    Reply
  79. Madhumathi

    April 1, 2009 at 6:21 pm

    Hey I got one doubt..you have mentioned in step2 to measure 2 cups of maida but in the recipe at the end has 1 cup of maida..if its like using 2 cups how much of water should i exactly use?

    Reply
  80. Madhumathi

    April 1, 2009 at 6:15 pm

    I’m new to baking breads..Thanks for this step-by-step tutorial..i will try this soon and let you know ow it came :)I also wanna try your butter-scotch blondies.but i couldn’t find the butterscotch/chocolate chips here..You know i’m living in a old town..can you suggest some alternatives ??

    Reply
  81. Happy cook

    April 1, 2009 at 9:45 am

    Wow Nags well done for making yuour very delcious fluffy looking bread, totally agree home made breads are the best and the aroma which comes from you kitchen when you bake them is pure bliss.

    Reply
  82. Arundathi

    April 1, 2009 at 5:06 pm

    Looks really soft! And I agree that the smell of freshly baked bread is hard to beat.

    Reply
  83. sra

    April 1, 2009 at 9:06 am

    Nags, the first and second photos are simply beautiful.

    Reply
  84. SJ

    April 1, 2009 at 8:22 am

    Yes, I agree with you-best smelling thing ever! I have to try this. Pics are gorgeous.

    Reply
  85. Make the Impossible...Possible

    April 1, 2009 at 6:04 am

    Nags,

    The picture spoke for itself….Great yummy breads….

    Reply
  86. Arch

    April 1, 2009 at 5:56 am

    Lovely one Nags, I baked my first bread (focaccia) a month back and totally loved the whole process/aroma/experience 🙂 And I made mine in the microwave (convection mode) and it turned out really well

    Reply
  87. Crafty Shines

    April 1, 2009 at 1:30 pm

    GIMME UR ADDRESS NAGS! i gotta raid! i’ll do all the kneading, clicking n posing as long as i get to eat what u make 😀 needless to say, i eat husband’s share too coz he is gonna be free of all this labour! 😉

    Reply
  88. renuka

    April 1, 2009 at 5:28 am

    Will post it soon,had tried few months back the aroma was just great but was a flop.Best to try with small quantity as yours.Thanks for sharing

    Reply
  89. Sushma

    April 1, 2009 at 5:17 am

    All I can say is.., great job lady.
    I’m jealous of you now, as I dont have an OTG. First thing I would love to try when I buy an oven or OTG would be this bread 🙂

    Reply
  90. Nandini Vishwanath

    April 1, 2009 at 4:22 am

    I love the post especially the part of bossing over someone to knead it 😀 A is my spot boy 😉 LOL
    But it is indeed a very well-written, funny, informative post and the bread for a person on a non carb diet is maddening to see. But then, having a person who is doing this at home has made me immune

    *goes off with nose in air*

    Reply
  91. Divya Kudua

    April 1, 2009 at 4:16 am

    Oh Nags..this one,after the B.Blondies is my favorite in Edible Garden[Though I’m planning to make spiced baby potatoes and a number of other recipes soon from here;-)].I’ve always wanted to bake bread but the list of ingredients always scared me off,I mean using up 5-6 cups of AP flour will finish off my monthly ration,well almost!!I’m definitely gonna try this out,though I’m not so sure about husband-kneading-the-dough-part;-).You rock!!

    Btw,Butterscotch chips are available in Nuts n Spices in Chennai!!;-)

    Reply
  92. Shreya

    April 1, 2009 at 3:38 am

    hi Naga, this is such a treat! I remember my mother made white bread at home when I was younger and we all loved it..especially with home made butter:-) The smell is divine..pls pls post how to make brown bread/wheat bread too…

    Reply
  93. veggie belly

    April 1, 2009 at 3:20 am

    the end result looks fantastic. i may never buy bread from a store again! thanks for the step by step 🙂

    Reply
  94. RAKS KITCHEN

    April 1, 2009 at 10:30 am

    Looks good!Hope you enjoyed that soft home made bread with hummus! I remember first time I used yeast for Naan,my hubby peeped into the kitchen and after smelling it,he even couldnot eat those naans..! But I feel bread will give a pleasant smell after baking!

    Reply
  95. Nags

    April 1, 2009 at 4:19 am

    Thanks Divya! And that’s a great tip on the store in Chennai. Let me add that in the post!

    Do drop in a line when you try other recipes 🙂 Would love to hear about it.

    Reply
  96. Nags

    April 1, 2009 at 3:39 am

    Shreya – you can follow the same recipe and replace the ap flour with whole wheat flour 🙂

    Reply

Leave a Reply Cancel reply

Your email address will not be published. Required fields are marked *

This site uses Akismet to reduce spam. Learn how your comment data is processed.

Primary Sidebar

Hello!

I am Nags, the face behind Edible Garden, a food and recipes website for the busy (and sometimes lazy!) cook since 2007. My recipes are meant to be quick yet healthy and delicious - Nothing fancy, nothing too difficult. Follow Me On Instagram for real-time food and life updates.

ADS

logo
Food Advertising by

Popular Recipes

Instant Oats Idli Recipe with Rava, Step by Step
Kerala plum cake recipe
Butter Chicken Recipe, Indian Butter Chicken Masala Recipe
dosa recipe-how to make dosa
pressure cooker eggless sponge cake recipe (no oven cake)
vegetable pulao recipe
Eggless No-Bake Mango Cheesecake Recipe Step by Step
garlic pull-apart rolls recipe, eggless
paneer butter masala recipe restaurant style

Browse Older Recipes

Translate

Copyright © 2022