Search for a Recipe

Loading...

10 March 2009

Food Photography Basics : Using Photoshop To Blur The Background

Ever since I started the Food Photography Basics Series, the most often asked question is 'how do I blur the background of my food picture?' or 'I tried and I am getting some results but its not great or as blurred as I'd want it to be'.

I hear you.

Until last December, I was using my Nikon L10 which is a really basic point and shoot that only had a macro mode to boast about and no other manual settings. It was hard to get the nice blurred effect that I so badly wanted and even though I had lots of natural light and used to set up the picture just right, it was frustrating to get a wuss of a blur in most cases!

This changed when I got Photoshop. Since its an expensive software and I knew nuts about it at that time (or even now for that matter), I bought Photoshop 7.0 which was an older version back then and so, much cheaper.

The first step is always deciding to buy the software and actually getting it. I felt so guilty for sitting on my lazy ass without using it for 2 months, that one fine day I decided to search around for some photoshop tutorials. It definitely wasn't easy to sift out what I wanted from the 1000s of articles out there. Surprisingly, none of them were meant for food pics so I randomly tried out a few things and came up with a solution.

So let's see what we are trying to do today.

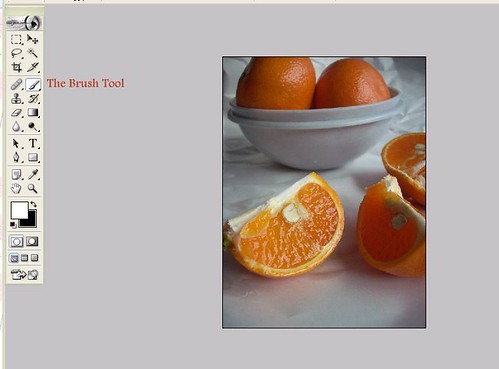
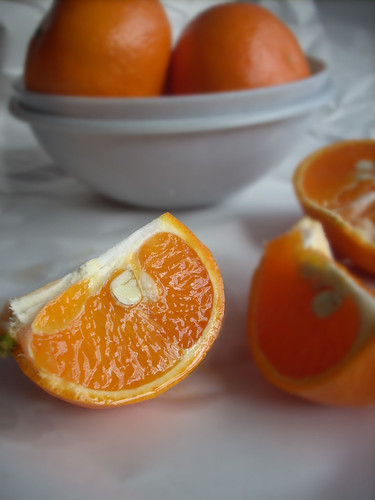
We are going to make this picture ..


.. look like this.


Excited? Good!

1. The first step is to open up your photoshop program and go to File --> Open and browse for the picture you want to edit.

Quick tip: Choose a picture that is not just one item, but has a definite 'background' and an item in it that you want to 'highlight' while the rest of the picture is blurred. Something like the picture I have chosen.


The good news is, we are not going to use any of the scary-looking colourful stuff on the right hand side. I have no clue what you can do with those! Let's just concentrate on the left hand side, the long bar, the Tools Palette.

2. The next step is to choose the Brush Tool from the Tools Palette on the left.


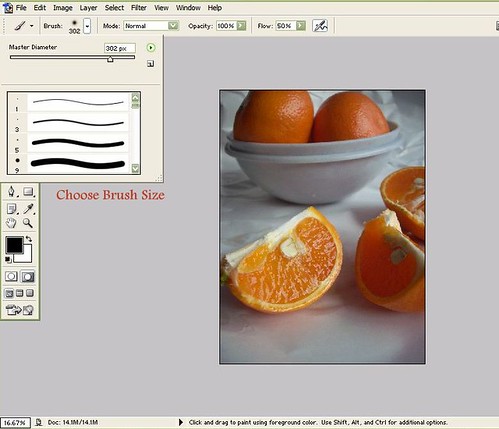
3. Once you have chosen the brush tool, your mouse pointer will turn to a circle or a tiny dot. We need to adjust the size of this circle, or brush, by using the brush size setting on top. Just move the pointer to the right until you get a brush of the required size.

Quick tip: The size of the brush should be adjusted according to the area you want to blur. If its a big area, then choose a bigger brush size so that you can save time. If you are working with a bunch of tiny areas in the pic, then stick with a smaller brush size.


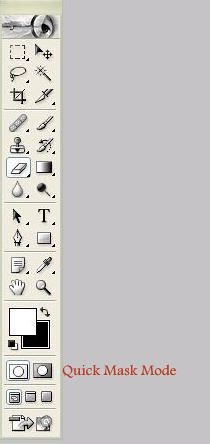
4. Now that we have a brush we can work with, the next step is to choose the area you want to blur. For that, you need to switch to the Quick Mask Mode. You will see two sqaures towards the bottom of the Tools Palette, click on the one on the right hand side.


5. Next, we need to select the area. Click and drag your mouse pointer over the area you want to blur making sure that you leave out the portion you want to highlight. I left out the slice of orange in the front and 'chose' the entire area outside of it. As you drag your pointer, the area will turn red so you can see what you are doing. The process is similar to using stuff on MS Paint.

Quick tip: if you accidentally highlight some portions you didn't mean to (like the top half orange slice in the front in my pic, for eg) use the 'eraser tool' to clear out the red highlight. You will find the eraser on the left hand side of the Tools Palette, 5th from top.

6. Once you have 'reddened' the entire region you want to blur, this is how it will look.


Now, go back to the Tools Palette and click on the square to the left of the Quick Mask Mode Button. This is get you back to the Standard Mode. Once you do this, you will see a dotted line around the area you don't want to blur. In my eg, its the orange slice, as below.


7. What this means is, the orange slice is selected as of now for the next edit that we peform. Since we want to blur the background and not the orange slice, we need to reverse the selection. Its ok if you find this confusing, just trust me and hold down CTRL+SHIFT+I.


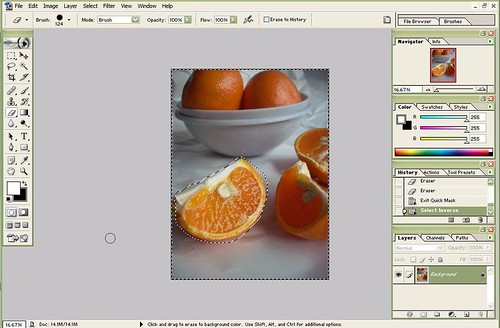
Now you will see the dotted line shifted to the perimeter of the pic and also around the orange slice. This means we have selected everything except that slice to be worked on next.

8. Now that we have the entire background selected for Operation Blurring Background its a breeze from here.

Click on Filter --> Blur --> Gaussian Blur..


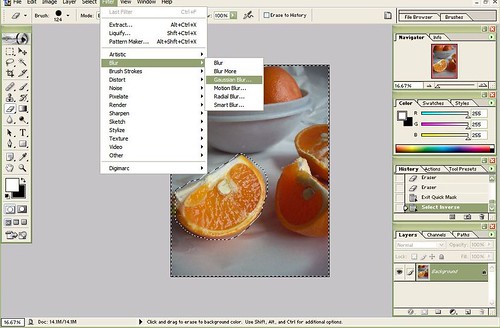
You will see a window appear where you can specify the amount of blur you want.


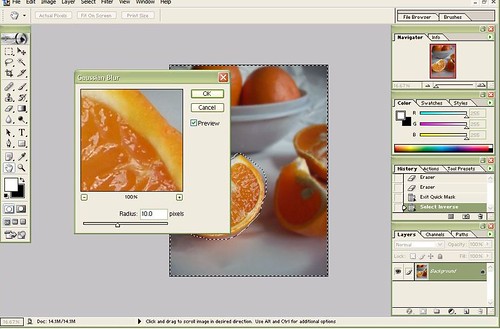
I have chosen 10 for the picture below.

Gaussian Blur - 10

For 10, its hard to see much difference so I have also tried 15 and 20 to illustrate the difference.

Gaussian Blur - 15

Gaussian Blur - 20

I'd probably go with 20 for this pic since that setting has highlighted the orange slice beautifully and made it look nice and crisp. I have never gone above 20 because I feel the picture may look too artificial beyond that.

9. Once you have chosen the blur amount you want and like what you see, go to File --> Save as --> and save your file.

10. The final step, of course, is to upload the picture to your site with the recipe and wow your friends ;)

I'd love to see the results in case anyone tries this. Please do leave a comment with the link to your picture.

For more examples of pictures edited in this manner, check out the following posts. All of them were taken with my Nikon L10 which is a 5 megapixel, 3x zoom basic point and shoot.

Paneer Peas Pulao
Rasmalai
Curd Rice
Eggless Butterless Chocolate Muffins

NOTES

- The options and menu items may change with a change in the Photoshop version. I have Photoshop 7.0 so if you have a different version and absolutely cannot find any of these options, please let me know.

- I am no photoshop expert but if you get suck in between, feel free to email me at naagu.v@gmail.com and I will try and see what could be wrong.

For previous posts in the series, please click here.

If you want to keep up with the Basics of Food Photography Series, you can subscribe to my RSS feed here or via email here.


56 Comments:

  1. Hey nice way to blur....I use a slightly different method, use the magic wand tool for the selections, but will give a try to urs and let u know how it turns out! but still wouldnt give up the trying the blur using the digicam :)
    ReplyDelete
  2. Thats a neat tutorial for blurring food pictures using PS..Thanks for taking your time for people like me..your food photography basics series is so useful :)
    ReplyDelete
  3. Hey Thanks Buddy, This was one of the real original , And very useful post i received from your End.Thanks.

    I was clicking few pics and trying to write my name on pics but No luck ,

    some1 suggested me to do it with P.Shop too,

    Any Suggestions on that too?
    the neat way of this blog and step wise visual frame just made me a biggest fan of your Blog

    Take Care,
    ReplyDelete
  4. VERY GOOD TUTORIAL. easy to understand and well explained.. and lovely pictures.. love the bright orange color.
    ReplyDelete
  5. Kitchen Adda - You can add text using Picasa 3, and its a free software you can download. I have a tutorial for that as well, just click on Photography Tips on the top menu bar.

    Thanks Madhu, Sharmi and Mahimaa :)
    ReplyDelete
  6. I don't have have photo shop , which is real pity, wish i had it, if i buy them i will be back to this page.
    ReplyDelete
  7. One more Superhit post from you!!Great tips there,I really feel tempted to buy photoshop software now;-)Great work Nags..thanks so much!!
    ReplyDelete
  8. Nags..I just followed ur step's..it worked very well for me..such a flawless step-by-step instruction's from u!!

    Thanks a lot with Hugs!!
    ReplyDelete
  9. Lavi!! Do let me know when you post the pic :)
    ReplyDelete
  10. I like your approach, but why not get a cheap DSLR with a fast lens? A used 20d or even 3-Digit-Canon (350d, .. ) is cheap, plus a fast 50mm (fast = aperture of f1.4, f1.8, f2, .. ) would give you amazing and realistic results. The way you blur the image hurts everyone who knows about DOF, it's simply not realistic and frankly not as smooth as a decent camera could make it look.

    Good luck,
    martin
    ReplyDelete
  11. Martin- I definitely agree that using techniques like this are only second to owning a great camera. I checked online for the price of a canon 350d and the cheapest comes for 440 USD which is roughly 22,000 INR.

    To put things into perspective, that amount is probably twice or thrice as much as an average, internet savvy person pays per month for rent in India.

    Not all of us can afford an SLR easily. Heck, I have been in Singapore for almost a year now and even I can't afford one right now cuz I have so many other priorities.

    This post is for people like that :) Maximising what you have, in the best way possible.

    Thanks for your tips though :)
    ReplyDelete
  12. Good point, 'cheap' is relative. But maybe think about getting a Olympus OM or Canon AE? I don't know how much it is for film processing where you live, but you could probably get an incredible camera with a fast manual focus lens for little money. Even if it's too much of a hassle for food photography, some of the food-people have such an artsy relationship with nutrition you might like photography as well ;)

    martin
    ReplyDelete
  13. Hi Nags,
    that was really a good post. I have an adobe [hotoshop installed in my laptop, but the only thing I do with is to crop photos and put those copyright notices on them. This is really great knowledge I have gained and would surely try out for my next post.
    Love Sudeshna
    ReplyDelete
  14. Great post Nagu. I looked at the photo shop too, although expensive and could have bought it, I am more concerned about all the tech thingies I just don't really need. Blurring and colors, we can do that Picasa too, not as perfect, but can do and Trisha got a sample disc of Photoshop, I hardly use it! :P

    Blurred photo looks excellent.
    ReplyDelete
  15. That was a great informative read..I haven't tried with photoshop yet.The picutres looks simply professional.
    ReplyDelete
  16. Thanks for this, really from the bottom of my heart. Also do you know how to use PS to make the entire pic B&W except for one portion with original color
    ReplyDelete
  17. Its simply Awesome!!! Wonderful to c tat u have made a nice combo of ur passion for food n photography!! Btw wanna ask u this.. whether it is possible to do the same with Corel-Draw 10??
    ReplyDelete
  18. Very informative tutorial. I have a very old version of photoshop, will check out if it has the blurring features. Thanks for posting this.
    ReplyDelete
  19. If you can post all the cool features of photoshop here- step by step of course! I will be eternally grateful to you! I cannot move my lazy ass to figure out those things by myself!
    ReplyDelete
  20. Thanks Yaar. This is a great great post!! I love taking pics.. & it is so darn frustrating.. I use only the macro to focus on the near & automatically put the beyond in out of focus... I just got an older version of PS.. but i am really struggling to teach myself. I'm bookmarking this post!! Thanks again & again.
    ReplyDelete
  21. Nags, check out my latest recipe have tried ur blur effect. Let me know ur comments!
    ReplyDelete
  22. great post..loved the step-by-step instructions..i had downloaded a free trial of Photoshop Elements and didnt even use it!! thanks agin!
    ReplyDelete
  23. Great tutorial! My Canon SD20 point-and-shoot is finicky and only blurs when it wants to. This will definitely help the quality of my photographs, thank you!
    ReplyDelete
  24. Great post Nags!
    As always I love the pics - I was wondering the little star thing on Paneer Peas Pulao, that's a star anise right?
    ReplyDelete
  25. Martin - that's definitely a good idea but developing film and stuff is too time consuming at this digital age ;)

    Sandeepa - Yes you can do it in photoshop but I don't think I know it well enough to give a tutorial. The pics in my header were done using Picasa so that does a good job too, actually :)

    Vilasini - Ayoo I haven't even heard of Corel Draw! I am really a novice at these things, sorry!

    SJ - will surely try :)

    Me - Yes, that's star anise! So pretty no? In India you get these broken, shrivelled star anise but here they are so beautifully formed and lovely. I don't know how you get them in the US but am guessing it will be good quality.
    ReplyDelete
  26. Gosh, thanks so much! This is a BRILLIANT post.
    ReplyDelete
  27. Hi,
    i am a novice blogger.Your blog is very informative and very well maintained .Posts like this helps a new blogger like me to enhance our blogs.
    Looking forward for more information.
    Keep it up!
    ReplyDelete
  28. hi,
    thanks a lot for visitng my blog & for those sweet words.
    i tried this blur tutorial..it works like magic and u will see this feature in my coming posts. Thanks again for this informative post.
    ReplyDelete
  29. Thanks for the step by step instructions. It was really helpful :)
    ReplyDelete
  30. Ohhh thats cool...and i was thinking that mostly everyone had a D-SLR cam...so now all i need is to arrange for a photoshop software to get that effect.. :)
    ReplyDelete
  31. Good tutorial... you just have to be careful to make the edges look sharp without leaving artefacts where it suddenly transitions from sharp to blurry.
    ReplyDelete
  32. Hi am new to this blogging world and this is something I really needed to know. Thanks for all your tutorials. they are very helpful.
    ReplyDelete
  33. great stuff there, Nags! Truly appreciate the work and time you are putting in. I have learnt a lot thru ur photography classes, and a big fan of piccasa now thanks to you
    ReplyDelete
  34. Awesome again Nags:-)Bookmarked this one...Thanks!!
    ReplyDelete
  35. great step by step instructions..I' m still at the point and shoot stage, haven't tried my hand at any thing else..you make it sound almost possible
    ReplyDelete
  36. Awesome!!!!!!! followed your blog from quite sometime but not checked this series.
    lovely..bloggers will be really greatfully for such helpful series.
    ReplyDelete
  37. THANK YOU! This was hugely helpful... Here is my post on how I used your instructions to blur one of my photos: http://www.bostonfoodandwhine.com/2009/03/12/sunchoke-puree-and-blurring-photo-backgrounds/
    ReplyDelete
  38. Thanks for all the tips you have been sharing with us - awesome !
    ReplyDelete
  39. Nags, i have corel paint shop pro, will try to see if I can do it this programme.
    ReplyDelete
  40. Hey Nags

    Thanks for this, it worked like a dream. Haven't posted the recipe though, shall let you know once I do it
    ReplyDelete
  41. I tried the trick,though it does look like heck job if not done precisely but still as u said,its a very useful trick for ppl like me who cant afford a digital SLR
    Thnks for the tutorial dear :-)
    http://sindhirasoi.com/2009/03/16/chilra-kadhisavory-pancakes-in-simple-curry/
    ReplyDelete
  42. Nags, i tried it, here is it. http://homecookreceipes.blogspot.com/2009/03/paneer-mint-rice-with-boondhi-raita-and.html
    The second Big Picture in the post!!

    Thanks for sharing! it was really helpfull!
    ReplyDelete
  43. THANK YOU! Your documentation has helped me out on about 3 sites now - I just looked this up again after not using your technique in a while.
    ReplyDelete
  44. its amazing .....good keep it up!
    ReplyDelete
  45. I tried the trick,though it does look like heck job if not done precisely but still as u said,its a very useful trick for ppl like me who cant afford a digital SLR
    Thnks for the tutorial dear :-)
    http://sindhirasoi.com/2009/03/16/chilra-kadhisavory-pancakes-in-simple-curry/
    ReplyDelete
  46. Very informative tutorial. I have a very old version of photoshop, will check out if it has the blurring features. Thanks for posting this.
    ReplyDelete
  47. Hi Nags,
    that was really a good post. I have an adobe [hotoshop installed in my laptop, but the only thing I do with is to crop photos and put those copyright notices on them. This is really great knowledge I have gained and would surely try out for my next post.
    Love Sudeshna
    ReplyDelete
  48. I don't have have photo shop , which is real pity, wish i had it, if i buy them i will be back to this page.
    ReplyDelete
  49. Thank you thank you thank you! Just took my first food shots ever for a friend starting her business, and this helps a TON!
    ReplyDelete
  50. hello! I just came across your tutorial and this is great!! photoshop has always been intimidating for me, but I know I should try to learn because the results can be incredibly rewarding. Thanks!
    ReplyDelete
  51. That's very good tutorial. Very enlightening :)
    ReplyDelete
  52. I've used the 'Macro' setting on my point & shoot for the hazy background & it works quite well...
    ReplyDelete
  53. Wow.. The tutorial is amazing...
    I would definitely want to try it out...
    Thanks for sharing your secrets of a great picture
    ReplyDelete
  54. Thanks a lot Nags! I really appreciate your time, effort!!! well written article....i hope i will be able to take better pics with the knowledge you have shared!!!
    ReplyDelete

Thank you for your comments. I appreciate your thoughts and points of view.

Please don't leave hyperlinks to - your site, events on your site, or particular recipes in your site. When you leave a comment, its automatically linked to your site or profile. Thank you for understanding.

Copyright

All content in this website including text and pictures is copyrighted and belongs to me. If you need to use it or reproduce it, please ask first. Any unauthorized usage will constitute plagiarism.

Blog Archive

Search Recipes by Ingredients


  © Blogger templates The Professional Template by Ourblogtemplates.com 2008

Back to TOP