• Skip to primary navigation
  • Skip to main content
  • Skip to primary sidebar

Edible Garden

  • Popular Categories
    • Dal Recipes
    • Chicken Recipes
    • Egg Recipes
    • Indo-Chinese Recipes
    • Mushroom Recipes
  • Kerala Recipes
  • Chocolate
  • About
  • Navigation Menu: Social Icons

    • Facebook
    • Instagram
    • Pinterest
    • Twitter
You are here: Home / Food Photography Tips / Food Photography in Portrait Mode

Food Photography in Portrait Mode

December 1, 2015 32 Comments

The first few rules you may keep hearing about taking food photographs is probably –

– Don’t use a flash (yes, please don’t)
– Use your macro setting
– Click in good, natural light
These are all good and valid points, definitely. But your camera, even if its a point and shoot, has a lot more capability than you give it credit for.
So here’s an experiment I did clicking with my macro setting off *gasp* and in the portrait setting. You should still leave your flash off and click in good, natural light because we are not going to break all the rules in one go. That will just be rude.
A bit about the portrait mode that’s in pretty much every camera out there. Its a very basic setting, but what does the portrait mode do to your camera?
The camera is going to try to isolate the subject, so it gives you a wide lens opening or a wide aperture to blur the background and give you little depth of field, thereby, isolating the subject so the subject stands out from the background, because the background is blurry and the subject is supposed to be clear. – Source

If you are wondering what the heck aperture and depth of field are, check out my article on Aperture, F-stops and DOF. Its confusing but very very useful.
Ok, now check out this picture of spinach thoran.

Spinach Edited
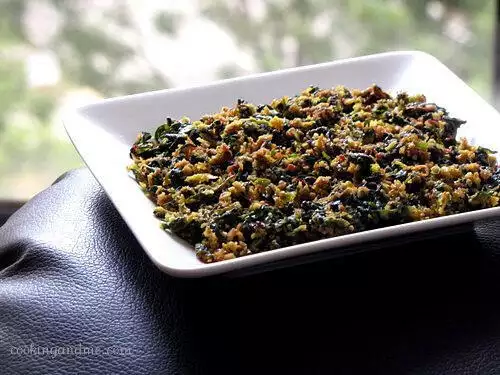
I perched the plate with the spinach on the hand of my couch and used the treetops outside my window to give it a green, blurry backdrop. Well, that actually sounded like I devised a master plan to make my picture look good but it was all spontaneous. I actually rested the plate there thinking I will go get my white table but then decided to shoot it then and there.
How I took the shot:
I turned the camera setting to Portrait (marked by the image of a head on that dial on your camera). I was sitting a bit away from the plate that was on the couch hand. I zoomed in (quite a bit) until I felt I was framing the plate pretty well. The background got beautifully blurred because the Portrait setting was doing its job. That’s it!
You can later edit the picture, crop it, sharpen it, etc. This technique will give you a good set of pictures to start with and choose from.
A few important things to remember:
– Make sure there’s enough natural light to give the picture clarity.
– Place the camera at least one feet away from the subject and zoom in. That’s the key!
– Keep the camera as parallel to the subject as possible. So if you feel the backdrop is your living room and its too dirty, switch the plate around until you find a satisfactory background for the picture. If you try this in a top-down shot, it may not work.
– Use a tripod if you have one. I didn’t for this shot but then I am stubborn and lazy sometimes but don’t be like me. If you don’t have a tripod, just use a stack of books, a shelf, a stool, anything that can give the base of your camera and your arms some support. When you zoom in, your camera becomes that much more sensitive (I will spare you the technical explanation for this) so using a tripod or some sort of support is very important.
Here’s another shot I took using the same technique.

IMG_3245
So, that’s it folks! So go ahead and experiment with your portrait settings and don’t be afraid to turn your macro off and zoom right in until you like what you see. Click 20-30 pics and pick out your favourites once you upload.
I’d love to hear from you if you try this out. You can also check out my other articles on Food Photography for Food Bloggers.

Share This Recipe
  • Facebook0
  • WhatsApp
  • Pinterest0
  • Twitter
  • Google+0
  • Email
  • Print
0

By nags Filed Under: Food Photography Tips, Uncategorized

logo
Food Advertising by

Subscribe

for your weekly recipe fix.

Previous Post: « Soya Chunks Cutlets Recipe, Easy Evening Snacks
Next Post: Cardamom Tea Recipe-Cardamom Tea with Milk {Recipe} »

Reader Interactions

Comments

  1. Chitz

    January 31, 2013 at 10:50 am

    U know what !! I read through all ur food photography tagged posts one day and thru my camera manual the next day.. Voila !! Amateur turned professional feeling it was. It was like reading thru a friend's notes on the night before the Engineering exams.. Concise and precise. Thanks a ton for sharing 🙂

    Reply
  2. Aruna

    September 18, 2012 at 7:50 pm

    So many insights abt food photography, was trying to click some for an event , clicking was so much more complicated than cooking, but your blog helped me out today. Cheers!

    Reply
  3. Gina Waltersdorff Photography

    July 26, 2011 at 2:22 am

    I enjoyed reading your photography tips and recipes. Thank you

    Reply
  4. Gina Waltersdorff Photography

    July 26, 2011 at 2:19 am

    I am so happy your Blog was featured as one of this weeks best or I never would have found you. I will try your recipes and Ilove what you love. I also give tips on taking amazing photographs, too. Please take a look and give me some feedback. We can share our photography skills.

    Reply
  5. shankar~selina

    April 8, 2011 at 12:18 am

    Check this site out. Good food photography. He lives in Malaysia.

    http://www.redsstudio.com/

    Reply
  6. Nags

    January 21, 2011 at 8:35 am

    great question, and i am going to do a series on that very soon!! 🙂

    Reply
  7. Kankana

    January 21, 2011 at 7:15 am

    I agree with you .. not using flash ! But what if you have to take the pic at night ? you cooked some dinner .. and you want to post that .. can't avoid flash then 🙁

    Reply
  8. Mythreyi

    January 20, 2011 at 12:05 am

    HI Nags,

    I have really enjoyed reading your blog on FOOD photography. I have learned some tricks and some tips are very useful.

    I am a newbie to food blogging community,
    check out my blog and let me know your feedback.

    http://yummyodds.blogpsot.com

    I have added your FOOD blog COOKING and ME to my blogroll.

    -Mythreyi

    Reply
  9. Nags

    August 10, 2010 at 1:35 am

    So glad it helped Pavithra 🙂

    Reply
  10. Pavithra Srihari

    August 9, 2010 at 4:14 pm

    OMG, Pics look so professional … its only after reading all of your photography articles , I have got a basic understandinf og what photography is .. specially that blurring the background thing ..I just love this space and looking forward to more tips ..

    Reply
  11. Manasi

    July 30, 2010 at 3:53 pm

    I did not know about the no flash rule! Since many pics are taken at dinner, i cannot rely on natural light to do the trick 🙁
    This is a gr8 post Nags, many thanks!

    Reply
  12. simply.food

    July 29, 2010 at 2:24 pm

    The tips and tricks you have given are wonderfully helpful.Thanks for such agood post.

    Reply
  13. Priya (elaichii)

    July 28, 2010 at 7:22 pm

    Another master piece from you! Very well explained. plz visit my blof @ http://www.elaichii.blogspot.com as I would like to share something with you!

    Reply
  14. RAKS KITCHEN

    July 29, 2010 at 2:21 am

    Thats really cool idea! I do try in different modes,but haven't noticed so keenly 🙂

    Reply
  15. Priya (Yallapantula) Mitharwal

    July 28, 2010 at 5:44 pm

    Nags, those are some wonderful tips and info for someone like me who is not good at taking pictures. Thanks, I will try these options.

    Reply
  16. DEESHA

    July 28, 2010 at 5:13 pm

    I so totally agree about the flash thing. It makes the food look totally look flat .. I never tried shooting in thr potrait mode .. should try it N see the difference

    Reply
  17. Akila

    July 28, 2010 at 5:08 pm

    Hi,

    This is my first visit to your blog and your food photography is really a nice tip for the new bloggers like me…

    I always used to take the picture with flash as i cook most of my food at night time. (thats a problem)

    In weekends, i try to take the photo, but it wont be that much nice and i always worried about it. Now i am going to follow your tips in taking the photo hereafter…

    Thanks for sharing……

    Reply
  18. lekha

    July 28, 2010 at 4:37 pm

    Wow..that was quite a bit of gyaan…very helpful…thank you!

    Reply
  19. Divya Kudua

    July 28, 2010 at 4:17 pm

    Thanks to you,I am learning so many things in photography–esp food photography!!

    Reply
  20. Arch

    July 28, 2010 at 2:07 pm

    Thank you, thank you, thank you…I always look forward to your posts on photography…Love the simplicity, doesnt make me feel foolish ! Will try definately…

    Reply
  21. [email protected] Omnivorous Bear

    July 28, 2010 at 1:16 pm

    Nags… you are a star! I didn't know that. I am going to try that from now on.

    Reply
  22. Jaya Wagle

    July 28, 2010 at 1:00 pm

    Nags, thank you so much for that valuable piece of information. I have always wondered how to get the blurred background with my point and shoot. Thanks to you, now I know. Keep up the good work. 🙂

    Reply
  23. An Open Book

    July 28, 2010 at 10:42 am

    I used 2 have a camera that had a macro mode and loved it every bit…but now im hooked on to my 50mm lens..and love that 🙂
    imagine living in a country where its either raining or cloudy and sunlight makes its guest appearance at a time you are not ready..sigh!

    Reply
  24. ?

    July 28, 2010 at 10:14 am

    It was good reading your post Nagu!
    I also use the 'close-up' setting on my point and shoot. Thanks for sharing all the info.:-)

    Reply
  25. sangeeta

    July 28, 2010 at 5:59 am

    I'll have to check what all i have missed here…..

    Lovely post , being so very casual with my pics i take care never to use the flash ..

    Using a tripod or support for a steady hand will take some time for a lazy bum like me …..thanks for making us aware of what we can do with that tiny instrument in our hands.

    Reply
  26. Satya

    July 28, 2010 at 5:08 am

    very useful info dear ,i learn this the hard way after so many mistakes wish u had posted this much earlier how ever it confirms i am now on the right track …i am beginning to enjoy food photography…thanks for sharing

    Satya
    http://www.superyummyrecipes.com

    Reply
  27. Siri

    July 28, 2010 at 4:47 am

    Very nice article Nags. To confess, all of my pics uptil now are in Macro mode (with NO flash). somehow I like the crispy pics which we get in Macro mode. will try portrait next. :).

    Siri

    Reply
  28. Kanchan

    July 28, 2010 at 4:44 am

    Lovely inputs Nags !
    This is the best part of your space.. I love reading about photography and you explain it in such a simple language. thank you 🙂

    Reply
  29. Veggie Belly

    July 28, 2010 at 4:12 am

    Zooming in will also give you the bokeh (background blurr). And yes, defenitely no to in camera flash! I envy people who live in climates where they get steady sunshine all through the year! it the best lighting there is! And for those of us who dont get predictable sun light in the winters, there are ego lights 🙂

    Reply
  30. Nags

    July 28, 2010 at 4:59 am

    Thank you so much for your encouragement, especially you, Kanchan 🙂

    Reply
  31. sowmya's creative saga

    July 28, 2010 at 4:56 am

    will go and check out the portrait option in my camera..good post..

    Reply
  32. Sharmilee! :)

    July 28, 2010 at 4:51 am

    I luv the second click very much esp the backdrop…colorful they look 🙂

    Reply

Leave a Reply Cancel reply

Your email address will not be published. Required fields are marked *

This site uses Akismet to reduce spam. Learn how your comment data is processed.

Primary Sidebar

Hello!

I am Nags, the face behind Edible Garden, a food and recipes website for the busy (and sometimes lazy!) cook since 2007. My recipes are meant to be quick yet healthy and delicious - Nothing fancy, nothing too difficult. Follow Me On Instagram for real-time food and life updates.

ADS

logo
Food Advertising by

Popular Recipes

Instant Oats Idli Recipe with Rava, Step by Step
Kerala plum cake recipe
Butter Chicken Recipe, Indian Butter Chicken Masala Recipe
dosa recipe-how to make dosa
pressure cooker eggless sponge cake recipe (no oven cake)
vegetable pulao recipe
Eggless No-Bake Mango Cheesecake Recipe Step by Step
garlic pull-apart rolls recipe, eggless
paneer butter masala recipe restaurant style

Browse Older Recipes

Translate

Copyright © 2022