• Skip to primary navigation
  • Skip to main content
  • Skip to primary sidebar

Edible Garden

  • Popular Categories
    • Dal Recipes
    • Chicken Recipes
    • Egg Recipes
    • Indo-Chinese Recipes
    • Mushroom Recipes
  • Kerala Recipes
  • Chocolate
  • About
  • Navigation Menu: Social Icons

    • Facebook
    • Instagram
    • Pinterest
    • Twitter
You are here: Home / Bread Recipes / Gobi Paratha Recipe | How to Make Gobi Paratha Recipe | Step By Step

Gobi Paratha Recipe | How to Make Gobi Paratha Recipe | Step By Step

November 23, 2015 97 Comments

I have been putting away this Gobi Paratha Recipe post for the longest time possible. I made these Gobi Paratha over a month back and took step by step pictures. I was too lazy to edit and upload and post so kept picking the simple recipes to post. Today I had to share this with you because I tried making layered gobi paratha in a different way and it was so much better than the traditional method of making the paratha, addng the filling, bringing the edges together and rolling it out again before cooking it on the tawa. I have given the shots of the usual method below. More Paratha Recipes on Edible Garden!

Gobi Paratha

Now for the different method I tried, you have to endure the whole post 😀
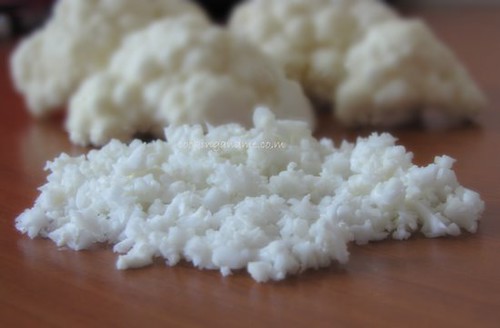
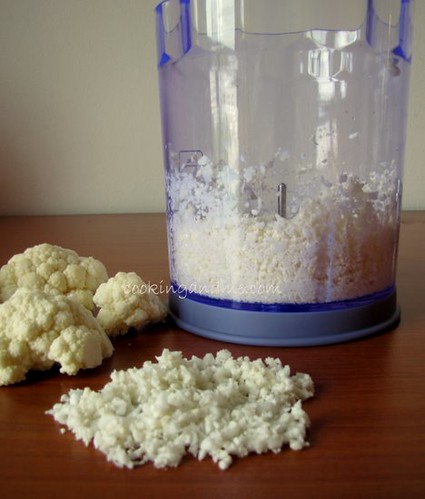
Let’s start with 1 cup minced cauliflower or gobi. Make it as tiny as possible. Like this.

Gobi Paratha
I recently got a Philips chopper/blender/whisk set and used the chopper blade to get it minced. Its super quick and I use this for pretty much all my chopping now.

Gobi Paratha
Since my kitchen has lousy lighting, I don’t have step-by-step pics of how I made the filling for Gobi Paratha but its quite straightforward. 

Recipe for Gobi Paratha Filling
Minced cauliflower – 1 cup
Onion – 1/4 cup, minced
Garam masala – 1 tsp
Cumin / jeera – 1/2 tsp
Red chilli powder – 1/2 tsp
Ginger garlic paste – 1/2 tsp (optional)
Oil – 2 tsp
Salt – to taste

How to Make Gobi Paratha Filling:
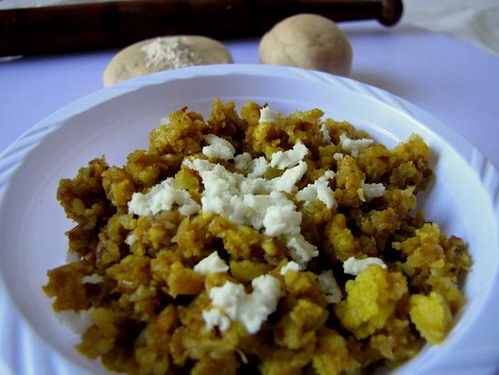
Heat oil, add the jeera and when it starts spluttering, add the minced onion and fry till golden brown. Next add the ginger garlic paste, garam masala and the chilli powder. Mix well with salt for a few seconds. Then add the cauliflower, sprinkle some water and cook covered on sim for about 10-12 mins. The cauliflower should be cooked well by now.
It should like this at the end. I added some crumbled paneer for good measure. You can add some chopped coriander leaves as well. I just didn’t have any.

Gobi Paratha
Now you need to make the dough. You will need 3 cups atta/whole wheat flour, salt and about 1 cup and a little more water. Mix in the salt and add water little by little to to the atta to make a firm dough. Let it rest for about 30 minutes.

Make lime-sized balls and divide each ball into two, like below. Now, for all those smart ones who ask “why can’t we just make smaller balls instead of making a big one and dividing into two?” the answer is: we need the two halves to be of the same size because we are going to roll out the halves and then superimpose them with the filling in between.
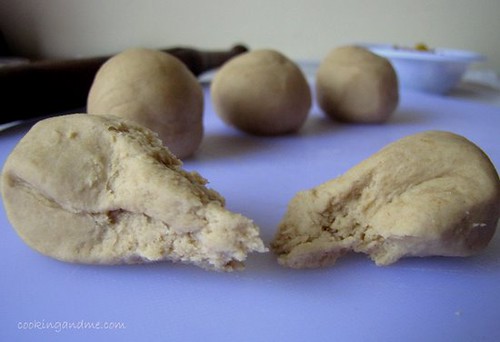
Ok let me show you that. Let’s start with halving each lime-sized dough ball.

Step by Step Pictures for Making Gobi Paratha:

Gobi Paratha
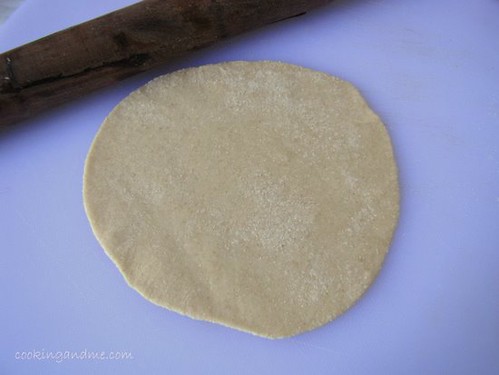
Then roll out each half. I know this is not a perfect circle. I like it this way.
Ok I admit, I can’t ever get a perfect circle. You caught me. I forgot this is why I never take step-by-step pics while making rotis or parathas. Well, too late now. Damn!
Gobi Paratha
Once both the halves are rolled out, spread some prepared filling on one half..
and super-impose it with the other half. Like so.
I know I haven’t done a perfect job of super-imposing either but I am going to ask you to stop finding fault if you genuinely want to learn how to make gobi parathas. Great gobi parathas!

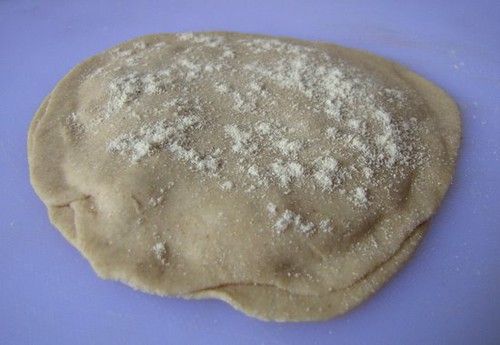
Good. Now dust with some flour..

Gobi Paratha

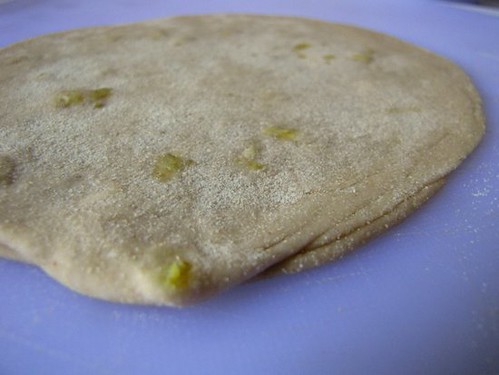
.. and roll it out. Some of the filling will come out and that’s fine. The edges will be slightly thicker so make sure you give some extra rolling-time there.

Gobi Paratha
Once you have rolled out all the parathas you can out of the prepared dough, cook them on a hot griddle or tawa until both sides are golden brown. Most of my parathas fluffed beautifully, more than parathas made the traditional way ever did.
I should probably hook up some studio lights in my kitchen. I so wanted to show off how well they fluffed. Anyway..
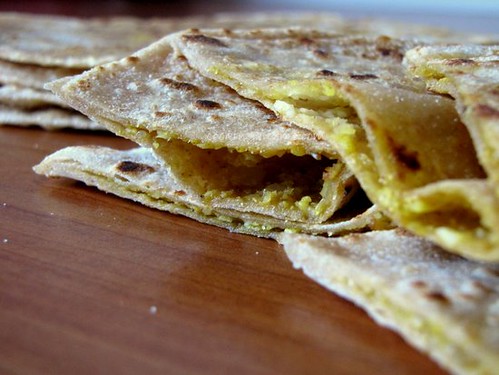
See how lovely the filling looks inside once they are done? I didn’t add any extra oil while cooking. The filling gives out some and that was enough for me. If you want, go ahead and indulge by dabbing the cooked parathas with some butter while they are still hot.

Gobi Paratha
I couldn’t get over how the layers separated while eating and showed the lovely filling inside. Make sure you dip them in some curd / raita and pickles while eating.

Here is the recipe with measurements again in case it was lost up there among all those pictures.

Gobi Paratha Recipe

INGREDIENTS:
For the dough:
3 cups atta/whole wheat flour
1 cup and a bit more water
Salt
Mix in the salt and add water little by little to the atta to make a firm dough. Let it rest for about 30 minutes.
For the filling:
Minced cauliflower – 1 cup
Onion – 1/4 cup, minced
Garam masala – 1 tsp
Cumin / jeera – 1/2 tsp
Red chilli powder – 1/2 tsp
Ginger garlic paste – 1/2 tsp (optional)
Oil – 2 tsp
Salt – to taste

INSTRUCTIONS
Heat oil, add the jeera and when it starts spluttering, add the minced onion and fry till golden brown. Next add the ginger garlic paste, garam masala and the chilli powder. Mix well with salt for a few seconds. Then add the cauliflower, sprinkle some water and cook covered on sim for about 10-12 mins. The cauliflower should be cooked well by now.
Share This Recipe
  • Facebook0
  • WhatsApp
  • Pinterest0
  • Twitter
  • Google+0
  • Email
  • Print
0

By nags Filed Under: Bread Recipes, Paratha Nan Roti, Punjabi Recipes, Uncategorized

logo
Food Advertising by

Subscribe

for your weekly recipe fix.

Previous Post: « Stir-Fried Tofu With Beans Recipe – Stir-fried Tofu Recipe
Next Post: Food Photography Basics : Using Photoshop To Blur The Background »

Reader Interactions

Comments

  1. Kirtana Srinivasan

    February 24, 2013 at 11:26 pm

    Ok this time around the paratha came out well !! Thanks for the super awesome blog post nags !

    Reply
  2. Ananya Basu

    November 20, 2012 at 8:29 am

    superb…you way of teaching…with foto…really..!

    Reply
  3. Sivamjothi

    November 16, 2012 at 12:22 pm

    Fantastic display!!

    Reply
  4. Swathika

    November 7, 2012 at 7:33 am

    Hi, this was awesome… My fellow North Indian roommates, do it just like that… I tried this with your help, it came out really well… My family loved it, I couldnt believe that I made it 🙂

    Reply
  5. Anonymous

    June 13, 2012 at 10:19 pm

    Tried this.. Turned out really good

    Reply
  6. lalitha

    February 24, 2012 at 11:44 am

    Hello Nagalakshmi,
    rather amused at the surprise expressed by all your good readers on hearing of this very very old and traditional way of making stuffed paranthas. Of course they must have tasted wonderful; this is the method I have been following for years. We should leave the other method of stuffing paranthas- ie rolling up and rolling out- to seasoned halwais of Old Delhi etc 🙂
    Wishing you all the best in many more delicious enterprises.
    Lalitha Rao

    Reply
  7. Anonymous

    February 14, 2012 at 4:35 pm

    I tried this recipe and it came out awful. Not enough spices added to the stuffing so it was very bland tasting and since you cooked the onions and gobi so much before putting it in the paratha the filling was too wet and made my paratha hard to roll, very sticky and falling apart. I will try another recipe with more flavor added to the filling and one that uses raw shredded gobi instead of cooked. My husband said it was the worst gobi paratha he ever had.

    Reply
    • Nagalakshmi V

      February 15, 2012 at 1:39 am

      well as you can see, it came out perfect for me and quite a few people after that. it's possible you overcooked vegetables or under-kneaded the dough, etc. Or, maybe it's just that some recipes only work for some people. Who knows.

      Reply
    • Nagalakshmi V

      February 15, 2012 at 1:40 am

      Oh and also, regarding the spices, what I have added here is MY preferred amount for MY meal. I would expect anyone trying this recipe to use their own judgement on what works for THEM. Obviously, what's enough for me may not be enough for you, etc.

      Reply
  8. vibha

    February 13, 2012 at 7:33 am

    new on the site! one can make this paratha by stuffing the gobi and not by superimposing?pls reply

    Reply
    • Nagalakshmi V

      February 14, 2012 at 1:23 am

      yes you can. i have shown how to do that in the first picture. this method is just an alternative to that.

      Reply
  9. magpie

    February 12, 2012 at 11:34 pm

    hee hee I smiled at "Superimpose" but yes that is the perfect word to describe the process! Looks so yumm will HAVE to try this soon!

    Reply
  10. bakesick

    February 1, 2012 at 5:27 am

    Parathas 😀 It's new for me about Gobi Paratha.. Yuumm yuumm~~ the last pics, bite bite :9
    Thanks

    Reply
  11. Anonymous

    December 14, 2011 at 11:51 am

    hi

    Thanks for the step by step process. It has made paratha making very easy. This dish is very mouth watering. All the best. Thanks

    Reply
  12. Nags

    November 3, 2011 at 5:38 am

    i am so glad you find the gobi paratha post useful 🙂 this is more time-consuming but since i don't make parathas that often, i don't mind using the slightly longer method. parathas are worth it anyway! 😀

    Reply
  13. Lauren

    November 2, 2011 at 8:57 pm

    I can't believe I just discovered your blog! You rock!

    I was double-checking the quantity of flour for parathas and was nice to see that you make yours the same way I do, especially since I'm not Indian. They are so much easier and better for me this way than the ball method.

    Reply
  14. Anonymous

    October 9, 2011 at 8:41 pm

    Hi,

    I love how you show the step by step photos. I will be using this recipe for a special event project. I was wondering, how many servings does this recipe make?

    Reply
  15. Anonymous

    July 24, 2011 at 4:15 pm

    It is nice to see a detailed recipe.

    Reply
  16. Shankari

    June 12, 2011 at 10:04 am

    hi am new to this site n i find it the most interesting blog…all ur recipies and the pictures are too good…now am being addicted to ur blog more than FB;)..n today i tried this parathas n it came out so well than i expected

    Reply
  17. Nags

    June 12, 2011 at 12:50 pm

    That's so sweet of you to say you are addicted to the blog more than Facebook. <> super glad you enjoyed the gobi paratha recipes 🙂

    Reply
  18. Progeria

    May 3, 2011 at 7:12 am

    Gobi!!! I am a lover of Gobi and I eat everything made from it. I've been pestering my wife to make me this gobi paratha but she did not know why. She did have some cook books, but they were not that helpful. She gave up and asked me to go eat it in a restaurant. Finally I came to this post and I am making my wife do it from here. Will let people know if it came out well.

    Reply
  19. Nags

    May 3, 2011 at 7:14 am

    will look forward to hearing from you on how this gobi paratha recipe turned out 🙂

    Reply
  20. writerzblock

    February 28, 2011 at 3:07 pm

    Looks fab, trying it out right now.

    Reply
  21. Progeria

    February 22, 2011 at 8:10 am

    Hey I am a relatively new cook and I've been interested in the Indian cuisine for sometime. The good thing about your explanation is that the step by step pictures you've put up. That really gave me confidence that I was doing the right thing, when I compared my own output with the pictures. Nice work…

    Reply
  22. khushi

    January 19, 2011 at 11:27 am

    and this one too:
    http://yummyfood-khusi.blogspot.com/2010/12/peas-paratha.html

    Reply
  23. khushi

    January 19, 2011 at 11:26 am

    try this out also
    http://yummyfood-khusi.blogspot.com/2011/01/chakri-paratha.html?spref=gr#close=1

    Reply
  24. chaitra bhat

    December 5, 2010 at 9:00 am

    Hey Nags,

    My first ever paratha came out very well 🙂
    Thanks a lot for posting

    Reply
  25. Anonymous

    November 24, 2010 at 1:13 pm

    Hey Nags!!.This is great.. I am gonna try it tomorrow…

    Reply
  26. Anar

    September 30, 2010 at 4:13 pm

    Hey

    I tried ur method yesterday ans absolutely love it!! The parathas came out amazibg with the filling so evenly spread! Will try the same technique with aalo n other parathas!!
    Thanka for the beautiful pictures too, very mouthwatering 😉

    Reply
  27. Nags

    August 30, 2010 at 2:15 am

    Thank you so much for trying my gobi parathas 🙂 So glad you enjoyed it!

    Reply
  28. Anonymous

    August 29, 2010 at 2:48 pm

    I tried this yesterday and everyone loved it! Thanks for this lovely recipe and also for the technique. The parathas looked gorgeous 🙂

    Reply
  29. Sonia

    August 19, 2010 at 4:06 pm

    With regard to SM's query, the cuisine art food processor is pretty good.

    Reply
  30. Anonymous

    July 27, 2010 at 9:17 am

    lovely parathas, excellent picturisation, mouth watering receipe. good combination. will surely try it tonight. thanks a lot

    Reply
  31. Nags

    July 27, 2010 at 9:25 am

    Thank you so much for letting me know Anon. Hope the gobi parathas come out well for you.

    Reply
  32. Sailaja Prakash

    July 19, 2010 at 3:33 am

    Hi Nags,

    Your recipe site is very good. I tried your gobi paratha. It was so simple and easy to prepare and liked the taste of it. And I have a list of dishes to cook from your site. Will try them too and let you know how they have come.

    Even I have a recipe blog (http://sailurecipes.blogspot.com)and some other blogs which you can find at the bottom of my recipe blog.

    Reply
  33. Nags

    July 19, 2010 at 3:37 am

    So glad you liked the gobi paratha recipe Sailaja. Checked out and liked your site too!

    Reply
  34. Nags

    July 18, 2010 at 1:25 am

    Hello SM, US is the capital of all things appliances so I am sure you get something like this there. A food processor is what I'd recommend since its handsfree and you can use it for practically everything chopping, mixing and grinding related. I don't own one so can't give a review but can ask around and give you recommendations.

    I do have sambar, rasam and spring rolls already posted 🙂 Write me at naagu.v[at]gmail.com and I will send you the links. Or you can do a search using the search bar above.

    Keep in touch SM!

    Reply
  35. SM

    July 17, 2010 at 5:22 pm

    Hey Nags,

    Thanks a lot for this. Any idea if we find it in USA? or in india with 110V. Also do you use any Food Processor which is good…or daily basis for chopping? I live in the USA and I am looking for something like that to make chopping easier so I get more time to actually try elaborate dishes. Would be great if you could add to the MMKT section, food processor, mixer-grinder, etc all the products you use with pictures, since I am still new to setting up a kitchen and would love to get ideas from you..

    i also really like the humor in ur blogs… looking forward to more interesting recipes – Like maybe Rasam,Sambar, coconut chutneys,spring rolls etc…not sure if i missed them

    WIll keep following ur blog and trying stuff…

    Reply
  36. SM

    July 14, 2010 at 8:18 pm

    Hi ,

    I have started following this blog a few weeks ago…and made a few things listed here, loved them all – gobi manchurian, dal makhani, paneer rolls etc…. love the detailed steps and the pictures. Please do post more veggies with gravy that we can try out.

    Also I am really curious what kind of chopper this is, I have been looking for one, please could you post a link to it….. Also is it only good for very fine chopping or all types of chopping?

    thanks again,please keep the posts coming.

    Reply
  37. Nags

    July 15, 2010 at 1:17 am

    Hello SM, thank you so much for the kind words. I use a Philips hand blender that comes with a whisk and chopper. You can follow this link to see it: http://www.myacegifts.com/product_info.php?products_id=514&osCsid=4c374ec444d0d4312a55ababd8c7de36

    Reply
  38. A_and_N

    April 1, 2010 at 1:31 pm

    Wow, this really took an effort no? Its visible. Great job!

    Reply
  39. Asha

    April 1, 2010 at 1:31 pm

    Slurp!!! I love Gobi Parathas. I made one too, is in the draft but the usual way of stuffing. This one is easier, layering betn chapatis. Photos are gorgeous, specially the last one.

    Enjoy the weekend, hugs! 🙂

    Reply
  40. Divya Kudua

    April 1, 2010 at 1:31 pm

    Great idea Nags..stuffed parathas are a nightmare for me since 99% of the time,the filling sort of comes out while rolling-not a pretty sight.I succeeded only once while making stuffed paneer parathas,but paneer is much more easier since it blends in.Love gobi paratha with cool cucumber raita and pickle.Shall try out your easier version soon!!

    Reply
  41. Pavani

    April 1, 2010 at 1:31 pm

    Those parathas look delicious. Great pictorial. I refrain from making parathas because of all the work that goes in and the end result is never what I expect it to be. But your superimposing method looks easy enough to try. Have a great weekend.

    Reply
  42. sriharivatsan

    April 1, 2010 at 1:31 pm

    Lovely parathas..Looks yummy..Even i try the same method, layering between two rotis..Your step by step pictorial explanation is much appreciated Nags.

    Reply
  43. TBC

    April 1, 2010 at 1:31 pm

    Nice parathas! Your writing style these days reminds me a lot of The Pioneer Woman.:)

    Reply
  44. Nags

    April 1, 2010 at 1:31 pm

    Nanma – Using pestle and mortar for cauliflower may not mince it uniformly. In fact, I haven't tried it except for spices and ginger-garlic so you could give it a shot. Otherwise, just chop finely by hand, that should work too 🙂

    Wandering – yes adding milk to chapati dough works wonders, i have tried it, though its not the usual way I make it. I use the potli method too but somehow prefer this method because of the way it fluffs and also is much softer 🙂

    Reply
  45. Anonymous

    March 17, 2010 at 9:45 am

    i'm a newly wed n havnt tried stuffed parathas yet .. u make thm look easy so i'm finally gonna try thm 4 myslf .. hope they look n taste as gr8 as urs .. 2mrw's b'fast is gonna b stuffed gobi parathas wid raita n pickle .. wll definitely let u knw wat my husband has 2 say .. thank u !!! 🙂

    Reply
  46. Nags

    March 17, 2010 at 9:47 am

    Now you've made me nervous Anon 😀 Keep me posted! These gobi parathas have never failed me so far 🙂

    Reply
  47. Anonymous

    March 1, 2010 at 11:18 am

    Nice Work
    It's very helpful to me………

    Reply
  48. Anonymous

    January 12, 2010 at 12:12 pm

    Great work. Good pictures. I am gonna try for tonight.

    Ann

    Reply
  49. Baljeet Sidhu

    October 1, 2009 at 3:32 am

    Hi Hi ….sorry abt the name …yes going to make this tonite ..should be yummy !!!

    Reply
  50. Nags

    September 29, 2009 at 7:26 am

    anon – try it this way then. layered gobi parathas! yummmm!

    wish you had left your name 🙂

    Reply
  51. Anonymous

    September 28, 2009 at 10:39 am

    Nice yummy looking Parathas…this way is easy ..i cant manage the one which r made as one ..just cant ..lovely pics aswell

    Reply
  52. chakhlere

    September 22, 2009 at 1:20 pm

    Hey Nags!! Paratha looks amazing. I am gonna make it today.

    I also liked your chopper very much. Can u send me the details of the model. I have been following you on twitter.Thanks in advance.

    Reply
  53. Appu

    September 22, 2009 at 6:45 am

    Great step by step recipe. I also make gobi parathas this way. Only thing is the filling is different. Its simple minced gobi, with grated cheese, salt and green chillies – uncooked. All gets cooked when parathas are getting cooked. Shd try your recipe for the filling next time, though the taste of gobi with cheese is just awesome 🙂

    Reply
  54. Anonymous

    September 13, 2009 at 3:53 pm

    yummy post. enjoyed reading your recipe with the humor 🙂

    Reply
  55. Nags

    July 31, 2009 at 1:51 am

    Nanma – Using pestle and mortar for cauliflower may not mince it uniformly. In fact, I haven't tried it except for spices and ginger-garlic so you could give it a shot. Otherwise, just chop finely by hand, that should work too 🙂

    Wandering – yes adding milk to chapati dough works wonders, i have tried it, though its not the usual way I make it. I use the potli method too but somehow prefer this method because of the way it fluffs and also is much softer 🙂

    Reply
  56. The Wandering Minstrel

    July 30, 2009 at 11:17 am

    Nags! I am seeing this one late. I like the first process better…what i do is pinch the edges so they are thinner than the rest of the paratha and then join them in together like a potli and stuff it in…that way, it gets binded well and isnt lumpy and when u cook it, it doesnt remain raw 🙂 what helps is having the dough extra soft. MIL says adding two spoons of milk to dough while kneading does the trick 🙂

    Reply
  57. nanma

    July 28, 2009 at 2:39 pm

    hi there.loved ur pics.please tell me something,i only hav a blender.if i hav to mince cauliflower can rather crush them in my pestle and mortar

    Reply
  58. janaki

    May 15, 2009 at 5:44 pm

    I am so hungry looking at this. I’ve never tried making gobi paratha but I’m definitely going to try now. Your method makes so much sense, it’d be silly not to! And lucky me, I have some fresh coriander downstairs, too…:)

    Reply
  59. Sushmita Srikant

    March 18, 2009 at 9:47 pm

    I tried the gobi parathas last night and my hubby absolutely loved it specially coz the parathas were so crisp and the stuffing was just enough to not come out. They were absolutely yummy even without the paneer added in!

    Reply
  60. Mahimaa's kitchen

    March 15, 2009 at 10:51 pm

    I made this for lunch today and it was too delicious Nags… this is the best recipe for gobi paratha 🙂 i also added some minced capsicum and kitchen king masala poweder.. superimposing method works great for me. it is very filling too.

    Reply
  61. Ann

    March 8, 2009 at 1:30 pm

    My fav too Nags..The pictures especially the first one looks awesome…

    Reply
  62. The KoshyMostafas

    March 7, 2009 at 11:39 pm

    Oh, that is simpler than doing it the traditional way. As always, Great pics and really such a cool idea!!!

    Reply
  63. Ranjani

    March 7, 2009 at 5:53 pm

    What a cool idea to sandwich the filling b/w the paranthas..bet there was no spillage!
    Great clicks, and love the detailed instructions and the addition of paneer to the stuffing.

    Reply
  64. Priya

    March 7, 2009 at 3:58 pm

    Paratha looks simply delicious…amazing work Nags:)

    Reply
  65. Swapna Pravin

    March 7, 2009 at 11:41 am

    Love the way u made paratha & the presentation. Its looks tempting & awesome. Wonderfull 🙂

    Reply
  66. Madhumathi

    March 7, 2009 at 2:46 pm

    Neat step-by-step tutorial for making parathas..The pictures are stunning,Nags 🙂

    Reply
  67. Mallugirl

    March 7, 2009 at 1:29 pm

    i still like method one.. fold once..roll once.. guess this time i am the lazy one.:))

    Reply
  68. Dibs

    March 7, 2009 at 5:15 am

    Looks really tempting! A lot of effort, and gobbled down in seconds, i’m sure!

    Reply
  69. Shreya

    March 7, 2009 at 5:14 am

    Awesome method, Nags. I have to try this method now, because this is do-able! I have had aloo parathas made by someone else this way, and they were great. I have never been able to get the stuffed and rolling out to work for me, and always ended up getting the mixture kneaded in with the dough which does not make it authentic stuffed parathas.. The step-by-step pics and the final pictures make me feel I can make this successfully:-) Thanks…

    Reply
  70. Namratha

    March 7, 2009 at 2:05 am

    Mmm, the parathas look gorgeous Nags, nicely illustrated.

    Reply
  71. A_and_N

    March 7, 2009 at 1:54 am

    Wow, this really took an effort no? Its visible. Great job!

    Reply
  72. ebagger

    March 6, 2009 at 11:34 pm

    I could just taste their warm goodness! Looks absolutely divine!

    Best,
    Emily
    http://www.justeatfood.com

    Reply
  73. jd

    March 6, 2009 at 9:13 pm

    This is such a fantastic post, but I can definitely see why you were putting it off for so long – I bet it took a lot of work!

    I love the step-by-step instructions, they actually give me hope that I can make Gobi Paratha look as delicious as yours does 🙂

    Thanks for the recipe!

    Reply
  74. Anonymous

    March 6, 2009 at 8:25 pm

    hi
    it is very nice recipe , i would like to ask can i make them in advance , and put them in refrigrator and cook them later.

    s

    Reply
  75. Superchef

    March 6, 2009 at 8:11 pm

    loved the last couple of photos!! i was gonna make gobhi parathas this week, but somehow that became aloo gobhi 😀

    Reply
  76. TBC

    March 6, 2009 at 7:43 pm

    Nice parathas! Your writing style these days reminds me a lot of The Pioneer Woman.:)

    Reply
  77. Mahimaa's kitchen

    March 6, 2009 at 6:05 pm

    this is nice.. usually the cauliflower is minced and stuffed raw . it’s a good idea to fry the it before stuffing.. it will taste much better.i should try this method. pics look neat.

    Reply
  78. Sia

    March 6, 2009 at 5:31 pm

    thats how i learnt to make parathas first, layering between two chapatties 🙂 now i find it quite easy to directy stuff and roll it. gorgeous pics nags.

    Reply
  79. Nags

    March 7, 2009 at 12:40 am

    TBC – I used to read her on and off but she posts super quick so its hard to keep up 🙂 I know my writing style here has changed but it happened due to a sudden revelation. I have a personal blog where I goof off like this and then here I used to be very straightforward and give out just the recipe thinking that’s what people. The other day, a close friend said she reads both my blogs and it would be great if she can get all the content in the same place. Though I don’t intend to combine the blogs, I thought why not be myself here too. That’s why you see me trying to be funny in here as well 😀 This is who I am in real life.

    Hope I didn’t scare you away 😉

    I can’t find the comment now but someone asked about freezing these. You can definitely make the filling and the dough on the day before, refrigerate, thaw the next day and follow the method. I haven’t tried freezing after cooking so do that at your own risk 😀

    Reply
  80. bhagyashri

    March 6, 2009 at 3:38 pm

    Your layered parantha looks great Nags! I have tried this method earlier but somehow found that it tastes a bit different than the usual method. Maybe its time for me to try it this way again & see.

    Reply
  81. Happy cook

    March 6, 2009 at 3:34 pm

    I think you are getting a expert in cooking after you getting married, these parathas looks so yummy delicious.
    I have to admit i have never made fille parathas.I always thing they are so difficult.
    Have fun with the new mixer.

    Reply
  82. Soma

    March 6, 2009 at 3:20 pm

    When I saw the first pics, i was going to say hats off to u, making a gobi paratha by filling & re rolling it.. with gobi I think its almost impossible.

    Very nive description & pics. I make mine between 2 rotis, but u have really gone an extra step in making the filling, whcih defintiely makes it taste better. i use just the raw grated gobi mixed with some chutney:-)

    Reply
  83. Pavani

    March 6, 2009 at 3:20 pm

    Those parathas look delicious. Great pictorial. I refrain from making parathas because of all the work that goes in and the end result is never what I expect it to be. But your superimposing method looks easy enough to try. Have a great weekend.

    Reply
  84. Alka

    March 6, 2009 at 3:09 pm

    Gr8 job done,loved the texture of the parathas.My best friend in college,who was(is) a true punjabi girl,used to bring those yummy gobiparathas,and the taste still lingers on.Though we use to have those Ghee soaked parathas with the Paani kum chai(Dilute tea)in the canteen,they still tasted worth million dollars
    Thanks for reminding me of these,i am going to dedicate my weekend breakfast to u and my lovely frnd,with these parathas 🙂

    Reply
  85. Trupti

    March 6, 2009 at 2:23 pm

    wow Nags ..Paratha looks very delicious. Very nice pictorial explanation. Lovely photos

    Reply
  86. Divya Kudua

    March 6, 2009 at 2:19 pm

    Great idea Nags..stuffed parathas are a nightmare for me since 99% of the time,the filling sort of comes out while rolling-not a pretty sight.I succeeded only once while making stuffed paneer parathas,but paneer is much more easier since it blends in.Love gobi paratha with cool cucumber raita and pickle.Shall try out your easier version soon!!

    Reply
  87. Anonymous

    March 6, 2009 at 2:17 pm

    Hey there
    Never commented before,but what i liked most about your post is your sense of humor. It really sets you apart from other bloggers. Keep it coming.

    Cheers
    Gayatri

    Reply
  88. Sakshi

    March 6, 2009 at 2:14 pm

    I just have one thing to say..the last picture..looks like the parantha is bowing to a standing ovation from all of us drooling in front of the screen…bite bite bite!!!

    Reply
  89. Siri

    March 6, 2009 at 1:50 pm

    Layering between the chapathis is a neat idea to make the parathas Nags. Lovely pics too. :))

    Cheers,
    Siri

    Reply
  90. Asha

    March 6, 2009 at 1:12 pm

    Slurp!!! I love Gobi Parathas. I made one too, is in the draft but the usual way of stuffing. This one is easier, layering betn chapatis. Photos are gorgeous, specially the last one.

    Enjoy the weekend, hugs! 🙂

    Reply
  91. Liz

    March 6, 2009 at 8:02 pm

    What a good idea. I’ve been playing with curried cauliflower this week and it hasn’t turned out quite right. I love this approach though – I will try it and let you know. Even better, I have leftover mango chutney to use too. Thanks!

    Reply
  92. Madhu

    March 6, 2009 at 7:25 pm

    Nice step by step presentation.. Love gobi paratha. Sometimes I fined it hard to stuff and roll, layering b/n two chapathis is nice idea.

    Reply
  93. sriharivatsan

    March 6, 2009 at 5:04 pm

    Lovely parathas..Looks yummy..Even i try the same method, layering between two rotis..Your step by step pictorial explanation is much appreciated Nags.

    Reply
  94. Crafty Shines

    March 6, 2009 at 12:00 pm

    Loved the look of the parathas! me loves the new method ( i am lousy beyond belief with filling n rolling!) thanks! 🙂

    Reply

Leave a Reply Cancel reply

Your email address will not be published. Required fields are marked *

This site uses Akismet to reduce spam. Learn how your comment data is processed.

Primary Sidebar

Hello!

I am Nags, the face behind Edible Garden, a food and recipes website for the busy (and sometimes lazy!) cook since 2007. My recipes are meant to be quick yet healthy and delicious - Nothing fancy, nothing too difficult. Follow Me On Instagram for real-time food and life updates.

ADS

logo
Food Advertising by

Popular Recipes

Instant Oats Idli Recipe with Rava, Step by Step
Kerala plum cake recipe
Butter Chicken Recipe, Indian Butter Chicken Masala Recipe
dosa recipe-how to make dosa
pressure cooker eggless sponge cake recipe (no oven cake)
vegetable pulao recipe
Eggless No-Bake Mango Cheesecake Recipe Step by Step
garlic pull-apart rolls recipe, eggless
paneer butter masala recipe restaurant style

Browse Older Recipes

Translate

Copyright © 2022