Food Photography Basics For Food Bloggers
You are a great cook with a passion for serving others. Your family appreciates your dishes and your skills of presentation. Your dish is the most talked about in any potluck party. You decide to share your recipes by documenting them in your own little space in the Internet. You find sites with similar tastes and interests as yours. You even make some friends. This is great! But soon, you are wondering how you can make your food look as good as it tastes. You have a basic point and shoot camera and don't want to invest in a more expensive one just yet. After all, food blogging could end up like most of your other hobbies and fizzle out in a few weeks time.
This was me 2 years back. I loved cooking, I was already an avid blogger before I started this blog and the only thing that was on my mind was 'how do I take better pictures of my food?'. I had a basic point and shoot camera, the Nikon L10 that was a 5 megapixel, 3x optical zoom camera.
If you think you can relate to my situation and feel that the only way to better your pictures is to get a better camera, then wait! That's not true. Really.
For eg: take a look at this picture below.

Pic 1
Looks quite ordinary and maybe even a bit unappealing, right? Potato masala is a beautiful dish which can be made to look lovely and vibrant. I should be able to do much better, even with the same camera.

Pic 2
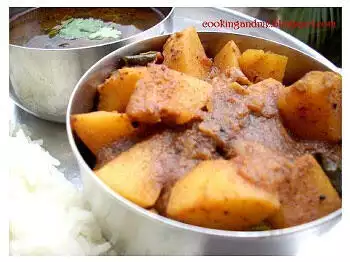
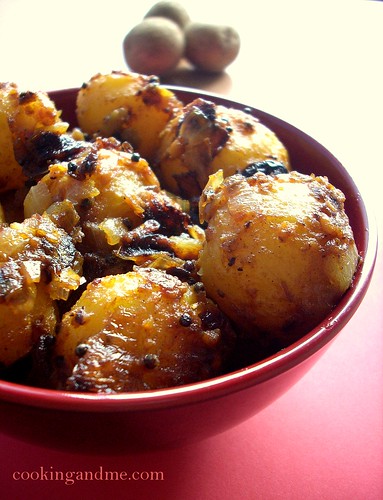
Now here is a picture of spicy baby potatoes that uses a slightly different recipe but captures the same subjects - potatoes and masala.There are several things I changed in the second picture.
1. Pic 2 was clicked near a window, indoors whereas Pic 1 was clicked by putting the dish on a plate in the balcony. The light was harsher in the first case.And I will share the tips I know with you in the next post in the series :)
Understanding the right amount of light needed and placing your dish at the right spot to photograph is most often the first step.
2. I used a different bowl for Pic 2 that was wider and could hold more of the dish. This is not always necessary but having a good set of plates and bowls goes a long way too. That was one of the first things I realised and now I can safely say I am addicted to cookware. I pick up cheap yet pretty bowls wherever I go.
3. I used a red chart paper as the base for Pic 2. This helped enhance the colour tone of the picture and match the colour of the bowl. I am still working on this aspect of food photography - choosing a good base and background for my pictures. I don't have that many props yet but next time I go to India, I intend to pick up some cloth material and kitchen napkins that will give me a nice solid base and background for the pics.
4. I clicked Pic 2 in a different angle. This is pretty much up to you. Most of us are comfortable with taking a shot from above, since we don't do elaborate setting for our pictures and if we take a shot at eye-level, we are going to capture some unwanted things around the dish or in the background.
I am normally very lazy to do any setting for my pictures. The most I end up doing is to place some coriander leaves around the bowl or wrap my brown kurta around it to enhance the dish. You can still get some pretty pictures this way, I feel.
5. I did some very basic editing for Pic 2 using Google Picasa and Photoshop. Its okay if you don't have photoshop. You can still make your pictures look much better with some basic tweaking with Picasa. You can download it here.
Disclaimer:
- I am NOT a food photography expert or a professional photographer. Since that comprises most of us out there, I am hoping you can relate to my posts as a normal food blogger who just wants to take better pictures of her/his food.
- The posts are written in the assumption that you don't own a fancy camera or lights or elaborate setting for your pictures. If you do, then you wouldn't be reading this post anyway 'cuz in all likelihood, you already take great pictures.
- There are no ugly pictures. Or bad ones. There are just different pictures. I know of people who like my pictures better than the ones you see on some professional food photography websites. This post is dedicated to them :)


wow..you got a great heart nags..thats such a useful post,which,i think i have never seen before..you r a real sweet heart
ReplyDeleteI have seen a couple of them Ann, but mostly you need a high end camera to put those features to use. I just thought I will share my experience with the most basic point and shoot.. and also what I learnt in Picasa :)
ReplyDeleteHey Nags,
ReplyDeletegreat post...indeed. Very simple yet helpful tips for photography. It will help me when I have my own blog.:)
Thanks a bunch.
Cool,looking forward for more :)
ReplyDeleteI am sure going to bookmarke this page. My food is always yumm but then whe it comes to the pictures they are always so dark etc.... i tried puting the table next to the wondow, but there is no use as ther eis no sun as the weather is always so dull.
ReplyDeleteBut sure i will kepp your ponits in mind hen i take picture.
My P&S camera has served me well over the years, and continues to do so. I only take pics with it though we have a SLR camera too.
ReplyDeleteThose are some useful tips.
Thanks Nags.. I am in the process o learning & yet to get props & even some software. haven't been using any software other than to add my name on the pics & resizing them...Ur pics are alwyas beautiful.
ReplyDeleteThis is a very bracing post, Nags. Its boosting my confidence.:)
ReplyDeleteSeriously, though your pictures look very good now and I have seen the progress. I relate totally to every bit of your post. But getting the light right is always the problem.
But I have finally discovered (and am learning) to set my white balance manually now.
Yes, props make a lot of difference.
Food photography isn't easy and photographing Indian food is even more difficult, in my opinion.
I mean, how do you convey how good a sambhar or rasam can be through a picture?
And the worst part is trying to take a picture when two very hungry people are eyeing the camera and the food very impatiently. Not the best scenario to produce the perfect shot! :D
Looking forward to the other posts in the series.
Btw, the link to Picassa in point 5 isn't there.
this is a useful article. Good you shared some tips with everyone.
ReplyDeleteWell Written post N! I remember when I started out the photos were such a struggle, it's not like I take great pics now, but at least I've come a long way from where I started, learning the basics from trial and error. This article will help a lot of people I am sure.
ReplyDeletehey nags... awesome article :)
ReplyDeletei fit into the profile.. new blogger... hopeless at photography... have a relatively low end camera... i am learning slowly and this post helps :)
aah! Almost all the food bloggers can relate to this subject. As u mentioned, when I look at some of my earlier photos - I cringe! but at the same time, I feel major happy that I am on a better plane right now with the best yet to come.
ReplyDeleteGood relatable post Nags.
As for your query :
Nope, kasuri methi is different, they are dried fenugreek leaves, this is the real fenugreek itself. Usually kasuri methi is to be used in v little qnty since they are quite strong in their flavouring. So using them predominantly in this recipe is not advisable - me thinks. You might get fresh ones th @ Sngpore - or else try the frozen section in the Indian grocery..am sure they have it in thr nags :) I am sure u will love it too....
Thanks for helping me out with the kasuri methi question, DK :) Will surely check the grocery store and find out.
ReplyDeleteThis is a great post..looking forward to the sequel post :)
ReplyDeletelovely post nags .....really appreciates u r effort for writing it in simple way .I have a habit of taking pics of my dishes . looking forward to more posts like this.
ReplyDeletedeepa
Thanks Nags, for the post! And you already know that you helped me learn to take better pictures over chat..:-) I am trying, but I think this series of posts (I am looking forward to more) will definitely be useful for me. I have a decent camera, but I still don't know how to use it properly-light,macro,blah,blah:-(
ReplyDeleteShreya - I will make it as easy to understand as possible :)
ReplyDeletehii...this is such a nice post...I can totally relate to it...relatively new to blogging, I find it really difficult to take good pics...lack of props and limited tableware is another issue...well i'm learning and looking forward to the future posts...
ReplyDeleteEveryone will be able to see the difference from Pic 1 to Pic 2. COngrats... the picture makes us drool over those potatoes.. that's the idea I am sure you wanted to capture and convey. I am trying to take nice pictures too. I find the dish in the photos do not look as good as reality.I look forward to more beautiful, creative pics.
ReplyDeleteNice post, Nags, like the way you ended it. :-)
ReplyDeleteI too began buying different kinds of dishes, napkins and mats a few months into blogging but gradually began to notice that with the amount of time at my disposal, white was best for most dishes, and that food of a certain colour looked good in dishes of the same colour, if not white. Contrasting colours didn't always seem to work. So my buying spree got arrested there. And I use everything handy to make a background for my pix - dupattas, kurtas, mats, napkins, dishcloths - I've even used the stand I use to dry clothes in my balcony-less apartment. Most of the time, I put my dish on the dining table in the living room, or in a window in the study. I even bought a few slabs of marble for background ... haven't used them much, though, and only vaguely remember where they are.
Excellent menu!!!! delicious.
ReplyDeleteThats a wonderful tip! Very nice post.. Even sometimes i fail to post my recipe jus becoz of the pictures turning out dull.
ReplyDeleteHey, I know you're way more into cooking Indian food but have you checked out Smitten Kitchen. She does some really good food photography to go with her recipes. I was thinking about the two of you and this post just seems like the perfect link.
ReplyDeleteB - I have her in my reader :) She takes gorgeous pics!
ReplyDeleteAs I said before, great post :) Thanks for this.
ReplyDeletehi nags,lovely tutorial and oh yes it is quite tough to get a good composition at home with all the muck. but honestly some of my favorite pics from foodie blogs are the fully amateur ones that use natural light and natural settings.cos i know how tough it is to get a shot over a kid;s head, minus the pile of clothes, or toys lying, or papers lying around. good job hope to see some more tips from you!
ReplyDeleteGreat post Nags!!! Really appreciates your effort and looking forward for more :)...Thank you dear!
ReplyDeleteGreat posts with lovely photo tutorial which will help others to learn how to take easily with ur suggestions. Waiting for ur new posts about it. You've very good heart to explain it.
ReplyDeleteGreat post...looking forward to the next one!
ReplyDeleteFABULOUS!!! i love how we are teaching others about what we've learned! xoxo jaden
ReplyDeleteoh yes Jaden, I did learn a lot from you :)
ReplyDeleteThis is such a big help..I started blogging a month back and struggling with the photography !! Very selfless and very sweet...thanks so much
ReplyDeleteI SO relate to PIC 1!
ReplyDeleteAwesome post! Thanx!
Thank you Mansi :)
ReplyDeleteYou are my new Idol! I actually got goosebumps when I came over this page.. I was so excited. :)
ReplyDeleteTussi great ho!
Could you also tell me which camera do u use.mine one is olympus digital with 7.1 megapixel ..how much pixel do ur camera has?
ReplyDeleteOC - In Dec '08 I got a Canon SX10 IS which is a point and shoot with 10 mega pixels and 20x optical zoom.
ReplyDeleteAll pictures in this blog before that were taken with my very basic nikon L5 which was 5 megapixels and 3x optical zoom :)
Hey Nags,
ReplyDeleteJust wanted to tell you that you have been a great help...I follow your blog avidly and this photography posts really helped me...I clicked a few pictures yesterday and tried doing what you had suggested...will you please check my blog out and suggest what you think...Cheers!
Wow...this was post was very heplful....thanks a lot...
ReplyDeleteNags, I have just spent the last hour reading all your posts on food photography - brilliant!!!!
ReplyDeleteYour attention to detail, the patience and grace with which you explain, born teacher and guide for sure and your energy and passion....much much appreciated!!!
I don't have Photoshop, have been using basics in IPhoto - I downloaded Picassa three days ago and have begun using it slowly - I am a little feather-brained when it comes to all this stuff -and your guidance with Picassa is definitely going to be of big help....Thank you very much....
Thanks Neeta! I am so glad you find the food photography basics easy to follow :)
ReplyDeleteHey Nags,
ReplyDeleteJust wanted to tell you that you have been a great help...I follow your blog avidly and this photography posts really helped me...I clicked a few pictures yesterday and tried doing what you had suggested...will you please check my blog out and suggest what you think...Cheers!
My P&S camera has served me well over the years, and continues to do so. I only take pics with it though we have a SLR camera too.
ReplyDeleteThose are some useful tips.
I have seen a couple of them Ann, but mostly you need a high end camera to put those features to use. I just thought I will share my experience with the most basic point and shoot.. and also what I learnt in Picasa :)
ReplyDeletethis is good info...thanks for sharing!:):)
ReplyDeleteThis was very useful .. specially for me . a new born food blogger ! :)
ReplyDeleteThanks to Mythreyi I have sat and read this post and thanks to you I have dropped the idea that I need a better camera. I will be bookmarking these posts.
ReplyDeleteThank you so much for your kind words Archana :)
ReplyDeleteHello Nags: Rarely does one come across someone who posts as sincerely on food as on photography. My wife - Irin - is a big fan of your food writing and I of your photography tips.
ReplyDeleteI recently wrote a post on our blog on the travails of a food photographer. Written partly in jest, there is a practical side to it about the dish getting unappetizing as one spends time photographing it (http://tothesenses.com/on-food/how-many-roads-must-a-man-walk-down/). Read it when you have the time and let us know what you think.
And please keep up the great work you are doing. Respect.
Regards
Subrata
Hi Nags,
ReplyDeleteTruly helpful tips for first timers like me with no experience in Food Photography. I am so eager to give it a try but son's exams going on and so submitting the chicken recipe and photographing will have to wait for a while. Your Paneer Butter Masala for dinner tonight and i must say its yummmm. My son gets his fav dish more often these days.... thanks to you.....
Just found this blog! Thank you for all the great tips!
ReplyDeletehii nags,thank god i visited ur site. I have been running my food blog from the past 3months. I have this question whenever i take photo of my recipe. Thanks for the post. ?Visit my blog.
ReplyDeletehttp://addictiontofood.blogspot.com
Very helpful post for beginners like me. I've been visiting your blog for a while now, very inspiring. Thank you!
ReplyDelete